How to oil a sewing machine: where to apply, how much, and when to skip it entirely
Many modern machines are sealed and need no oil. Learn which machines to oil, the exact points to hit, the one-drop rule, and what goes wrong with too much or the wrong oil.
Many home sewing machines made in the last 15 years need no oil at all from the user. Before you reach for the oil bottle, the most important step is confirming your machine actually needs lubrication - because applying oil to a sealed, self-lubricating machine can cause real damage. If your machine does need oil, the hook race is the one spot that matters most, the amount is one drop, and the oil must be clear, odorless sewing machine oil with nothing else substituted.
Does your machine actually need oil?
Check your manual first - this is a hard rule, not a suggestion. The answer divides machines into two clear groups.
No oil needed (sealed / self-lubricating): Most Brother home machines fall here. Brother's official support guidance states: "Do not put oil in your machine... There is no need to lubricate the machine because it was manufactured with the necessary amount of oil applied to ensure correct operation." Almost every computerized Brother (CS6000i, CS7000X, Innov-is series), most modern computerized Singers, and many mid-range Janome computerized models are sealed from the factory. The New Mexico State University Cooperative Extension notes that some machines "have bearings that are nylon or graphite-impregnated bronze and do not require oil or lubricant" while others "are designed with oil impregnated in the bearing casings." Oiling a sealed machine can contaminate precision electronics and void your warranty.
Oil needed (mechanical / older / heavy-duty): Singer mechanical machines such as the Heavy Duty 4423 and 4452 have explicit oiling instructions in their manuals. Vintage machines from any brand - Singer 15, 66, 99, 201, and the Featherweight 221 family - require regular oiling. Many Janome mechanical models, most Bernina machines, and industrial-grade Juki machines also expect user lubrication. If your manual shows an oiling diagram with numbered points, your machine is in this group.
| Machine type | Oil needed? | How to confirm |
|---|---|---|
| Modern computerized Brother (most models) | No - sealed from factory | Manual says "do not oil" or shows no oiling diagram |
| Modern computerized Singer | Usually no - check manual | Manual will show numbered oil points if needed |
| Singer Heavy Duty series (4423, 4452, 4411) | Yes - hook race point | The 4452 manual specifies "point (6)"; the 4423 and 4411 manuals should be verified individually - oiling instructions vary by print run |
| Vintage mechanical (Singer 15/66/99/221, any brand) | Yes - multiple points | Manual or service guide lists all bearing and shaft points |
| Janome mechanical (HD1000, HD3000, 2212) | Yes - hook race wick | Manual shows felt wick location in hook area |
| Bernina (most models) | Yes - hook race + felts | Bernina includes an oiling guide in every manual |
| Juki home/semi-industrial (TL-2000Qi) | Yes - multiple points | Manual specifies hook race, wick, and oil ports |
If you cannot find your manual, search your model number at the manufacturer's website or ManualsLib. Never oil without confirming.
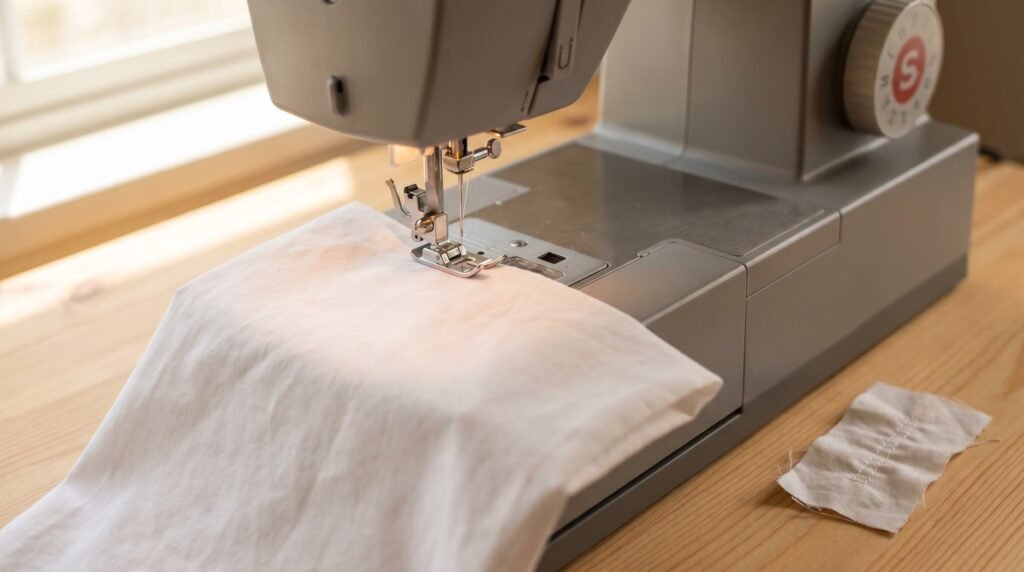
The hook race: the one oil point that matters most
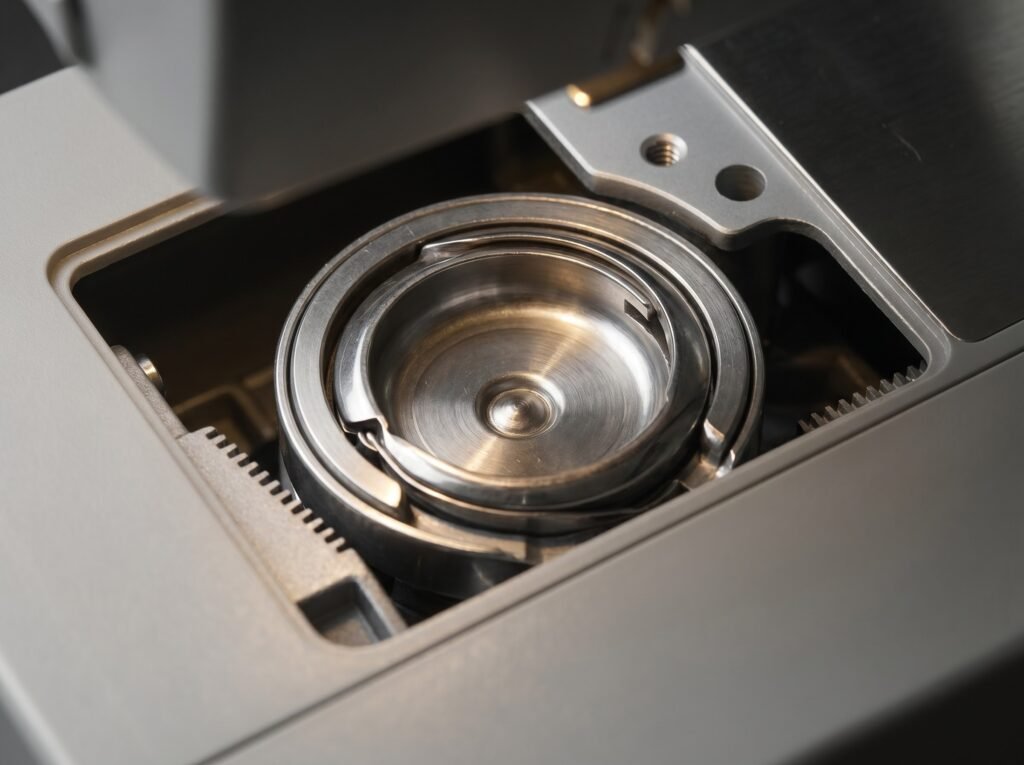
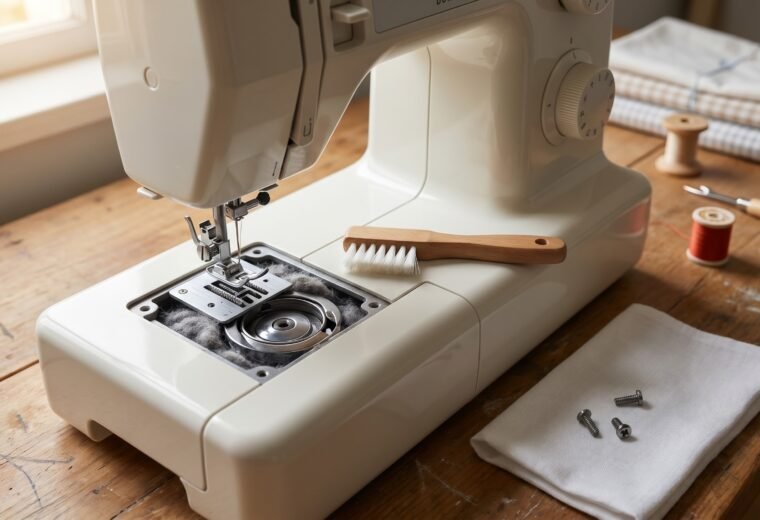
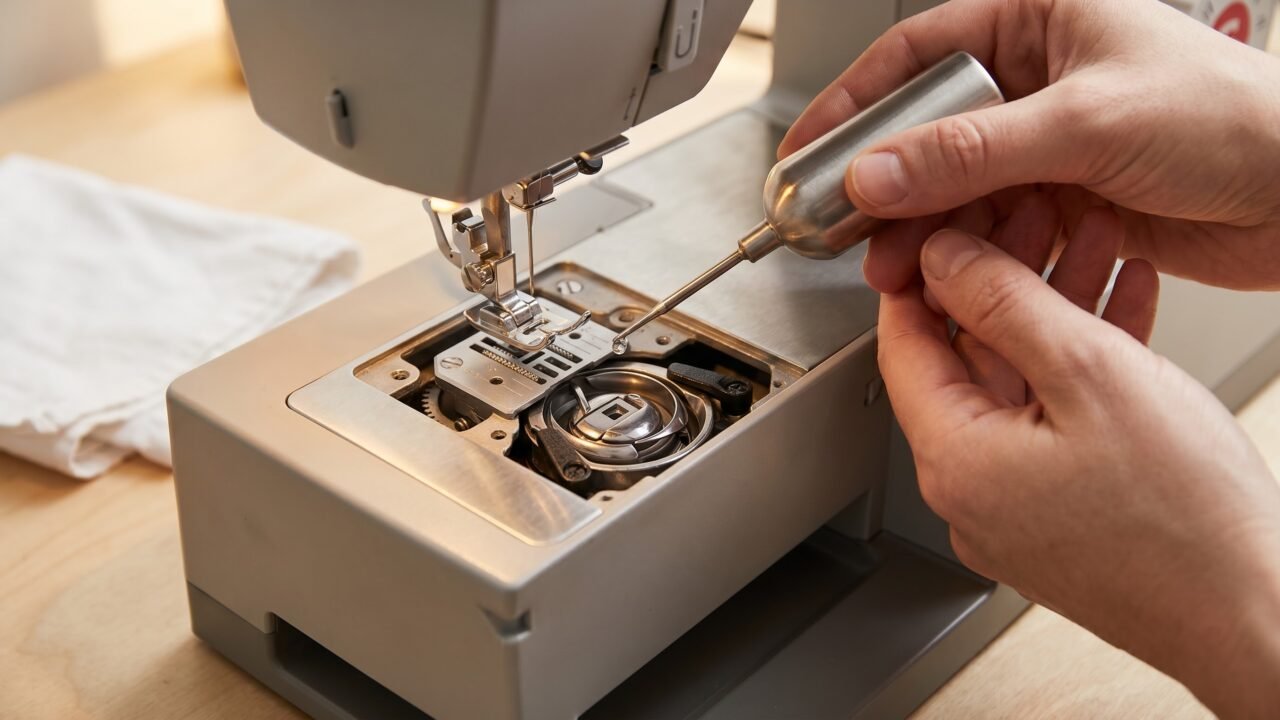
On every machine that takes oil, the hook race is the primary lubrication point. This is the circular track that the rotary hook rides around as it picks up the bobbin thread to form a stitch. Metal rubbing against metal at speed without oil will gall the race surface, eventually destroying the assembly.
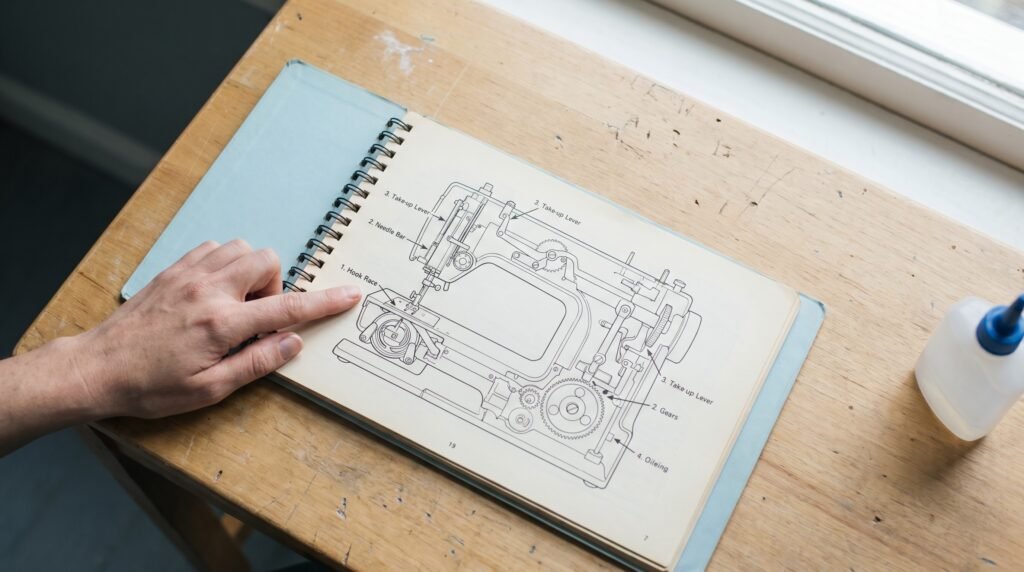
To reach it, remove the stitch plate (the metal plate with the needle hole) and the bobbin. On most drop-in machines you will see the rotating hook assembly directly. On front-loading machines you remove the bobbin case to expose the race. Your manual's oiling diagram will show the exact spot - often a small depression or felt wick in the center of the hook assembly.
Bernina's official guidance, published on their WeAllSew platform, is to "place one drop of oil into the hook race" - and on machines where the hook itself is removable, "oil the two felt pads inside the hook with one drop on each." One drop. That figure is consistent across Singer, Janome, and Bernina manuals.
Singer's Heavy Duty 4452 manual is specific: "Lubricate at the point (6) with 1-2 drops of sewing machine oil." Janome's guidance is a single drop on the felt wick "if the bobbin area sounds a little noisier than usual." Neither manual says to pour oil liberally - precision is the whole point.
Other oil points on mechanical machines
Vintage machines and some current mechanical models have additional lubrication points beyond the hook race. The NMSU Cooperative Extension guide puts it plainly: oil "the holes designated, and on all parts that rub against or within one another" using "one drop of oil on each bearing and in each oil hole." The iFixit service guide for mechanical machines adds: "Oil all places you see the metal bars going through any kind of bearing, as well as any places that are meant to rotate."
Common secondary oil points include:
- The needle bar - the vertical shaft that drives the needle up and down
- The presser bar - where it slides through its bushing
- The take-up lever pivot - the arm that pulls thread up on each stitch
- The feed dog crank mechanism (underneath, if accessible)
Hard stops: never oil the tension discs, the handwheel clutch/release, rubber drive belts, or nylon drive gears. The NMSU guide is explicit: "Do not oil the tension discs, the handwheel release, or the belts and rubber rings on any machine." Oiling tension discs will ruin your tension calibration. Oiling rubber belts makes them slip and swell.
For deeper guidance on cleaning before you oil - removing lint from around the feed dogs, the hook race, and the bobbin case - the how-to-clean guide walks through that step first. Oiling over accumulated lint turns the debris into an abrasive paste, which is worse than no oil at all.
The right oil and the one-drop rule
Sewing machine oil is a highly refined, clear, thin mineral oil. It is not the same as 3-in-1 oil, cooking oil, or any other household lubricant. Using the wrong product is one of the most common maintenance mistakes - and the damage is cumulative and slow, which means people often do not connect the problem to the cause.
WD-40 deserves a separate mention because so many sewers reach for it. WD-40 is a water-displacing solvent and light penetrating oil - not a lubricant rated for sustained metal-on-metal contact. It leaves a residue that attracts lint and eventually dries out, leaving moving parts without protection. The guide on why WD-40 and canned air cause damage covers this in detail.
Goldstar Tool's maintenance guidance summarizes what happens with any wrong oil: "When oil mixes with lint and debris, it becomes sticky and clumpy." That sludge is more damaging than running dry for a short period. Bernina's blog warns specifically about cooking oil: it congeals into a thick, sticky mass and the hook can then no longer run smoothly (source 6).
Recommended product types: clear, colorless, purpose-labeled sewing machine oil. Common options include generic sewing machine oil, Singer All Purpose Machine Oil, Zoom-Spout Turbine Oil, and brand-matched oils (Janome oil, Bernina oil). The details of what to buy, including a comparison of ISO viscosity grades, are in the sewing machine oil buying guide.
The one-drop rule is not vague - it is the actual specified amount. More oil does not mean more protection. Goldstar Tool's trade guidance is direct: "Remember to add only a drop or two of the correct type of oil, and wipe away any excess to prevent problems." Excess oil migrates toward the needle and the fabric. A drop or two of oil on a finished garment is a real and common outcome of over-oiling.
Step-by-step: how to oil a machine that needs it
- Unplug the machine. Always. Every manufacturer manual requires this before any maintenance.
- Clean first. Remove the stitch plate and bobbin. Use a small brush (the one that came with the machine is fine) to clear lint from the hook race and feed dog area. Do not use compressed air - it pushes lint deeper into the mechanism. See the clean and oil overview for the full cleaning sequence.
- Locate the oil points. Open your manual to the oiling diagram. The hook race is always first. Note any secondary points on the needle bar or presser bar.
- Apply one drop. Hold the oil bottle tip close to the point and squeeze gently. One drop at the hook race, one drop at each additional marked point. If your bottle does not have a needle tip, use the thin applicator tube that came with the oil.
- Wipe away any excess. Use a lint-free cloth or an old cotton cloth. Any oil sitting on a surface rather than absorbed by a felt wick needs to come off.
- Reassemble and run on scrap fabric. Thread the machine, lower the presser foot onto a folded piece of scrap cotton, and sew a few inches. This distributes the oil through the mechanism and lets any remaining excess absorb into the fabric rather than your project. Discard those scrap pieces - do not reuse them.
- Check the scrap for oil spots. If you see oil marks on the fabric after step 6, you applied too much. Clean the hook race area again and run another scrap pass.
How often to oil
Singer's cross-model guidance (help.singer.com) is usage-frequency based: daily use means weekly oiling; weekly use means monthly oiling. Singer gives no hour-count recommendation that applies across mechanical models. One machine-specific exception: the Singer Featherweight 221. The Singer Featherweight Shop (singerfeatherweight.com) recommends oiling that machine's high-speed friction points roughly every 8 hours of sewing time, but that figure is for the 221 specifically, not a general Singer rule. Janome's published guidance is more conservative: oil only when "the bobbin area sounds a little noisier than usual," and pair that with yearly professional servicing. The NMSU guide recommends servicing before and after any extended storage period.
A practical schedule for a home sewer doing a few projects a week: clean and oil roughly once a month, or before any major project. The Stitchmend team's working estimate from the guidance above is every 4-6 hours of actual sewing time, but treat it as a starting point rather than a hard rule. Heavy use (daily sewing, thick fabrics, upholstery) warrants more frequent attention - follow Singer's daily/weekly guidance if that describes your pattern. The maintenance schedule guide has a full service interval table by usage level.
One situation that is often overlooked: machines that have been in storage. A machine sitting unused for a year or more may have oil that has gummed or dried in the bearing surfaces. Running it immediately can grind that old residue into the metal. The vintage machine cleaning guide covers how to flush old oil before re-lubricating.
FAQ
My manual says "no oiling required" but the machine is squeaking. What do I do?
Do not add oil. A squeak on a sealed machine usually means lint buildup in the hook area or a dry hook race that only a technician should address - because accessing the internal sealed bearings requires disassembly that can cause more harm than good. Clean the accessible bobbin area thoroughly first. If the noise persists, book a service appointment. Forcing oil into a sealed machine voids the warranty and can damage circuit boards.
Can I use sewing machine oil on a serger/overlocker?
The same oil type applies, but the oiling points differ significantly. Sergers have multiple looper shafts and more moving parts than a sewing machine. Always use your serger's specific manual for the oiling diagram - do not assume the same points apply.
What if I accidentally over-oiled and now there are spots on my fabric?
Stop sewing. Wipe the hook race area with a lint-free cloth to remove excess oil, then run several more scrap passes until no oil transfers. For fabric that has already been stained, blot (do not rub) with a dry cloth while fresh, then treat with a small amount of dish soap worked in before washing. Oil stains that have set are difficult to remove from most fabrics.
How do I know if the hook race is the right spot on my specific machine?
Every manufacturer's oiling diagram will mark it - typically labeled "hook race," "hook assembly," or numbered as the first point. On a drop-in bobbin machine, it is the circular track visible after you remove the stitch plate and bobbin. If your manual shows no oiling diagram at all, your machine is most likely sealed and takes no oil.
- Brother USA SupportOiling the machine
- Singer Heavy Duty 4452 Instruction Manual (ManualsLib)
- BERNINA / WeAllSewSewing Machine Cleaning and Oiling
- New Mexico State University Cooperative Extension, publication C102Sewing Machine Maintenance
- iFixitRiccar Mighty 1000 Oil and Timing Service
- BERNINA BlogWhy and how to oil your sewing machine
- Singer Machine FAQshelp
- Singer Featherweight ShopHow and Where to Oil a Singer Featherweight 221
The Stitchmend team
Every fix here is built from manufacturer service manuals and needle-maker specs, and fact-checked against those sources before it goes live. How we work