How to clean and oil a sewing machine the right way
The clean-then-oil sequence that keeps your machine running smoothly, how often to do it, the right brush and oil, and the two things you must never use.
Most "it just stopped working" calls trace back to one skipped maintenance session. Lint packs around the feed dogs, dried oil turns gummy on the hook, and a machine that stitched beautifully last month now skips, jams, or grinds. A 15-minute clean and oil every few bobbins prevents nearly all of it.
Two things shape how you do this: you always clean first, then oil - never the other way around. And before you reach for anything other than a small brush and a bottle of sewing machine oil, read the short list of what not to use. Those two points are where most home maintenance goes wrong.
Does your machine even need oiling?
Check your manual before you add a single drop. This is the one rule that overrides every general schedule, every video, and every tip on this page. Singer's official guidance puts it plainly for any machine whose manual is silent on oiling: the machine was pre-lubricated at the factory and does not need additional lubricating by the user. The same logic applies whatever the brand on the front - if the manual has no oiling or lubrication section, treat the machine as sealed and self-lubricating, and do not add oil yourself.
You do not need to memorize which models are which. The split tracks the machine's design, and the manual tells you which side you are on:
- Mechanical machines with an oiling section in the manual - these have accessible hooks and pivot points and genuinely benefit from regular lubrication. The manual lists the exact spots and the order; oil only those.
- Computerized machines whose manual says nothing about user oiling - most modern computerized models are pre-lubricated and sealed. If oiling is not mentioned, skip it; adding oil does more harm than good.
- Higher-end and professional machines that do call for oil - these tend to be precise about which oil, how much, and where. Follow the model's own manual and no other source, including this page.
If your manual says nothing at all about oiling and you still want peace of mind, the safe move is a professional service rather than self-oiling a machine that was never designed for it. We cover when that makes sense in our guide to knowing when to see a technician.
What you need and what you must avoid
The supply list is short. The avoid list is shorter, but more important.
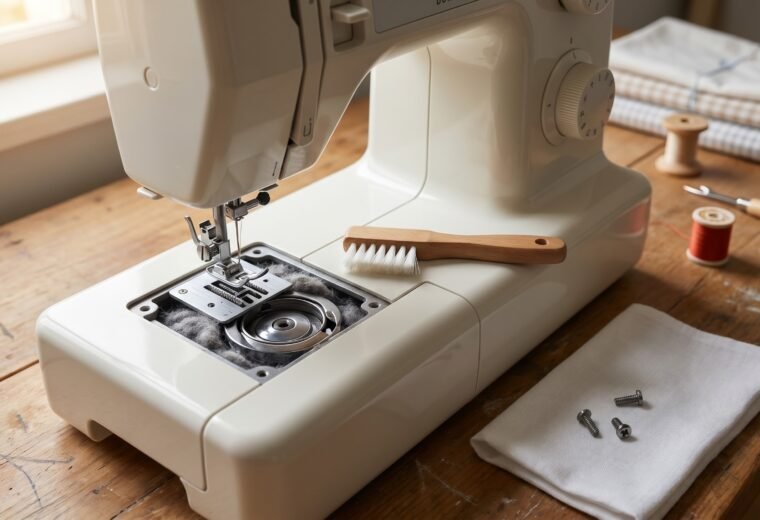
What to use
- Small lint brush - the flat brush that came in the accessory pouch with your machine. A soft, dry watercolor brush works too. Aim for something narrow enough to reach under the feed dogs.
- Tweezers - for pulling thread wrapped around the shaft below the hook or stuck in the shuttle keeper slots.
- Sewing machine oil - clear, odorless, very fine-grade mineral oil made specifically for sewing machines. One bottle lasts years. Brother's service manuals specify sewing machine oil for every lubrication point and note that any other type "may result in damage to the machine."
- A soft cloth or tissue - to wipe excess oil after application.
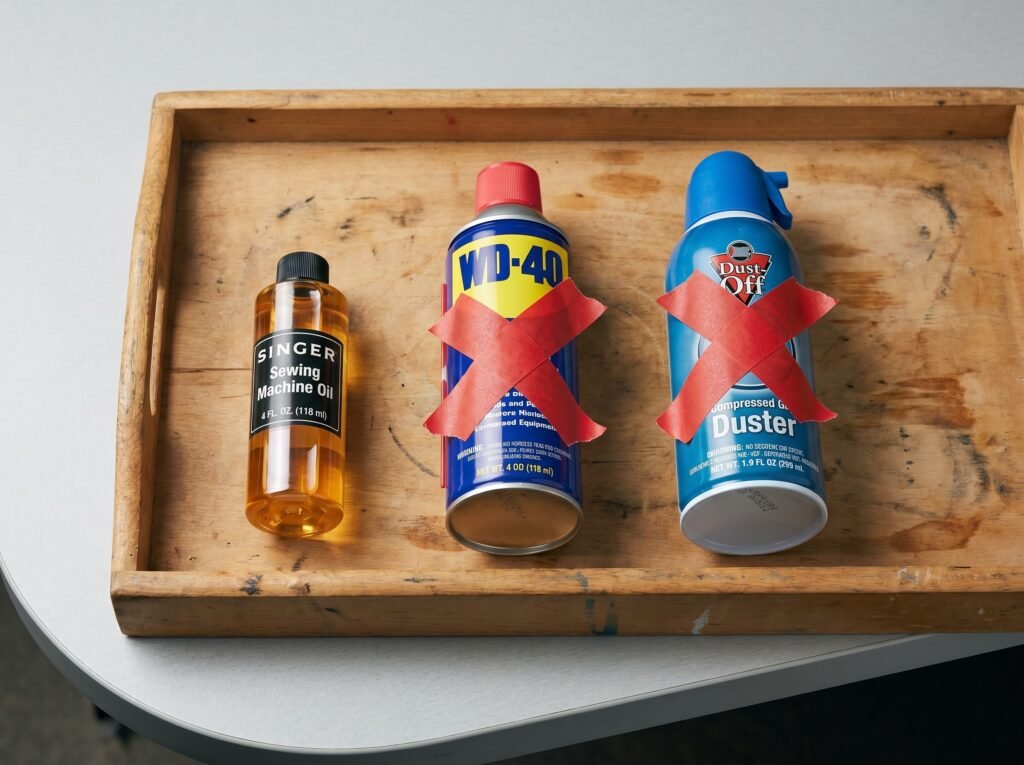
What to avoid - this is the short list that matters most
- Compressed air (canned air) - avoid it. It pushes lint deeper into the machine rather than removing it, and the propellant adds moisture that turns fine lint into sticky gum. Brush or vacuum the debris out; don't blow it in.
- WD-40 - not suitable for sewing machines; it is primarily a water displacer and penetrant, not a sewing machine lubricant, and its petroleum-based residue attracts lint and can degrade the thin oil films that precision hooks depend on. Our full breakdown of why WD-40 and similar sprays cause long-term damage is in this guide.
- 3-in-1 oil or household oil - these are heavier than sewing machine oil and can varnish on the hook race, creating drag and eventually preventing the hook from rotating freely.
- Needle lubricants, silicone spray, or sewing thread conditioner - these belong on thread, not on the machine's metal surfaces.
Singer's FAQ confirms the pre-lubrication note but does not specify what to avoid by name. iFixit's maintenance guide is the most direct source: "Avoid 3-in-1 oil; use only good quality sewing machine oil - it is clear and very fine." The detail about compressed air adding moisture that creates "gunky lint" is from the same source. For oil options by brand and grade, the best sewing machine oil guide compares the most common bottles side by side.
How often to clean and oil
Two questions decide your routine, and they are different questions. First: does this machine get oiled at all, and where? That is answered once, by the manual, and it never changes. Second: how often do you clean and (if applicable) oil? That scales with how much you sew and what fabrics you use, since cotton and fleece shed far more lint than polyester or silk.
Before the cadence, settle the first question. This is the part most online schedules skip, and it is the part that actually protects your machine:
| Your machine | Does it need user oiling? | Where the oil goes (if it does) |
|---|---|---|
| Manual has no oiling section | No - treat as sealed and pre-lubricated; add nothing | Nowhere; clean only |
| Mechanical machine, manual lists oiling points | Yes - on the schedule below | Only the points the manual names (commonly the hook race and a felt washer) |
| Front-load shuttle machine | Usually yes - manual confirms | Shuttle center pin and hook area, one drop |
| Most modern computerized machines | Usually no - sealed hook, clean only | None user-accessible; service alert or manual decides |
Once you know whether and where, the cadence below sets how often. The cleaning column applies to every machine; the oiling column applies only if the table above put you in a "yes" row.
| How often you sew | Clean the bobbin area | Oil (only if your manual requires it) |
|---|---|---|
| Daily | Every 2-3 bobbins | Once a week |
| A few times a week | Every project or every 3-4 bobbins | Every 2-3 weeks |
| Once a week | Every 2-3 sessions | Once a month |
| Occasional (monthly) | Every session | Every 3 months |
| Long storage break | Before and after | Professional service before resuming |
The cleaning cadence above translates well across most machines; the oiling column reflects Singer's usage-based guidance from their official FAQ, scaled for general home use.
Cadence varies by manufacturer, which is another reason the manual wins over any single schedule. Bernina's published guidance, for example, points owners of machines that take user oiling to oil the hook after using up the contents of three to four bobbins, and notes that the machine screen may prompt you, or that a louder motor and irregular stitches can signal it is due. That is more frequent than Singer's usage-based cadence, and suits a high-use precision machine. For most home sewers with a mid-range mechanical, the "every few bobbins" rule for cleaning and monthly oiling is a reasonable middle ground - but if your manual gives a number, use that number.
One more trigger worth remembering: if the machine has been sitting unused for more than a few months, old oil and grease can dry out and turn tacky inside the mechanism. A machine coming out of long storage may need a professional service before you start using it again, not just a quick clean at home.
How to tell the oil has already gone gummy
Dried, gummed oil announces itself before the machine fully seizes. A few signs to check for:
- The handwheel turns stiffly or unevenly by hand, with the machine off and unplugged. Fresh lubrication lets it spin smoothly; old oil that has hardened into a varnish on the shafts adds drag, and you can feel it bind at certain points in the rotation.
- The motor sounds louder or labors on a stitch it used to handle easily, and stitch formation gets irregular even after a clean and a fresh needle.
- A cotton swab run along an oiling point comes back with a sticky, brownish, sometimes lacquer-smelling residue instead of clear thin oil. Tacky or gummy on the swab means the old oil has oxidized.
- You can see yellow or brown crust on visible pivot points, the hook race, or the gears under the bobbin area on older mechanical machines.
If you find this on a machine whose manual does call for user oiling, the fix is to soften and clear the old residue before adding fresh oil. A drop of fresh sewing machine oil left to sit will loosen mild stickiness; a stubborn varnished spot usually needs the gummy film cleaned off with a swab and a touch of isopropyl alcohol, then re-oiled and the machine run for a minute or two to redistribute. Do not pile new oil on top of hardened old oil and call it done - the new oil just floats on the crust and the drag stays. On a sealed machine, or any machine where the gum is on internal shafts you cannot reach without opening the casing, this is a technician job. Forcing a stiff handwheel can knock the timing out of alignment, which turns a maintenance task into a timing repair.
The clean-then-oil sequence

This is the core procedure. Clean first, every time, without exception. Oiling over lint just traps the debris in place; cleaning after oiling wastes oil. Both mistakes create the gunky paste that brings machines to a stop.
The full step-by-step procedure for each bobbin style lives in two dedicated guides - the cleaning walkthrough and the oiling walkthrough - but the sequence logic is here so you understand why the order matters.
Step 1: Power off and unplug
Both Brother and Singer's maintenance documentation start here, before any other instruction. Unplug the machine. Not just power off - unplugged. The handwheel can still rotate with power off, and a needle descending on a finger while you're brushing the feed dogs is entirely avoidable.
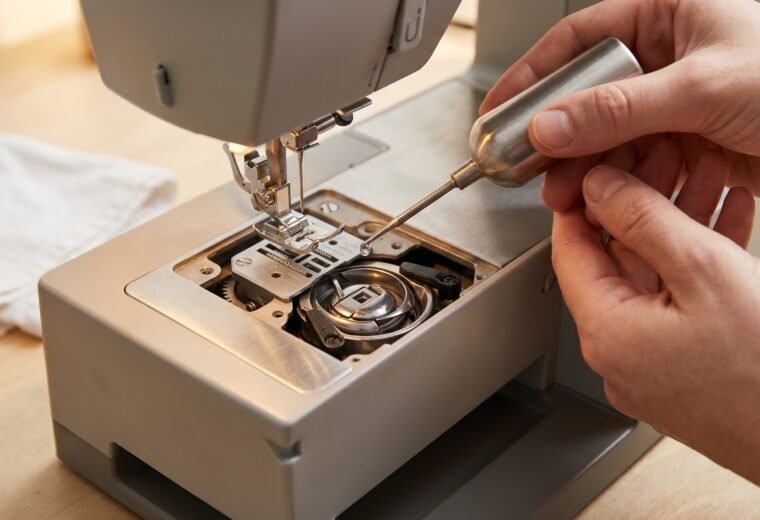
Step 2: Remove the needle, presser foot, and needle plate
The needle plate (throat plate) comes off by sliding or unscrewing it depending on your model. This exposes the feed dogs and gives you full access to the hook area below.
Step 3: Remove the bobbin and bobbin case
Take out the bobbin and, if your machine has a removable front-load bobbin case, take that out too. Set both aside. You want the entire race area open and visible.
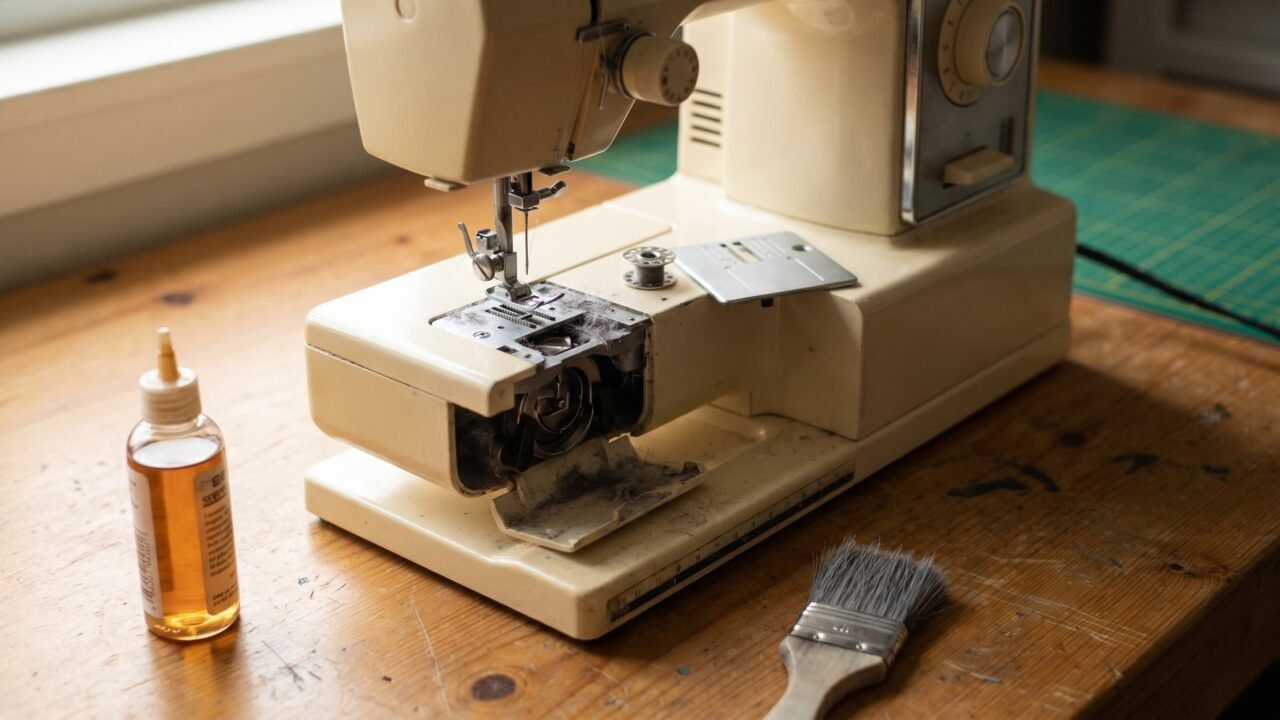
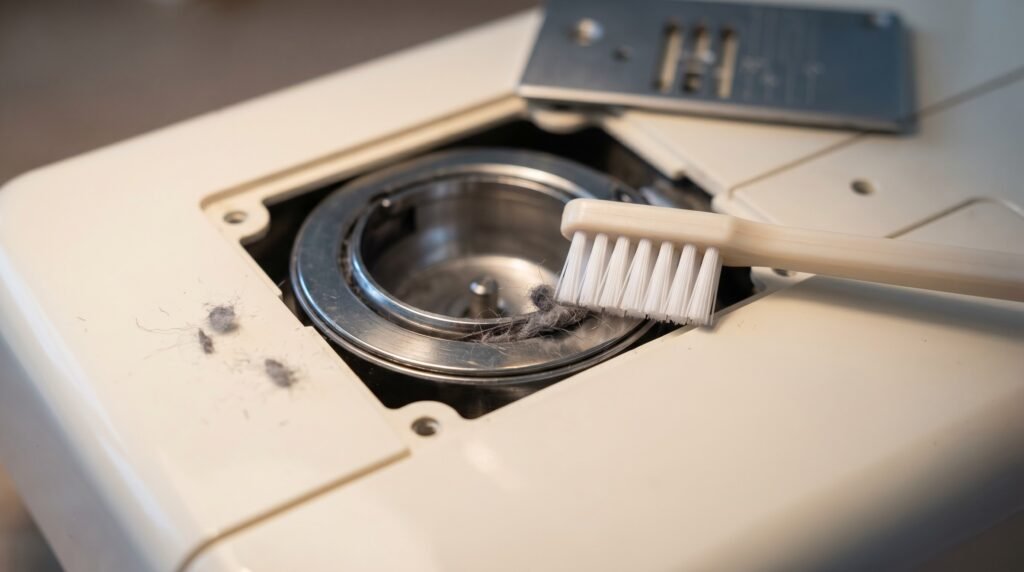
Step 4: Brush out lint, then vacuum
Use the lint brush in short strokes along the feed dog slots, around the hook race, and under the shuttle. Work the debris toward an opening where it can fall out or be lifted away. Follow with a vacuum on low suction if you have one - it picks up what the brush loosened. Tweezers for any thread wound around the hook shaft or stuck in the race grooves.
Brother's official cleaning instructions specify "the cleaning brush or a vacuum cleaner to remove any dust from the race and its surrounding area." Do not use canned air here.
Step 5: Oil - only now, and only if your manual calls for it
With the machine clean and dry, apply oil to the points your manual specifies. For most mechanical machines this means the hook race (one drop), the center pin of the shuttle (one drop for front-load models), and the needle bar felt washer if your machine has one. Singer recommends 2-3 drops across the bobbin case area, needle bar, and the handwheel where it meets the side of the machine; Brother's PR-series documentation specifies one drop on the hook, daily before use for that machine class.
More is not better. Brother's documentation warns directly that "too much oil may drip onto your sewing project." One drop at each point is the standard. Wipe away any visible excess with a tissue.
One point Brother's cleaning guide states clearly: do not put oil on the bobbin case itself. The case sits inside the race, and oil on it transfers to thread and fabric.
Two more cautions round out the "when not to oil" picture. On many sealed modern machines the hook and race are not user-oilable at all - the assembly is enclosed and the manual gives you a brush-and-vacuum routine with no oiling step. If you cannot reach the hook without prying off a fixed cover, that machine was not designed for home oiling there; clean it and leave the lubrication to a service. And if your machine does have a needle-bar felt washer, resist the urge to soak it. The felt is meant to hold a small reserve, not to be saturated; a drop or two is plenty. Drench it and the surplus wicks down toward the needle and onto your fabric, which is the exact stain you were trying to avoid.
Step 6: Reassemble and run a test seam
Replace the bobbin case, bobbin, needle plate, presser foot, and needle. Plug the machine back in and sew a few inches on a scrap of fabric. This works any excess oil off the hook surfaces before it reaches your actual project. If the machine feels smoother and quieter, the maintenance worked. If it still skips stitches or makes noise, the problem may not be lint or oil - the full troubleshooting guide covers the diagnostic sequence.
Bobbin type changes the cleaning approach slightly
Drop-in top-loading bobbins (the most common type on modern machines) expose the hook race simply by sliding out the bobbin cover and lifting the bobbin - fast and accessible. Front-load bobbins require removing the bobbin case from its latch and, on some models, swinging out the shuttle to reach the center pin. The mechanics are different enough that each has its own detailed cleaning walkthrough: drop-in bobbin cleaning and oiling and front-load bobbin cleaning and oiling.
Vintage machines with long-shuttle or vibrating-shuttle mechanisms follow a different sequence entirely - more oiling points, more care around the timing mechanism, and often original oils that have hardened. The vintage machine cleaning guide covers those specifics.
When maintenance is not enough
Regular cleaning and oiling prevents most common problems, but two things it cannot fix are worth naming directly.
First: if skipped stitches or jamming start immediately after cleaning and oiling, the cause is almost certainly not maintenance-related - it is threading, the needle, or the bobbin. If bird's-nest bunching appears right after oiling, a specific culprit is oil that reached the bobbin case or thread path; remove the bobbin case, wipe the race and case clean, rethread with the presser foot up, and test on scrap first. More causes for tangling are in the bird's-nest bunching guide; jamming starts at machine jamming.
Second: if the machine still runs rough, squeaks loudly, or has a stiff handwheel after a proper clean and oil, the internal grease on the main shaft and cam mechanism may have dried out. That grease is not user-serviceable on most modern machines - it requires a technician with the right compound and the ability to open the machine's sealed casing. Singer recommends a professional tune-up every 3-4 years even for well-maintained machines, and that cadence holds up as a reasonable baseline for any brand.
The maintenance schedule guide has a full checklist of what you can do yourself versus what belongs at a shop - including the exact stop line for home servicing.
Questions answered
How do I know if my sewing machine needs oil at all?
Open your manual and look for an oiling or lubrication section. If it is not there, Singer and Brother both confirm that the machine was pre-lubricated at the factory and the user should not add oil. Oiling a sealed self-lubricating machine can attract lint and cause problems rather than prevent them.
Can I use olive oil, baby oil, or 3-in-1 in a pinch?
No. Olive and vegetable oils go rancid and leave a gummy film. Baby oil contains fragrances and additives. 3-in-1 is heavier than sewing machine oil and varnishes on precision surfaces over time. iFixit's maintenance guide specifically warns against 3-in-1. Sewing machine oil is inexpensive and a bottle lasts years - buy a small one.
How much oil is the right amount?
One drop per oiling point. But if you put on too much, here is how to recover: run a few inches of scrap fabric through the machine right away. The first seam wicks off the excess before it reaches your project. If the fabric still shows an oily mark, stop, remove the bobbin case, and wipe the visible oil from the race and case with a clean dry cloth - then retest on scrap again. Brother's documentation warns that excess oil "may drip onto your sewing project," which is why the standard is one drop, not a generous squeeze. If oil does stain fabric, a drop of dish soap worked in before washing usually pulls it out cleanly.
My machine started bunching thread right after I oiled it. What happened?
Two likely causes: you oiled before cleaning (lint is now stuck in the race), or you got oil on the bobbin case or thread path, which disrupts tension. Remove the bobbin case, clean the race thoroughly, wipe off any oil from the bobbin case, and rethread the machine with the presser foot up. If bunching persists, the bird's-nest guide walks through every cause in order.
Is there a cleaning difference between computerized and mechanical machines?
The bobbin area cleaning is essentially the same - brush, vacuum, no compressed air, no WD-40. The difference is oiling: many computerized machines require no user oiling at all. Some computerized models that do still take oil, such as Bernina's, display a maintenance reminder on-screen when lubrication is due. Always follow the on-screen prompt or your manual rather than a general schedule.
- iFixitBasic Sewing Machine Maintenance
- Singer official FAQ (help.singer.com)
- Brother Support (support.brother.comCE-5500)
- Brother Support (support.brother.comPR-650)
- Singer Support (help.singer.comfeed dogs and shuttle area)
The Stitchmend team
Every fix here is built from manufacturer service manuals and needle-maker specs, and fact-checked against those sources before it goes live. How we work