Sewing machine parts diagram and glossary: every term explained, from throat plate to 130/705
A complete labeled guide to sewing machine parts and repair slang: throat plate, feed dogs, hook, tension discs, take-up lever, drop test, bird's nest, 130/705, and more.
Thirty-seven parts, a dozen nicknames, and about eight pieces of slang that nobody explains. Every troubleshooting guide on this site links back here when it uses a term you may not recognize yet, so consider this the shared vocabulary. Work through the major assemblies in order below, or jump straight to the A-Z glossary at the bottom for a quick lookup.
The parts diagram section covers each assembly as a working unit - what the part does, where it sits, and which other names it goes by. The glossary captures the repair slang: the phrases sewers and technicians actually use when something goes wrong.
The needle and its path from spool to fabric
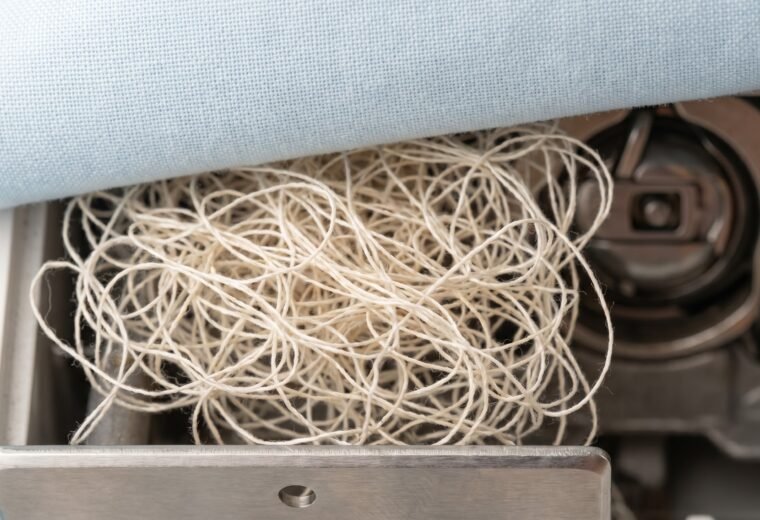
Thread travels a precise route before it ever reaches the fabric. Get any step wrong and the machine tells you immediately - with skipped stitches, thread breaks, or the tangled pile under the work that everyone calls a bird's nest.
Spool pin holds the thread spool at the top of the machine. Most machines offer both a horizontal and a vertical pin; which you use affects how the thread unwinds. An incorrect unwind direction can cause irregular tension even with perfect threading everywhere else.
Thread guides are the small loops, hooks, and channels the thread passes through on its way down. Their job is to keep the thread at a consistent angle so each part of the tension system gets a fair grip. Skipping a guide is one of the most common causes of thread breaks and loose stitches.
Tension discs (also called the upper tension assembly or tension mechanism) are two metal plates inside the threading path that pinch the thread between them. The presser foot controls whether they are open or closed: foot up, discs open wide; foot down, discs press together. Thread the machine with the foot down and the discs never grip the thread properly, which is the mechanical reason a bird's nest forms underneath the fabric. Singer's support documentation is explicit: raise the presser foot lifter before threading "so that the thread can be properly seated in the tension mechanism and take up lever." The dial you turn to adjust tension moves these discs closer together or further apart, increasing or decreasing the pinch.
Take-up lever (sometimes called the uptake lever or check spring) is the arm that moves up and down in a slot on the front of the machine, looping in and out of the thread path. It pulls the thread tight after the hook catches a loop, then releases slack for the next stitch. If your thread slips out of the take-up lever mid-sewing, the stitches downstream go slack - a pattern called eyelashing (thin thread loops pulled to one side of the fabric, resembling eyelashes). Threading through the take-up lever requires the needle to be at its highest position, which is why every threading sequence on every machine asks you to raise the needle first.
Needle bar is the metal rod that holds the needle and drives it up and down. The needle clamps to the bottom of the bar. On almost every home machine the flat side of the needle shank faces the back; push the needle all the way up until it stops before tightening the clamp screw.
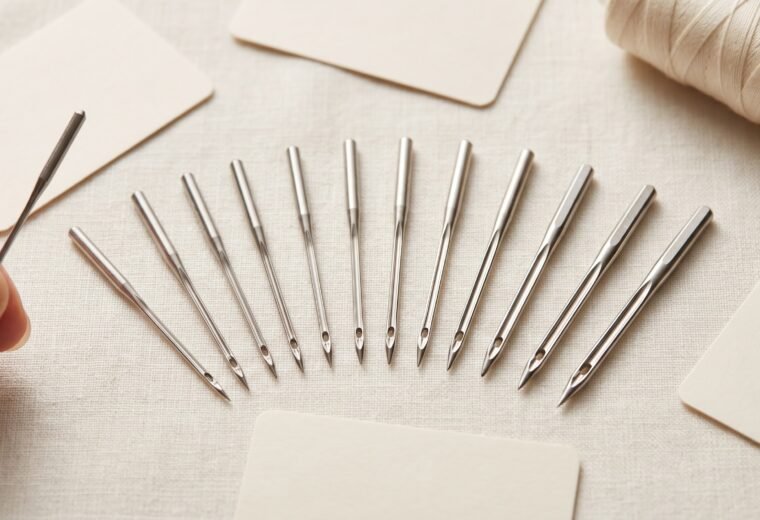
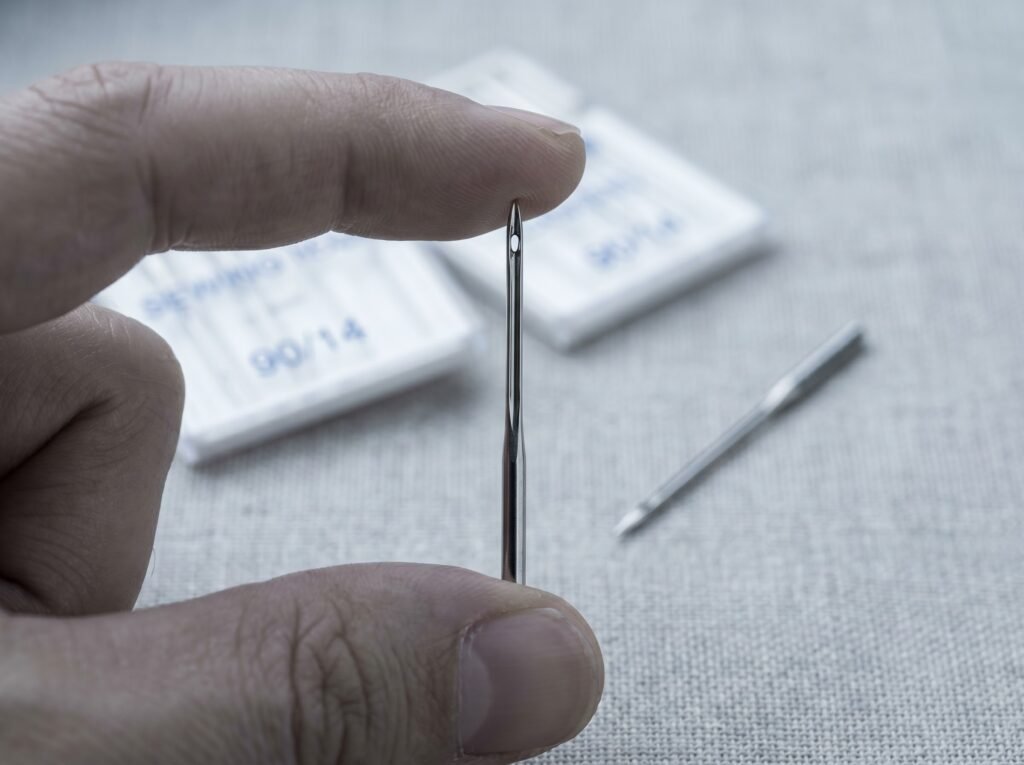
Needle is the part that actually carries the upper thread through the fabric. Home machines use the 130/705 H system (also written HAx1 or 15x1) - the standard for roughly 99% of domestic machines, covering Singer, Brother, Janome, Bernina, Pfaff, Husqvarna Viking, and most others. Schmetz's FAQ confirms this coverage. The needle size uses dual notation: for example, 90/14 means the blade is 0.90 mm in diameter (metric) and size 14 in the Singer/US system. The H in the system name comes from the German "Hohlkehle," meaning the scarf - the small indentation on the back of the needle, just above the eye, that the hook tip passes through to catch the thread loop. The eye is the hole the thread passes through; the groove is the channel running down the front of the blade that protects the thread as it penetrates fabric.
The stitch-forming system: hook, bobbin, and bobbin case
Every lockstitch machine makes its stitch the same fundamental way: the needle pokes a loop of upper thread through the fabric, the hook catches that loop and wraps it around the lower (bobbin) thread, and the take-up lever snugs everything tight. The parts below are the ones that execute that sequence. A full explanation of the stitch cycle lives in our how it works guide.
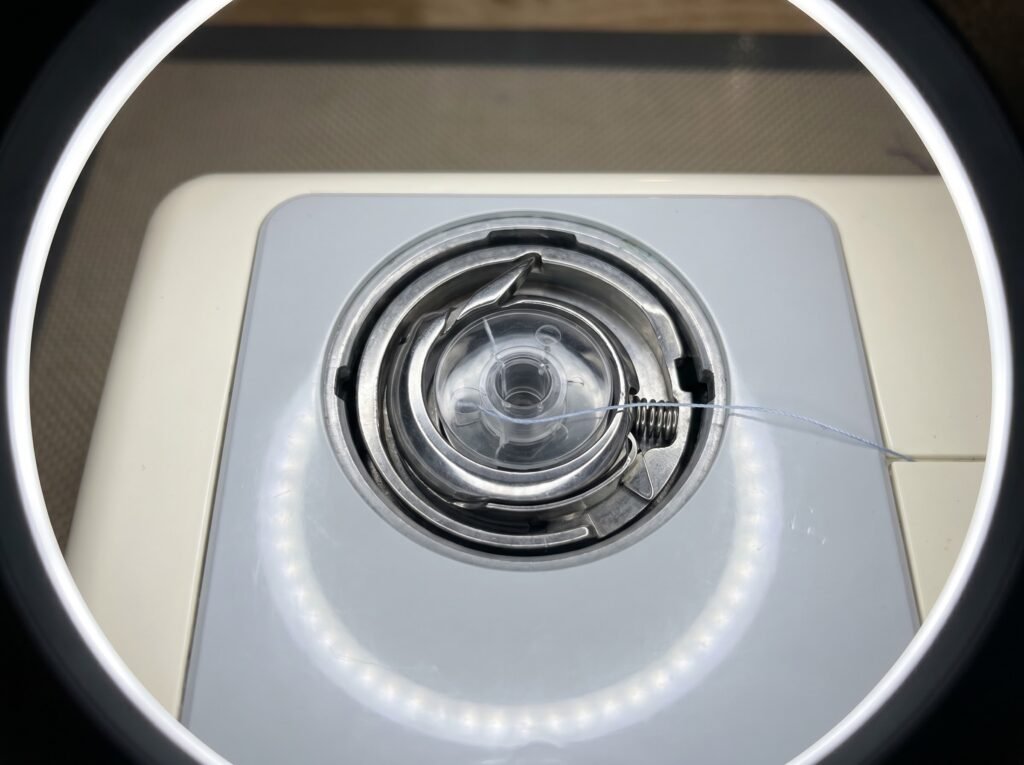
Hook (also called the rotary hook, shuttle hook, or just the shuttle on older machines) is a hardened steel component that spins continuously inside the machine. Its pointed tip catches the upper thread loop as it passes the 12 o'clock position on each rotation - as Wikipedia's entry on the rotary hook describes it, "hooking the upper thread each time its pointed tip passes the 12 o'clock position." The hook then carries that loop around the bobbin case so the two threads interlock. Older machines used an oscillating hook (it rocks back and forth rather than spinning full circles); most modern home machines use a full-rotation rotary hook, which runs smoother and at higher speeds.
Hook race is the circular machined track that the hook body rides in. Think of it as the groove the hook travels along. The race needs periodic oiling - running it dry even briefly can score the metal and require a complete assembly replacement. On drop-in (top-loading) machines the race is visible once you remove the bobbin cover; on front-load machines it is deeper inside the machine body.
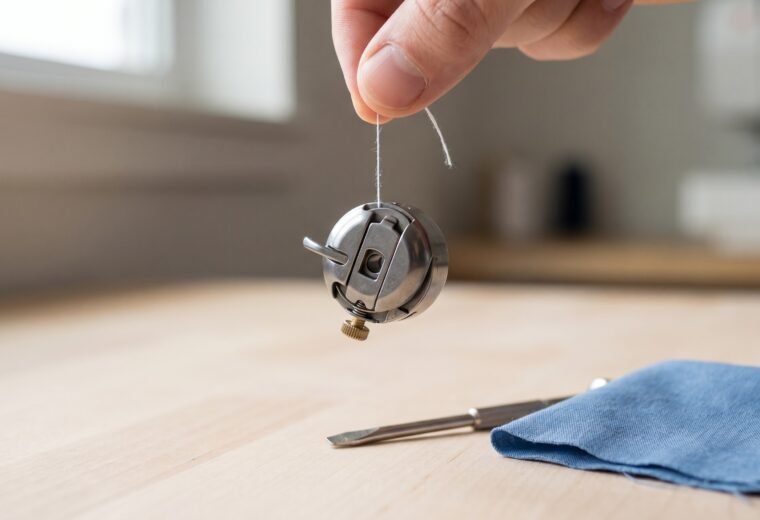
Bobbin case sits inside the hook race and holds the bobbin. Its job is to stay stationary while the hook spins around it, allowing the upper thread loop to pass completely over and lock with the lower thread. The bobbin case has a small tension spring and a tiny screw that adjusts how much drag the case puts on the bobbin thread - that is the bobbin tension. Many cases come from the factory with the tension screw sealed under a dot of paint (often yellow, sometimes green). That paint mark means the factory has calibrated the tension; disturbing the screw moves you into technician territory because returning to the factory setting requires a torque reference. Leave the paint-sealed screw alone until you have confirmed, via the drop test, that bobbin tension is genuinely off - not just the result of a top-threading mistake.
The drop test is the standard field check for bobbin case tension. Hold the bobbin case by the thread tail, flick your wrist gently downward as if giving a small bounce, and watch what happens. Correct tension: the case slips about 1-2 inches and stops. Too tight: the case does not move at all. Too loose: it drops freely. A detailed walkthrough is in the bobbin tension drop test guide.
Bobbin is the small spool of lower thread. Bobbins come in classes that are not interchangeable between machine families. The most common domestic class is Class 15 (also called A-style): 13/16 inch in diameter and 7/16 inch wide. The Class L (L-style) bobbin is the same diameter but narrower at 11/32 inch - an L bobbin can sometimes be used in a Class 15 machine as a temporary substitute, but a Class 15 bobbin is too wide to fit a Class L machine. A third common style, Class M, is larger and used in industrial and commercial machines, as well as long-arm quilting machines (Grace Company and Handi Quilter product specifications confirm this). Bobbins also come in plastic and metal; use whichever your machine specifies. Mixing materials can alter thread tension or disrupt smooth running, according to Wawak's bobbin compatibility reference. To confirm which bobbin your machine takes, check the machine's manual or match the existing bobbin exactly - do not guess by appearance alone, since many look similar. The which bobbin fits guide covers the full compatibility chart by brand and model.
Drop-in bobbin (top-loading): the bobbin goes in from the top, under a clear plastic cover, and the bobbin case is built into the machine. You see the bobbin lying flat. Most modern consumer machines use this design.
Front-load bobbin (side-loading): a removable metal bobbin case is accessed through a door on the front or side of the machine. The case clicks out, the bobbin loads inside it, and the whole assembly clicks back in. Older machines and many heavier-duty models use this system. The removable case is what makes the drop test possible; drop-in machines require a different tension check because the case does not come out.
The throat plate and feed dogs
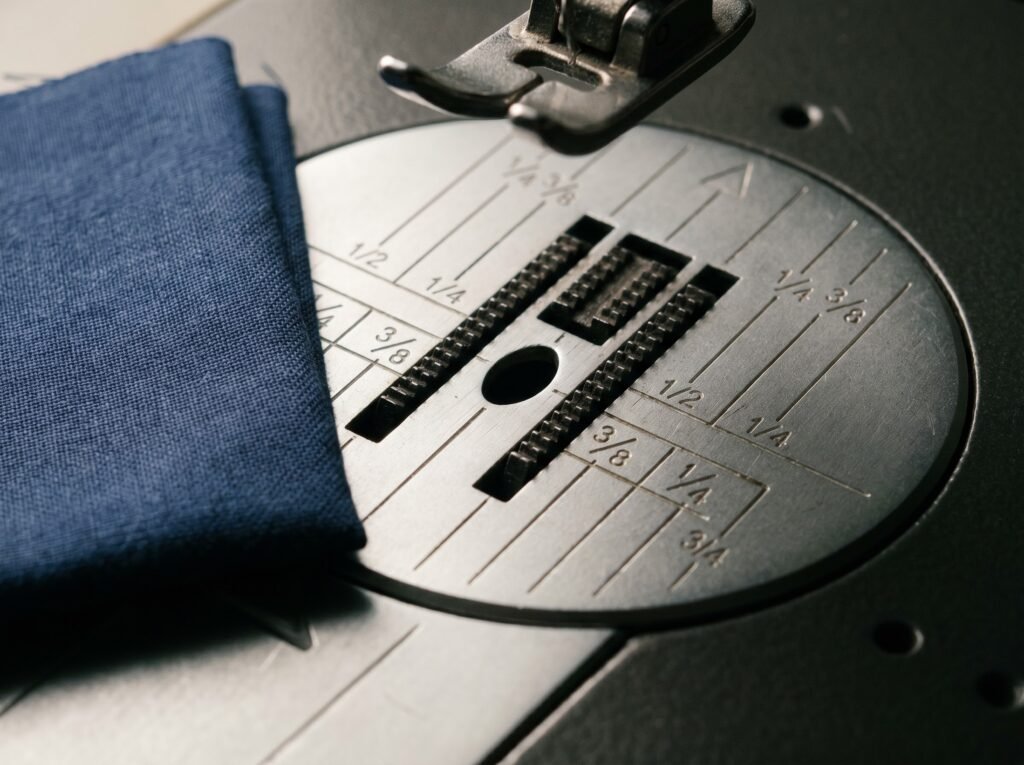
Throat plate - also called the needle plate or stitch plate - is the flat metal plate the fabric slides across while you sew. It has a small oval hole for the needle to pass through, slots for the feed dogs, and usually seam-guide lines marked in fractions of an inch or millimeters. All three names (throat plate, needle plate, stitch plate) refer to this same single part. Brand documentation and machine manuals use all three interchangeably, which is why the name confusion exists. Our throat plate replacement guide covers how to swap one out when the needle has scored the hole or the guide lines have worn off.
Feed dogs are the toothed metal bars that live just below the throat plate. ISMACS's historical technical description captures the mechanism well: they "rise through a slot in the cloth plate underneath the presser foot, engage with the cloth, force it forward the length of the stitch, then fall below the cloth plate, and moving back rise again" - one complete cycle per stitch. Stitch length is controlled by how far the feed dogs move per cycle. At stitch length zero the dogs move almost no distance, which is why the fabric stays in place; this is useful for locking thread at the start and end of a seam (some machines call it a "lock stitch" setting). Feed dogs that are packed with lint may not grip properly, causing fabric to stop advancing; cleaning around the dogs is the first step when fabric stops feeding, covered in the fabric not feeding guide.
Most machines have a drop feed lever or switch (sometimes a button on the back of the machine) that lowers the feed dogs below the plate level so they do not engage. This is the setting for free-motion quilting and embroidery. If your fabric suddenly stopped feeding and you do not know why, check whether the drop-feed switch got bumped accidentally before assuming a mechanical problem.
The presser foot assembly
Presser foot is the forked metal (or plastic-body) foot that presses down on the fabric from above while the feed dogs push from below. The two together grip the fabric and move it. The shank that holds the foot to the machine - either a low shank, high shank, or slant shank, depending on the machine family - determines which aftermarket feet are compatible with your machine. The presser foot lifter (the lever at the back left of most machines) raises and lowers the foot. Raising it also opens the tension discs, which is why every threading instruction tells you to raise the presser foot first. Our presser feet guide covers the standard feet types and when to use each one.
Presser foot pressure is adjustable on many machines, usually via a dial or screw at the top of the presser bar. For very thin or loosely woven fabric, reducing the pressure prevents puckering; for heavy material like denim, more pressure keeps the foot from skipping.
The handwheel and motor controls
Handwheel (also called the balance wheel on older machines) is the large wheel on the right side of the machine. Turning it toward you (counterclockwise when looking from the right side) manually advances the needle down and back up through one stitch cycle. It is the correct way to move the needle by hand for precision work or when clearing a jam. Turning it away from you (clockwise) can tangle the hook mechanism and cause jams - most machine manuals explicitly warn against this. A handwheel that resists turning or feels gritty is covered in the handwheel stuck guide.
Bobbin winder is the small pin and spindle assembly, usually on the top right of the machine, that winds thread onto a bobbin before sewing. A clutch or stopper disengages the needle mechanism while winding so the needle does not move. If the bobbin winder spindle is left pushed outward (in winding mode), the machine will run the winder but not move the needle - one common reason a machine "won't sew." Push the spindle back toward the left (or inward, depending on the machine) to re-engage the needle drive.
Foot pedal (also called the foot controller or foot control) regulates motor speed. The pedal connects to the machine by a cord and varies current to the motor based on how far down you press it. Electrical faults here - a worn cord, a dirty rheostat inside, or a broken pedal casing - should be diagnosed by unplugging and inspecting the connections before any internal disassembly. For anything beyond the cord and socket, a technician is the right call; internal electrical repair carries real safety risk. The foot pedal fix guide covers what you can safely check yourself.
Stitch controls
Stitch length dial (or setting) controls how far the feed dogs advance the fabric per stitch, measured in millimeters. Standard all-purpose sewing runs around 2.5 mm. Basting uses 4-5 mm. Setting stitch length to 0 (or the minimum, often 0.5 mm on machines that do not go to true zero) locks the stitches in place at the start or end of a seam - a tidier alternative to backstitching on fine fabrics.
Stitch width dial controls the left-right swing of the needle for zigzag and decorative stitches. On straight-stitch-only machines this control is absent. Width at zero means the needle stays centered, producing a straight stitch.
Reverse lever or button feeds the fabric backward (toward you) for backstitching at the beginning and end of seams. Some machines use a lever you hold down; newer machines use a push button that latches. If the feed dogs are damaged or stitch length is at zero, the reverse control will not move the fabric effectively regardless of how you engage it.
A-Z glossary: repair terms and slang
These are the terms that show up in troubleshooting threads and repair discussions. Each one links to the relevant fix if there is a dedicated guide for it.
Which part causes which symptom: quick-reference table
If you came here with a specific problem, use this to find which part or assembly to look at first, then drop into the glossary entry below for a fuller explanation.
| Symptom | Most likely part(s) involved | First check |
|---|---|---|
| Bird's nest under fabric | Tension discs, upper threading path | Rethread with presser foot raised; hold thread tails back for first stitches |
| Skipped stitches | Needle, threading path, hook timing | Replace needle first (bent tip invisible to eye); rethread; then check hook timing last |
| Eyelashes on the back of fabric | Tension discs (top tension), take-up lever | Raise foot and rethread from scratch first; if eyelashes persist after rethreading, then increase top tension one increment |
| Thread breaking | Needle (wrong size or burr), thread guides, throat plate | Change needle; check throat plate needle hole for burrs; re-route through all guides |
| Fabric not advancing | Feed dogs, drop-feed switch, stitch length dial | Confirm drop-feed is off; confirm stitch length is above 0; clean lint from feed dogs |
| Needle breaking | Needle, needle bar clamp, throat plate, hook timing | Push needle fully up before tightening clamp; check flat side faces back; rule out hook collision |
| Machine won't sew (needle still) | Bobbin winder spindle, handwheel clutch | Check bobbin winder spindle is pushed back to sew position |
| Handwheel stiff or gritty | Hook race (dry), motor, handwheel clutch | Oil hook race and other oil points per manual; check for thread jammed in hook assembly |
| Rattling noise during sewing | Bobbin case threading, bobbin fit | Remove and rethread bobbin case; confirm bobbin class matches machine |
| Tension looks right but stitches uneven | Feed dogs (lint), presser foot pressure, spool pin unwind direction | Clean feed dogs; check spool pin orientation for your thread type |
A-Z glossary terms
| Term | What it means |
|---|---|
| 130/705 H | The standard needle system for home sewing machines. Also written HAx1 and 15x1. Fits machines from all major brands. The 130 and 705 are historical system identifiers; H is the scarf (from the German "Hohlkehle"). Size uses dual notation: metric/US, e.g. 90/14. |
| 90/14 | A needle size in the dual-notation system. The first number (90) is the blade diameter in hundredths of a millimeter (0.90 mm). The second (14) is the Singer/US size. Common sizes: 60/8 (sheer), 70/10 (lightweight), 80/12 (medium), 90/14 (medium-heavy), 100/16 (denim/heavy), 110/18 (very heavy). |
| Balance wheel | Older name for the handwheel. Used in vintage Singer documentation. Functionally the same part. |
| Bird's nest | A tangled wad of thread under the fabric. Almost always top thread, not the bobbin - caused by threading with the presser foot down so the tension discs never gripped the thread. Full fix here. |
| Bobbin | The small spool holding the lower thread. Must match the machine's bobbin class (see Class 15, Class L, Class M). Wrong-class bobbins cause tension problems and jamming. |
| Bobbin case | The housing that holds the bobbin inside the hook assembly. Has a tension spring and adjustment screw. The term "bobbin case" is also used loosely to mean the entire bobbin-area compartment, even on drop-in machines where the case is not removable. |
| Class 15 | The most common home-machine bobbin class. Dimensions: 13/16 inch diameter, 7/16 inch wide. Used in most Singer, many Janome and Brother machines. Same diameter as Class L but wider. You may also see this called Class 15J - the J refers to the hook or case style on certain machines, not a different bobbin size. Class 15 and 15J bobbins are the same physical size and are generally interchangeable. |
| Class L | A bobbin class narrower than Class 15 (13/16 inch diameter, 11/32 inch wide). Common in some Janome machines and multi-needle embroidery setups. An L bobbin can sometimes fit in a Class 15 machine; a Class 15 bobbin cannot fit in an L-class machine. |
| Class M | Larger industrial-style bobbin, approximately 1 inch in diameter. Used in commercial and industrial machines; also widely used in long-arm quilting machines (Grace Company, Handi Quilter, and similar brands specify Class M). Not used in standard domestic sewing machines. |
| Drop feed | The setting that lowers the feed dogs below the throat plate so they cannot grip the fabric. Used for free-motion quilting and embroidery. If your fabric stopped advancing, check whether this switch was accidentally engaged. |
| Drop test | The standard field check for bobbin case tension. Hold the removable bobbin case by its thread tail, bounce your wrist gently downward. Correct: the case slips 1-2 inches and stops. No movement = too tight. Falls freely = too loose. Only works on front-load machines with a removable bobbin case. |
| Drop-in bobbin | A top-loading bobbin system where the bobbin sits flat under a clear cover. The bobbin case is built into the machine. Also called top-loading. Most modern consumer machines use this design. Full comparison in the drop-in vs. front-load guide. |
| Eyelashing | Thin thread loops on one side of the fabric that look like eyelashes. Eyelashes on the back of the fabric mean the top thread tension is too loose (or bobbin tension too tight) - the tighter lower thread pulls the slack top thread through to its side. The side with the eyelashes is where the pulled thread ends up; the side opposite the eyelashes is the tight side. First fix: increase top tension before touching the bobbin. A second cause is the upper thread not seated in the take-up lever, which Superior Threads confirms produces eyelashes or thread buildup under the needle plate. Reseat the top thread with the presser foot up and the needle at its highest point. |
| Feed dogs | Toothed metal bars under the throat plate that grip and advance the fabric. They rise, grab, move forward, drop, and return - one cycle per stitch. Lint between the teeth reduces grip; clean with a stiff brush, not compressed air (which pushes lint deeper). See the cleaning guide. |
| Front-load bobbin | A side-access bobbin system with a removable metal bobbin case. Used in older machines and many heavier-duty models. Also called front-loading or side-loading. |
| HAx1 | Alternative designation for the 130/705 H needle system. You will see it on Brother and Organ packaging. Same needle, different label. |
| Hook | The rotating steel component inside the machine that catches the upper thread loop and wraps it around the bobbin case to form a lockstitch. Also called rotary hook, shuttle hook, or (on vintage oscillating machines) shuttle. See the how it works guide. |
| Hook race | The circular machined track the hook body travels in. Requires periodic oil to prevent scoring. On drop-in machines it is visible under the bobbin cover. |
| Lockstitch | The stitch type every domestic sewing machine makes: upper and lower threads interlock inside the fabric, locking at the crossing point. Distinguished from chain stitch (single-thread loop) used in some sergers and industrial machines. |
| Needle plate | Another name for the throat plate or stitch plate. All three names refer to the same flat metal plate under the presser foot. See Throat plate. |
| Out of time | When the hook and needle are no longer synchronized - the hook tip does not pass behind the needle at the right moment to catch the thread loop. Symptoms include persistent skipped stitches, broken needles, and thread bunching that does not resolve with rethreading or a needle change. Most skipped-stitch complaints resolve without touching timing - rule out a bent needle, wrong needle size, and a threading error first. Full explanation and diagnosis in the out of time guide; the fix is in how to fix timing. |
| Oscillating hook | An older hook design that rocks back and forth rather than rotating continuously. Found on many vintage machines. Produces more vibration at high speed than a rotary hook. |
| Presser foot | The foot that presses down on the fabric from above while the feed dogs push from below. Lifts via the presser foot lifter (the lever at the back-left of most machines). Must be up before threading - this opens the tension discs. See presser feet guide for foot types. |
| Presser foot lifter | The lever (usually at the back-left of the machine) that raises and lowers the presser foot. Raising it also opens the tension discs, which is why threading with the foot up is a mechanical requirement, not just a suggestion. |
| Scarf | The small indentation on the back of the needle, just above the eye. The hook tip passes through this clearance to catch the thread loop. This indentation is what the H in the 130/705 H system name references (from the German "Hohlkehle"). |
| Stitch plate | A third name for the throat plate / needle plate. See Throat plate. |
| Take-up lever | The arm that moves up and down in a slot on the machine front. It pulls the thread tight after the hook forms each loop, then releases slack for the next stitch. Thread must be routed through this lever during threading or the stitches will be loose and eyelashing will occur. Also called uptake lever or check spring. |
| Tension discs | The two metal plates inside the upper threading path that pinch the upper thread to create top tension. They open when the presser foot is raised and close when the foot is lowered. Threading with the foot down leaves the thread outside the discs and produces the classic bird's nest underneath the fabric. |
| Throat plate | The flat metal plate the fabric slides across, with a needle hole, feed dog slots, and seam-guide marks. Also called needle plate or stitch plate. A scratched or burred needle hole damages thread and can break needles - replacement is straightforward. See throat plate replacement. |
| Yellow-paint seal | A dot of paint (usually yellow, sometimes green or another color) applied at the factory to the bobbin case tension screw, indicating the factory-calibrated tension setting. Breaking or moving this seal places you in technician territory, because returning to the correct setting requires a reference torque. Run the drop test first - if the drop test passes, the bobbin tension is fine regardless of what the top tension looks like. |
Where the DIY boundary sits
Most of the parts above are things you can clean, replace, or adjust yourself. The line sits clearly in two places. Internal electrical components - the motor, the wiring harness, the foot pedal's rheostat - carry real shock risk and should be left to a technician or a certified repair shop. And true timing adjustment (moving the hook relative to the needle) is DIY-possible for someone who follows the service manual carefully, but it has an honest stop-line: if you tighten the hook collar set screws wrong, you can strip the shaft. Read the timing overview and the when to see a pro guide before deciding.
The yellow-paint bobbin seal is a similar boundary. You can check tension with the drop test without ever touching the screw. If the drop test fails and rethreading and a new needle did not fix things, then a technician with a calibrated reference can reset it properly. Many repairs that look like bobbin tension problems are actually top-thread problems - and those cost nothing to fix.
Questions answered
What is the difference between a throat plate, needle plate, and stitch plate?
Nothing. All three names refer to the same flat metal plate under the presser foot, with the needle hole and feed-dog slots. Machine manuals and parts suppliers use all three interchangeably. If you are ordering a replacement, all three search terms will find the same part for your machine model.
My machine has a drop-in bobbin. Can I still do the drop test?
Not in the standard way. The drop test requires a removable bobbin case that you can hold by the thread. On drop-in (top-load) machines the case is built in and does not come out. A technician can check drop-in bobbin tension with a gram scale and a calibrated reference instead.
Is the 130/705 needle the same as HAx1?
Yes. Both names describe the same standard home-machine needle with a flat shank. You also see it written as 15x1. Organ uses the HAx1 label on their packaging; Schmetz uses 130/705 H. The needles are cross-compatible - any 130/705 H needle from any of the major brands fits any machine that accepts this system.
What does "out of time" actually mean for everyday sewing?
It means the hook and needle no longer sync up at the right moment for the hook to catch the thread loop. In practice it shows as skipped stitches that refuse to respond to rethreading or a needle change, and sometimes needles that break against the hook or bobbin case. Before assuming timing, rule out a bent needle, wrong needle size, and a threading error - most skipped-stitch complaints resolve at one of those three steps without touching the timing mechanism.
Why does my bird's nest keep coming back even after I rethread?
The most common reason is rethreading with the presser foot already down. The tension discs close when the foot is lowered, so thread laid in while the foot is down sits outside the discs rather than between them. The fix is simple: raise the presser foot first, then thread. Hold both thread tails toward the back of the machine for the first few stitches as well. This keeps the top thread taut above the hook assembly long enough for the tension discs to establish their grip; if you release the tails immediately, the slack top thread gets pulled down into the hook before tension has a chance to take hold, and the nest starts before the first stitch is complete.
The Stitchmend team
Every fix here is built from manufacturer service manuals and needle-maker specs, and fact-checked against those sources before it goes live. How we work