Sewing machine timing: is it really timing, and can you fix it yourself?
Most "timing" symptoms are actually needle or threading problems. Learn what out-of-time means, the symptom table, the real stop-line, and the DIY fix route.

Most machines that "seem like a timing problem" are not timing problems at all. Roughly four out of ten cases that reach this diagnosis come down to a bent needle, the wrong needle type, or the machine being rethreaded with the presser foot down. Ruling those out takes about five minutes and saves you a repair bill. This page maps the whole timing question: which symptoms genuinely point to it, the quick elimination checklist, what the mechanism actually is, and then the honest boundary between a real DIY fix and the stop-line where you hand it off.
Symptoms that make people suspect timing
Three symptom patterns send people to "timing" as the answer. All three can also come from cheaper causes. The table below gives you the routing.
| Symptom | Timing is likely if... | More likely cause | Quick check |
|---|---|---|---|
| Skipped stitches (consistent pattern) | Persists after new needle + rethread + clean bobbin area | Bent/dull/wrong-type needle; threading error | Install fresh 90/14 needle, rethread with presser foot UP |
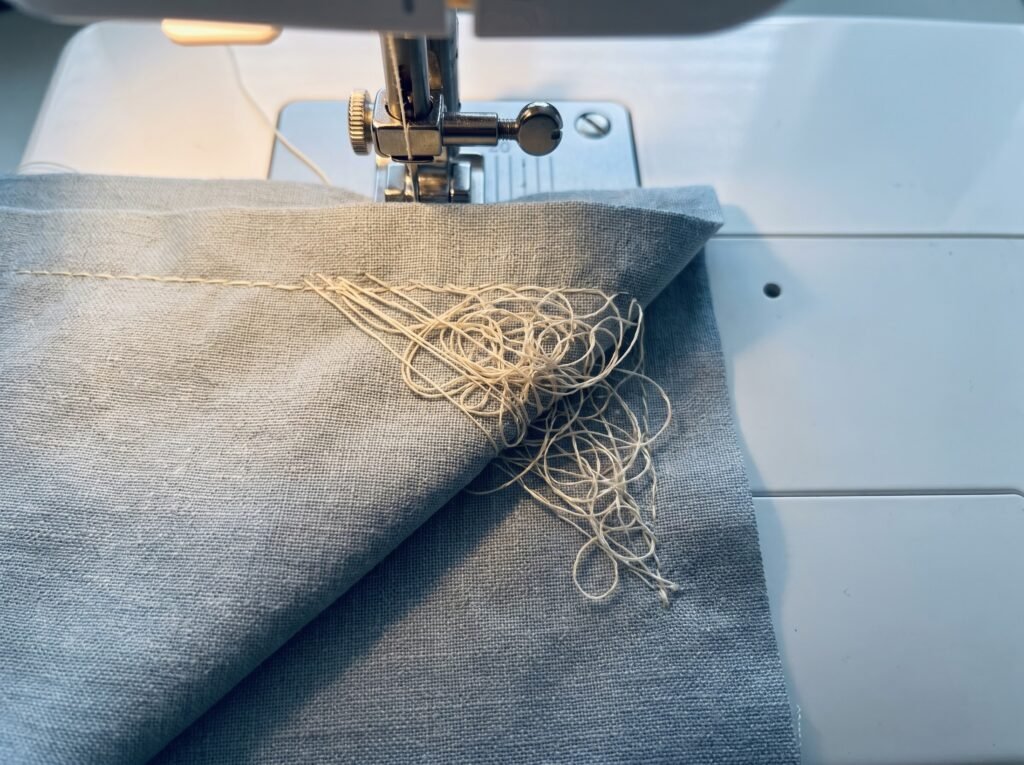
| Bird's nest / heavy bunching underneath | Happens even after complete rethread with foot UP | Presser foot was down during threading, so the tension discs stayed closed and never clamped the upper thread | Raise foot, rethread entire upper path, hold both tails at start of seam |
| Needle striking metal (thud or click) | New needle still strikes; not the bobbin case position | Bobbin case reseated off-center; bent needle; needle installed too high or low | Seat the needle as high as it will go in the clamp before tightening; reseat bobbin case |
| Machine won't pick up bobbin thread at all | All above checks done; hook visibly misses needle loop | Wrong or wrongly-installed needle; bobbin not seated; wrong bobbin class | Fit a fresh correct-system needle pushed fully up, then confirm bobbin class (Class 15/15J, L, M - 15 and 15J are the same physical bobbin) and reseat |
| Rhythmic clunk on every stitch | Started after hitting a pin, a thick seam, or a drop | Needle hit the hook and physically shifted it | Inspect hook tip for a burr or flat spot; if it followed an impact, suspect shifted timing |
Two rows on that table catch most people. Bird's nest is almost never a timing fault. It is the top thread, not the bobbin - threading with the presser foot lowered closes the tension discs so the thread never seats between them, and the machine dumps slack top thread underneath the fabric with every stitch. Rethread with the foot raised every single time. If bunching persists after a complete correct rethread, check that the thread is passing through every guide in the upper path including the take-up lever arm - a missed guide during threading is the next most common cause, and it is still a threading issue, not a hardware fault. The other trap is the "won't pick up the bobbin thread" row, where the needle itself is the usual culprit, not the hook. More on diagnosing all of these at the full troubleshooting guide.
What timing actually means
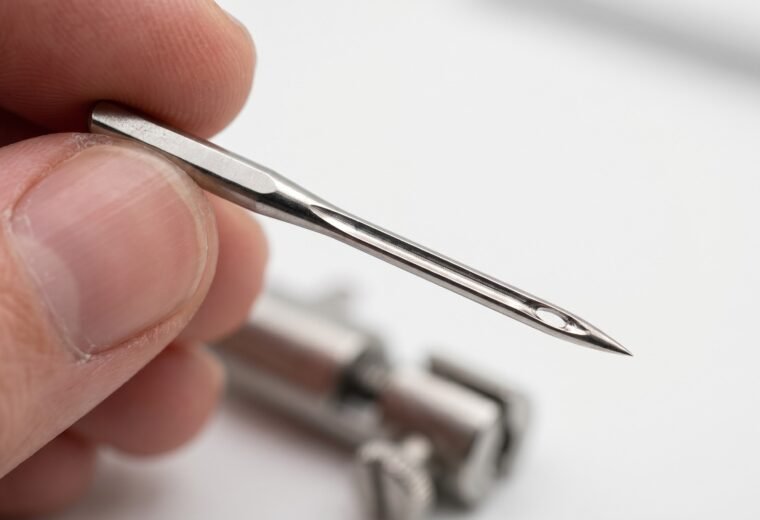
Timing describes the exact moment the hook tip swings behind the needle to catch the thread loop. As the needle descends, it punches through the fabric and carries a loop of upper thread down with it. On the upstroke, that loop opens up just briefly. The hook - the curved metal point that sweeps past the needle, rotating around the bobbin on most modern machines and rocking back and forth on older oscillating-hook models - must arrive at that opening at that instant to snag the loop and interlock it with the bobbin thread. That interlock is the lockstitch.
The Janome JW7630 service manual gives the tolerances in plain numbers: the hook tip must contact the needle when the needle bar has risen 3.25-3.55 mm from its lowest position. Singer's official guidance specifies that the needle eye must sit just below the hook point when the needle is 2.2 mm above bottom. These are tight windows - fractions of a millimeter - which is why a single collision with a pin or a hard seam can shift things enough to start dropping stitches.
"Out of time" means the hook arrives too early, too late, or at the wrong lateral position. The loop has either already collapsed or hasn't formed yet. No catch, no stitch.
For the fuller definition and a diagram of the hook path, see what "out of time" means on a sewing machine.
The elimination gate: rule out needle and threading first
Before any timing diagnosis is valid, four checks must pass. All four are fast. If any one of them fixes the problem, timing was never the issue.
First, learn to read the stitch, because the back of the seam tells you where the fault is before you touch a screw. Sew a short test line on a doubled scrap and flip it over. Two simple reads cover most of what looks like "timing":
| What you see | What it means | Where to look |
|---|---|---|
| Loose loops of top thread on the underside | Top thread is too loose or mis-threaded; the bobbin is pulling it down | Rethread the top with the foot UP; then raise upper tension slightly |
| Bobbin thread dragged up to the top surface | Top thread is too tight, or the bobbin tension is too loose | Lower upper tension a little first; check the bobbin is seated and threaded right |
A balanced lockstitch interlocks in the middle of the fabric, so neither thread shows on the wrong side. When the stitch reads as a tension or threading fault, fix that. A genuine timing fault shows up as skipped stitches, not as loops or a thread pulled to one face. There is a fuller walkthrough at how to read your stitches and the tension side at sewing machine tension.
- Rethread with the presser foot UP. Raised foot opens the tension discs. Lower it only after threading. This single habit prevents the majority of thread nests and a large share of skipped stitches. Brother's support pages include incorrect threading among the leading causes of skipped stitches alongside needle problems and installation errors.
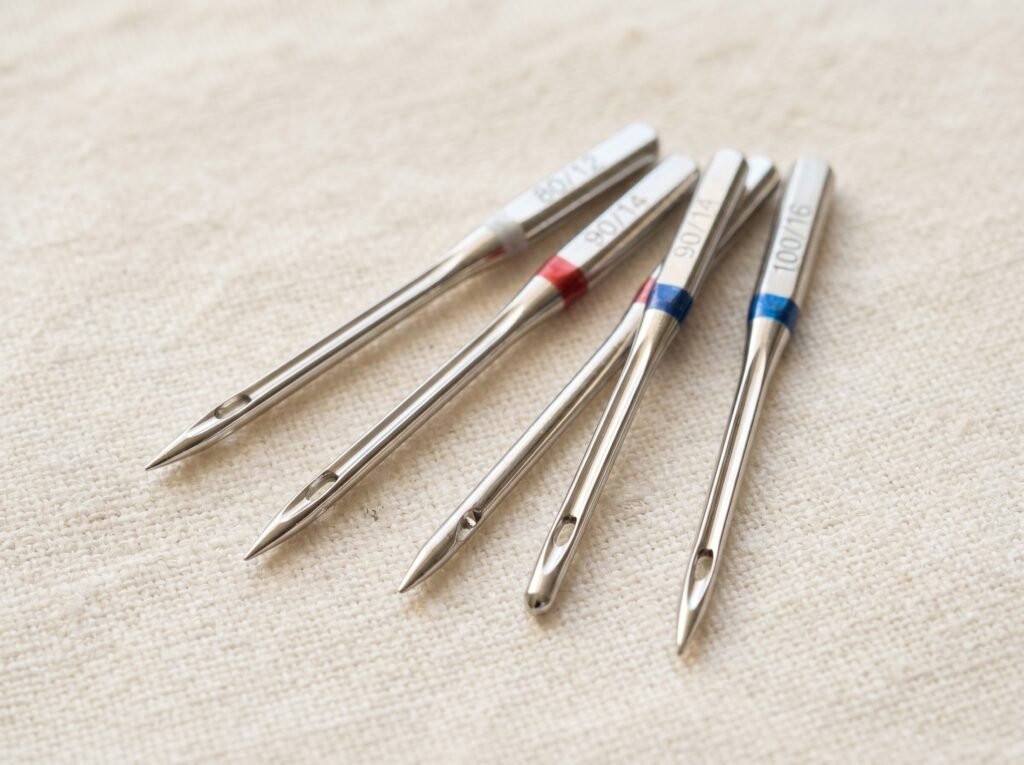
- Install a fresh needle of the correct type and size. Home machines use the 130/705 H system (also marked HAx1 or 15x1) - a flat-shank needle confirmed compatible across Bernina, Brother, Elna, Husqvarna Viking, Janome, Juki, and Pfaff, among others. For knits or stretch fabric, use a ballpoint or jersey needle, not a universal. A size 90/14 is a safe all-purpose starting point; go 80/12 for lighter fabric, 100/16 for heavier. Slide the needle up until it cannot go any higher in the clamp, then tighten the screw. The flat of the shank faces the back on most machines, but check your manual - a few models differ. Schmetz, the leading needle manufacturer, explicitly rejects time-based rules: "It could be three seconds or 20 hours. It would be better to reframe the question to, What are the clues to changing the needle while sewing?" The clues are your guide - replace the needle when you notice shredded or fraying thread, skipped stitches that were not there before, puckering on fabric that usually sews cleanly, or an unusual sound as the needle enters the fabric. Any of those is a clear signal; a dull needle produces skipped stitches that look identical to a timing fault.
- Reseat the bobbin correctly. Wrong bobbin class causes tension failures and jamming that mimic timing. Class 15 and 15J are the same physical bobbin - the J refers to the hook or case style on some machines, not a different-sized bobbin - so the real incompatibility to watch for is Class 15/15J versus Class 66, or metal versus plastic where the machine specifies one. Check your machine's manual for the correct class (common ones are 15/15J, L, and M). For a removable front-load case, drop the bobbin in, pull the thread through the tension slot, then do the drop test: hold the case by the thread tail and give a short, sharp bounce. With correct tension the case slips roughly 1 to 3 inches (about 2.5 to 7.5 cm) and stops. If it falls freely, the thread missed the tension slot or the spring is not engaged; if it does not budge at all, the thread is caught wrong. The fix here is reseating and rethreading, not the small tension screw on the case. That screw is usually set at the factory and on many cases is marked with a dab of yellow paint as a seal; for most owners, turning it is technician territory, and if you ever do adjust it, move it no more than an eighth of a turn at a time and only as a last resort. Drop-in (top-load) bobbins have no removable case to bounce, so for those just confirm the bobbin sits flush, spins the correct direction, and the thread is fully seated in the tension slot.
- Clean the bobbin area. Lint packed under the needle plate or around the feed dogs changes how thread moves. A brush or a vacuum works; compressed air drives lint deeper and can damage delicate parts, so skip it.
Only after all four checks pass without fixing the problem does a timing diagnosis make sense. The dedicated checklist at is it timing or not? walks through each step with visuals.
What actually knocks timing out
Timing is a factory-set relationship between two driven shafts. It does not drift on its own under normal use. Something specific moves it:
- Hitting a pin or a thick seam at speed, which jerks the needle bar and can shift the hook gear.
- A thread jam so severe that the handwheel is forced against the drive, torquing the hook assembly.
- Dropping the machine - even a short fall onto a hard floor can shock the hook mount.
- A needle breaking inside the machine and the fragment striking the hook.
- Years of high-volume use gradually loosening the setscrews on the hook carrier (rare, but real on older machines).
If none of these events happened and the machine went from working to dropping stitches overnight, the cause is almost certainly in the needle-and-threading category rather than timing.
Can you fix timing yourself?
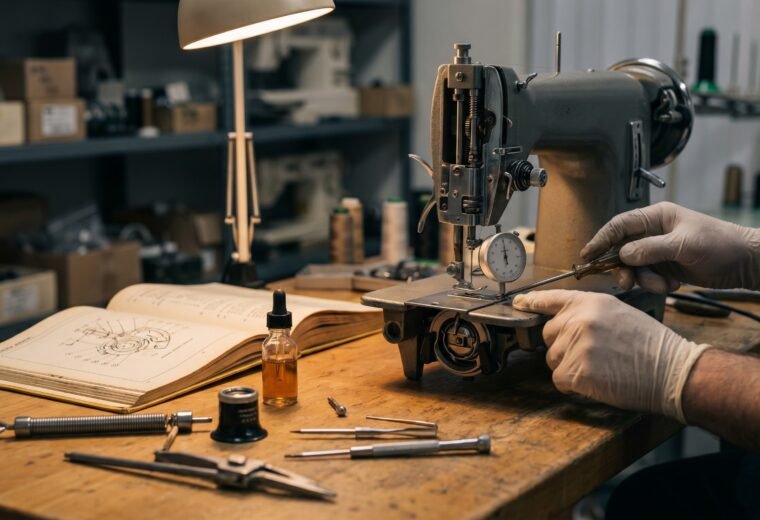
On a mechanical home machine, often yes. Timing adjustment is not electrically dangerous, and the procedure needs no special tools beyond a set of Allen keys. The steps involve removing the needle plate and bobbin housing, turning the handwheel slowly to position the needle at the correct height above its lowest point, then loosening the hook carrier setscrews, rotating the hook until its tip aligns behind the needle at the right position, and retightening. Singer's official guidance specifies the needle eye should sit just below the hook tip when the needle is 2.2 mm above bottom center.
Accessible is not the same as simple. Getting the hook carrier angle correct often takes several tries, and if you tighten the screws with the hook even slightly off, you trade one timing problem for another. The full procedure with step-by-step positions is at how to fix sewing machine timing.
Two situations sit past the DIY stop-line:
- Computerized machines. As a general rule, treat any computerized machine as off-limits for a home timing reset. Beyond the mechanical hook adjustment, these models can involve electronic control and calibration steps that are not documented for owners and are better left to the brand's authorized service. If your machine has a screen and stitch programs rather than a simple dial, take it to a dealer rather than opening it up.
- A bent or burred hook tip. A hook that has been struck hard enough to bend its tip or develop a flat spot cannot be corrected by repositioning - the hook itself needs replacing. Replacement requires sourcing a model-matched hook and in many cases partial disassembly that goes beyond a simple timing reset.
If either of those applies, or if you've attempted the timing adjustment twice and stitches still skip, stop. A basic service that includes timing from a qualified technician typically runs $80 to $150 on a mechanical machine, somewhat higher on computerized models. On an entry-level machine that cost under $150 new, that figure matters - the repair-vs-replace guide has a calculator to work out whether service is worth it. And when to see a technician covers the clear signals that DIY is done.
What the skipped-stitch cluster looks like in practice
Skipped stitches follow a rough order of likelihood based on what repair technicians consistently find first. The needle is the leading cause - bent, dull, wrong type for the fabric, or installed with the flat of the shank facing the wrong direction. Threading failure follows. Bobbin or feed issues come after that. True timing faults sit at the far end of the list - the cause you arrive at after ruling out everything else. iFixit's sewing machine repair resource puts it plainly: persistent skipped stitches after normal fixes "may be a problem with its timing mechanism, which may require professional help" - meaning timing is the diagnosis you reach after exhausting the other paths, not the first guess.
For skipped stitches specifically - the symptom most people connect to timing - the dedicated article at why your machine is skipping stitches covers every cause in ranked order, including needle type matching for stretch and knit fabrics.
Questions answered
How do I know if my machine is out of time?
The clearest sign is a rhythmic skipped stitch that started right after hitting a pin, sewing over a thick seam, or a physical bump to the machine. If a fresh needle, a full rethread with the presser foot raised, and a clean bobbin area do not fix the skipping, the hook timing is a real candidate. Look into the bobbin area while slowly turning the handwheel: the hook tip should swing close behind the needle as it begins to rise. If it clearly misses the needle or arrives far too early or late, timing is off.
Can I fix timing myself on a Brother or Singer?
On most mechanical Brothers and Singers, yes. The hook carrier is typically secured by two or three Allen-key setscrews. You loosen them, rotate the hook to the correct position (needle eye just below the hook tip, needle 2.2 mm above its lowest point), then retighten. It takes patience rather than skill. Computerized models are a different matter: leave those to an authorized dealer rather than opening them up yourself.
Is a bird's nest always a timing problem?
Rarely. A bird's nest - thread bunching on the underside - is almost always a top-threading fault. When the foot is down during threading, the tension discs remain pinched shut and the upper thread passes through without being held, so there is no control over how much thread feeds through. Rethread with the foot raised, hold both thread tails for the first few stitches, and in most cases the bunching stops immediately. Only if it persists after a complete, correct rethread should you consider anything mechanical.
What causes timing to go off in the first place?
A specific mechanical event moves the hook out of its factory position: sewing over a pin at speed, a severe thread jam that forces the handwheel, dropping the machine, or a needle breaking and the fragment striking the hook. Timing does not drift on its own during normal use - if the machine started skipping with no such incident, the cause is almost certainly a needle or threading issue, not timing.
- Schmetz NeedlesHow to Read the Needle Package and Needle FAQ
- Brother Support (official troubleshooting pages)
- Janome JW7630 Service Manual (ManualsLib)
- Singer Machines UK official FAQ
- iFixitSewing Machine device page
The Stitchmend team
Every fix here is built from manufacturer service manuals and needle-maker specs, and fact-checked against those sources before it goes live. How we work