Sewing machine troubleshooting: find the symptom, fix the problem
Start here when your sewing machine acts up. Symptom-to-fix table, the fix-the-obvious-first order, and clear DIY vs. technician boundaries.
Most of the time a misbehaving sewing machine is not broken. The problem is threading, the needle, or the bobbin, and each of those is fixable in a few minutes at your work table. What feels like a mechanical failure is usually something you changed a few minutes earlier.
This page is a routing map. Find your symptom below, confirm the likely cause, and follow the link to the full fix. The master table covers the most common complaints. Below it is the fix-the-obvious-first sequence to run before anything else, plus a guide to the handful of symptoms that genuinely need a technician.
Fix-the-obvious-first: run this before you do anything else
This four-step sequence costs you three minutes and resolves the majority of sewing machine problems, regardless of symptom. Do them in order - earlier steps often make later steps unnecessary.
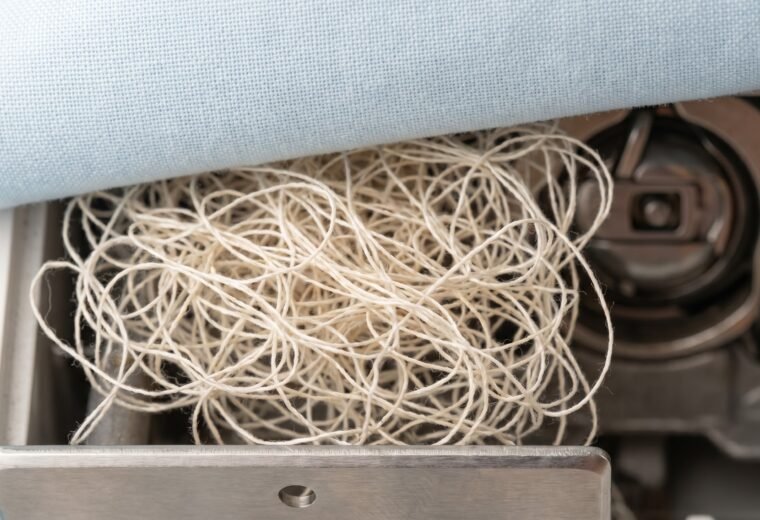
- Rethread the top with the presser foot UP. Lower the foot, clip off both threads, then raise it again before you touch the spool. The tension discs are spring-loaded; they only open when the foot is lifted. Thread seated with the foot down skips the discs entirely, and the machine cannot form a stitch correctly. This single mistake causes most bird's-nest tangles and most "tension" complaints.
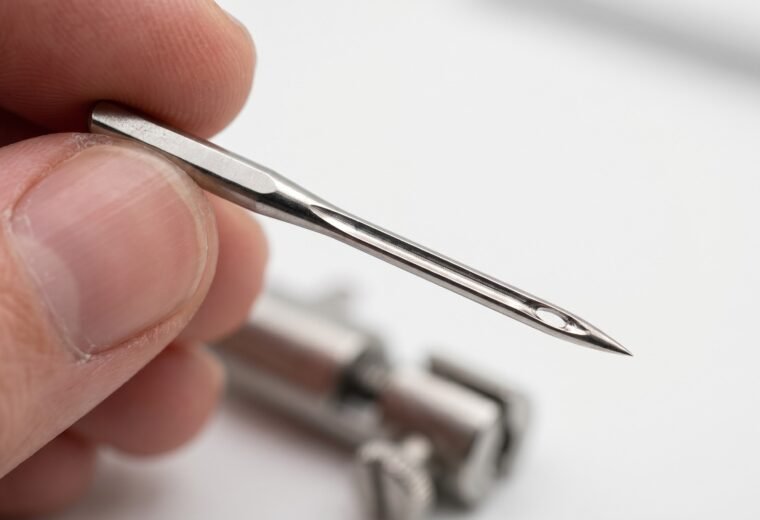
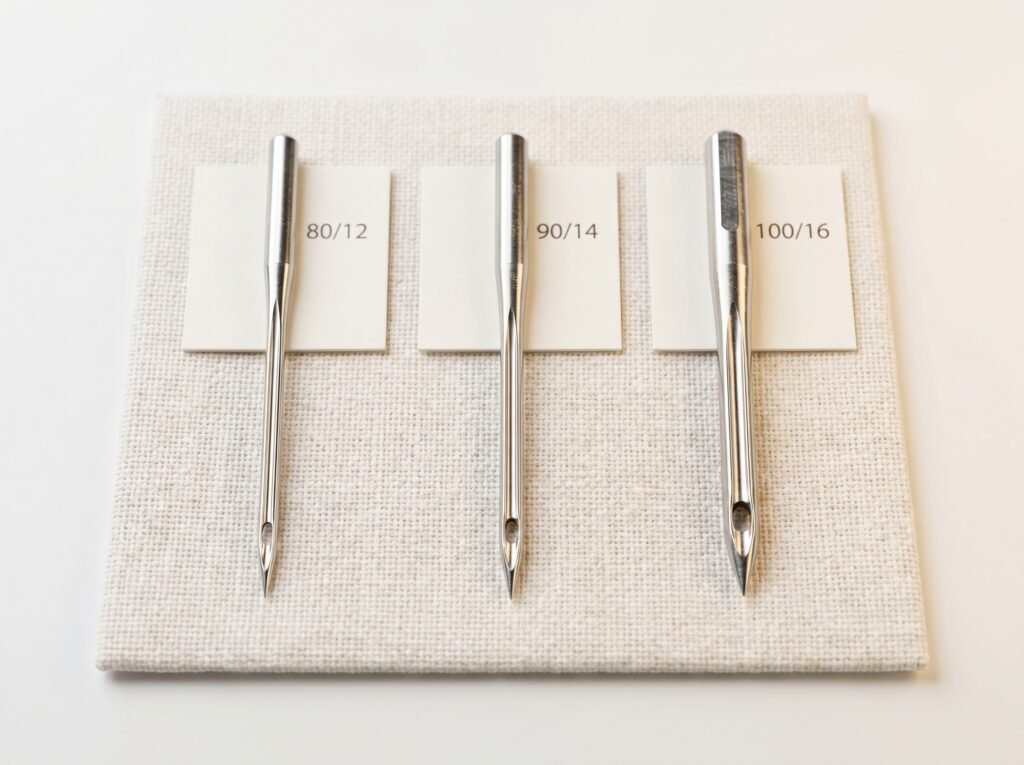
- Put in a fresh needle - the correct size for your fabric. Home machines use the 130/705 H system (flat shank, scarf groove). Sizes run in dual notation: 80/12 for light cotton, 90/14 for medium wovens, 100/16 for denim or canvas. Knits and stretch wovens need a ballpoint or stretch needle, not a universal - the rounded tip slips between the loops instead of piercing and splitting them. Seat the new needle fully - slide it up into the clamp as far as it will go, until you feel it hit the stop; the flat of the shank faces the back on nearly all home machines (check your manual for exceptions). A dull or slightly bent needle causes skipped stitches, thread breaks, and fabric snagging - and needles go dull faster than most people expect, roughly every 8 hours of sewing time.
- Reseat the bobbin. Remove the bobbin, blow out any visible lint with a soft brush (never compressed air - it drives lint deeper), then reinstall the bobbin so the thread unwinds in the direction your machine specifies. Follow the arrow molded or printed inside the bobbin compartment - the correct direction varies by machine, so trust the arrow rather than any rule of thumb. Thread the tail through the slot and pull gently until you feel slight resistance - that is the tension spring engaging. Using the wrong bobbin class for your machine is a genuine cause of jamming and poor tension. Class 15 and 15J bobbins are the same physical size and interchangeable (the J designation describes the hook and bobbin-case design, not a physically different bobbin). The real incompatibility is Class 15 versus Class 66 - those are different sizes and will not work correctly if swapped. Check the bobbin class printed in your manual or on the bobbin compartment cover.
- Clean the feed-dog channel. Remove the throat plate (usually two small screws or a slide latch), pull out the bobbin case, and brush all lint from around the feed dogs and out of the bobbin housing. Lint packed around the dogs affects thread tension and fabric feeding even when it looks minor.
Run a test seam on scrap after each step. If the problem clears, you are done.
Master symptom table
The table below covers the most common complaints. Likely causes are ranked: start at the top of the list, not the bottom. Each "Fix" column links to the full Stitchmend guide for that symptom when one exists.
| Symptom | Most likely cause (ranked) | Quick fix / guide | DIY or technician? |
|---|---|---|---|
| Thread bunching / bird's nest under fabric | 1. Top thread not seated in tension discs (presser foot was DOWN during threading) 2. Top thread mis-routed past the take-up lever 3. Wrong bobbin class for the machine |
Rethread with presser foot UP; hold both tails under the foot at the start. See bird's nest and bunching. | DIY - almost always the top thread, not the bobbin |
| Skipped stitches | 1. Needle bent, dull, wrong size, or wrong type for fabric 2. Needle not pushed fully up into clamp 3. Top thread not in tension discs 4. Timing desync (last resort) |
New needle first - always. Knits and stretch need a ballpoint (jersey) or stretch needle, not a universal. See skipped stitches. | DIY for steps 1-3; timing check may need a tech |
| Loops of thread on the underside | 1. Top thread too loose or not threaded through tension discs 2. Top thread mis-routed (skipped a guide) |
Rethread top completely with foot UP. Do NOT reach for the tension dial first. See tension diagnosis. | DIY |
| Bobbin thread pulled to the top surface | 1. Top tension too tight 2. Top thread mis-threaded or caught on a spool cap |
Rethread top; check spool cap orientation. Adjust top tension down one number at a time. See tension diagnosis. | DIY |
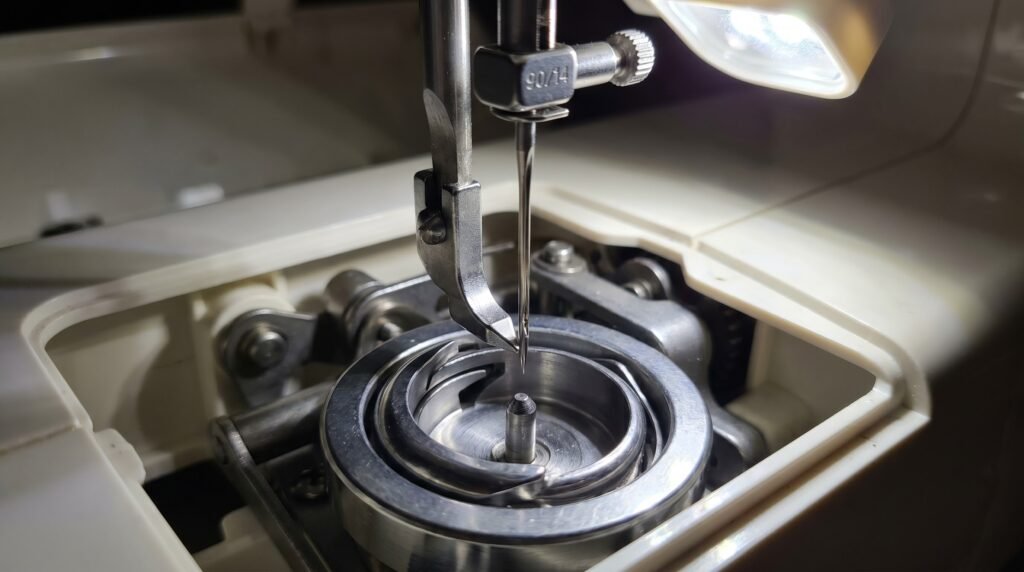
| Machine won't pick up bobbin thread | 1. Needle installed backwards or not fully seated 2. Bobbin empty or installed wrong direction 3. Wrong or poor-fit needle brand - Singer advises only Singer needles in Singer machines, since a slightly off shank or eye height can stop the hook catching the loop 4. Hook-to-needle timing off |
Reinstall needle (flat back, full height); try a fresh needle of the brand the machine maker specifies; reinstall bobbin per manual. See not picking up bobbin thread. | DIY steps 1-3; timing = borderline DIY (see below) |
| Fabric not feeding / machine "sewing in place" | 1. Stitch length set to 0 2. Feed dog drop lever in lowered position 3. Presser foot pressure set too low 4. Lint packed around feed dogs |
Check stitch length (set to 2.0-2.5 for normal seams); confirm drop lever is raised; clean the feed channel. See fabric not feeding. | DIY for all four causes |
| Needle keeps breaking | 1. Needle too fine for fabric weight 2. Needle not fully up in clamp (catches throat plate) 3. Pulling or pushing fabric while sewing 4. Wrong needle for presser foot (embroidery needle in zigzag foot, for example) |
Match needle size to fabric; let feed dogs move the fabric. See needle keeps breaking. | DIY; repeated breaking on the same machine with new needles may signal hook damage - tech territory |
| Handwheel hard to turn or stuck | 1. Thread jam around the bobbin case or under the throat plate 2. Dried, gummy oil seized in the hook race 3. A broken needle tip or fabric fragment lodged in the mechanism |
Unplug, then clear any tangled thread from the hook race and bobbin area; clean and oil a gummed hook race; check for a metal fragment. See handwheel stuck. | DIY for 1-3; if the handwheel is still locked after clearing - tech |
| Handwheel spins freely but the needle does not move | 1. Bobbin winder spindle still pushed to the right (engaged) after winding - it disengages the needle drive on purpose 2. Clutch knob on the handwheel left loosened (older machines with a separate stop-motion knob) |
Push the bobbin winder spindle back to the left (sewing position); on a machine with a stop-motion knob, retighten it. See handwheel stuck. | DIY |
| Machine jammed (needle won't move, loud grinding) | 1. Thread tangle in the hook race or bobbin case 2. Needle broke off inside the machine 3. Fabric pulled down into the machine |
Unplug first. Clear thread tangles with scissors and tweezers; remove broken needle fragment before sewing again. See machine jamming. | DIY to clear a thread jam; broken internal parts = tech |
| Machine won't turn on / no power | 1. Foot pedal or power cord not fully seated 2. On/off switch off 3. Blown fuse in the plug 4. Internal electrical fault |
Check cord and pedal connections. Consult your machine's manual for fuse location and rating. Unplug before inspecting any connection. | External connections: DIY. Internal electrical: technician only - do not open the motor housing. |
| Stitch length or tension erratic (computerized machines) | 1. Firmware or sensor glitch 2. Lint on the presser foot sensor 3. Incorrect stitch program selected |
Power off, unplug for 30 seconds, power back on (clears most sensor errors). Clean sensor areas per your manual. | DIY reset first; persistent errors on a computerized machine = authorized service center |
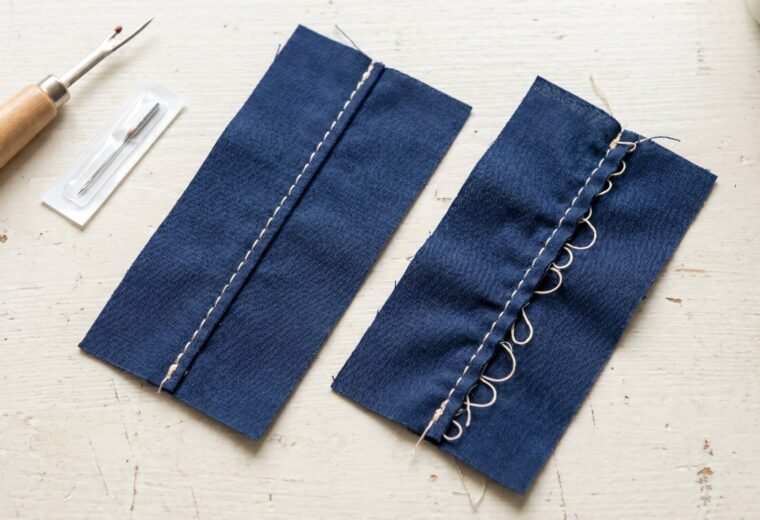
How to read the stitch before touching the tension dial
The finished stitch tells you exactly where the problem lives - if you know what to look for. Flip your test seam over and study both sides.
Loops hanging on the underside mean the top thread is running too loose, or (far more often) the top thread is not properly seated in the tension discs at all. Turning the tension dial higher will sometimes mask this symptom without fixing it. The right first move is always to rethread - with the presser foot up - before touching any dial.
When the bobbin thread is visible on the top side of the fabric, the diagnosis flips: top tension is gripping too hard, or something is catching the top thread and starving it (a rough spool cap edge, a nick on a thread guide, the thread caught behind the spool holder). Check all of those before increasing the bobbin tension.
A perfect stitch - interlocked thread balanced exactly in the middle of the fabric - requires both threads tensioned equally. Our full tension diagnosis guide walks through how to read every stitch variation and which dial to adjust, and in what order.
Bobbin tension: the drop test, and where to stop
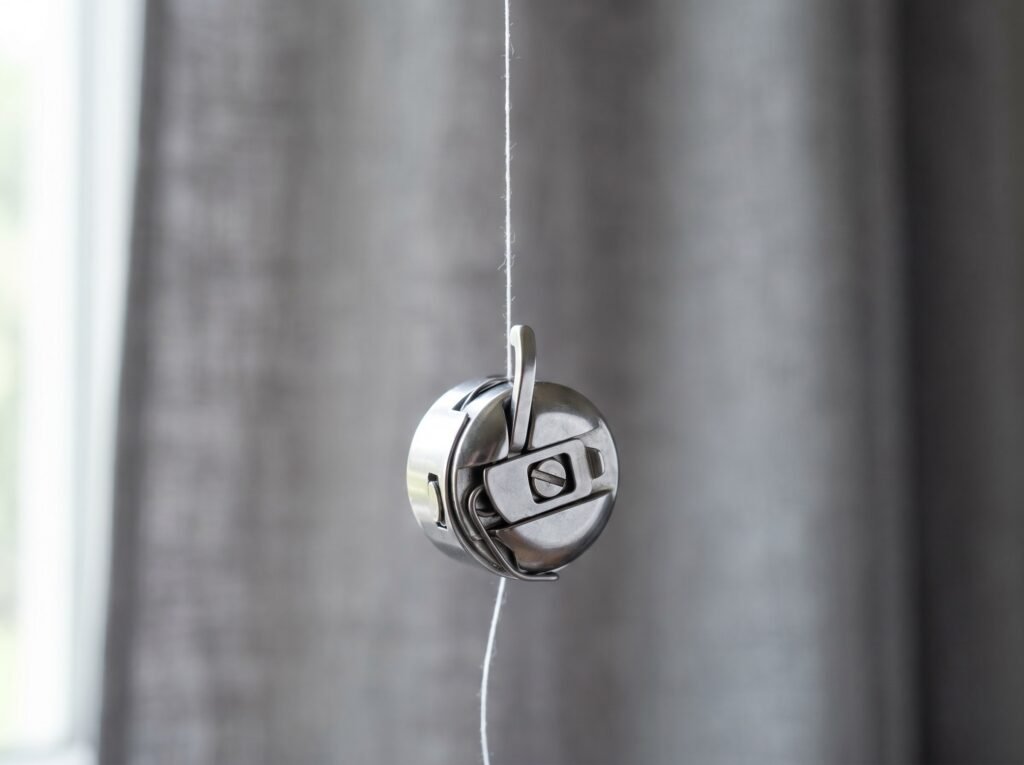
The bobbin-case drop test is the standard quick-check. Hold the bobbin case (front-load machines) or a filled bobbin in its case (drop-in machines) by its thread tail, letting the case hang freely. Give the thread a short, gentle jerk - not a hard pull, just a quick flick of the wrist. A correctly tensioned case will slip about 1 to 3 inches and stop. If it free-falls, the tension spring is too loose; if it won't budge at all, it is too tight.
Most users can adjust the tiny flat-head screw on the bobbin case - quarter turns only, clockwise to tighten - and the drop test confirms whether the adjustment worked. But many manufacturer bobbin cases ship with a paint dot or seal on that screw, factory-set at the correct tension. If your screw has a colored paint seal, the manufacturer's intent is that end-users leave it alone; adjusting through a seal moves you into technician territory. Get a spare case, adjust that one, and keep the original sealed case as your baseline. Our full drop-test guide covers both drop-in and front-load setups step by step.
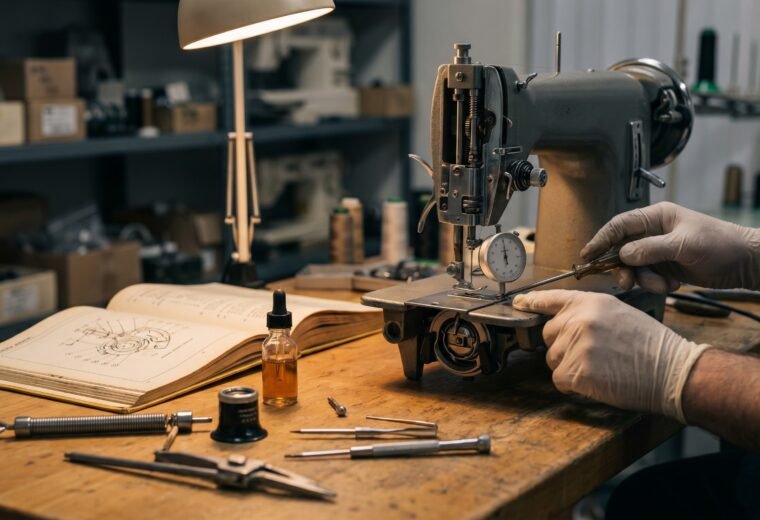
Timing: how to know if it's really the issue
Timing gets blamed for a lot of symptoms it didn't cause. A bent needle, incorrect threading, or the wrong needle size produces missed stitches that look identical to a timing problem - and all three are far more common than genuine timing failure. Before concluding the timing is off, work through the full fix-the-obvious-first sequence above, then try a fresh 90/14 needle.
True timing failure - where the hook and needle are no longer synchronized - produces a specific set of clues: the machine consistently misses stitches on one side of the needle position only, you hear the needle ticking against the hook or bobbin case, or needles break for no visible external reason. Those three together, after a new needle and full rethread, are a strong signal.
A timing adjustment is DIY-possible on most home machines. The target is machine-specific, so check your model's service spec: on many machines the hook point should pass behind the needle when the needle has risen roughly 2 to 2.5 mm from its lowest position (one Singer Machines UK guide cites 2.2 mm for its hook), with the needle eye just below the hook point. To get there you loosen the hook-gear screws (usually two or three hex-key screws), rotate the hook to the target position, and retighten. It requires patience, a good light, and a 90/14 test needle installed before you adjust.
The honest stop-line: if the feed-dog timing also needs adjustment (a separate cam-and-shaft system on most machines), or if the machine uses internal gear synchronization that requires a service fixture, stop and book a technician. Forcing those without the right fixture usually turns one problem into several. Our dedicated pages on what timing failure actually means and how to tell timing from other symptoms will help you confirm before you open the machine.
Symptoms that genuinely need a technician
Most repair decisions are straightforward once you know what you're looking at. Here is the specific list of symptoms where DIY stops and a technician starts.
- Electrical faults. Anything inside the motor housing, control board, or wiring harness. Unplug the machine, check the external cord and foot pedal, then call service if the problem persists. Never open the motor housing or control board yourself.
- Timing that does not respond to a single hook adjustment. If you adjusted the hook, re-tested with a fresh needle, and still have consistent missed stitches or needle-tick sounds, the feed-dog timing or another internal component may also need calibration. A technician has the fixtures for this.
- Hook or needle plate physically damaged. A chipped hook race or a gouged throat plate produces consistently rough stitches and broken needles. These are replacement parts, not adjustments. See our throat plate replacement guide and bobbin case replacement guide for parts you can reasonably swap yourself; a damaged hook race is technician work.
- Repeated needle breakage with no clear external cause. If a new, correctly-installed needle breaks on the first seam, something inside the hook path is out of position or damaged. Stop sewing and have the machine checked.
- Complex internal repairs on a machine worth keeping. A basic shop service (clean, oil, adjust) usually costs a meaningful fraction of a budget machine's price, and premium European brands such as Pfaff, Bernina, and Viking run higher. On an inexpensive machine, that math may not work out - get a written quote first, and our repair-vs-replace guide will help you decide. The real boundary is not dollar value but machine complexity: timing and cleaning on a mechanical machine are DIY-achievable with care; internal control board repairs, gear-synchronization calibration, or any electrical fault on a computerized machine belong with an authorized service center regardless of what the machine cost.
Our when to see a technician guide covers the decision framework in more detail, including how to find an authorized service center for your brand.
Quick reference: the most common beginner mistakes
A few patterns show up across machines, brands, and skill levels. Worth keeping posted somewhere visible.
- Threading with the presser foot down. Every time. It closes the tension discs, and the thread goes in the wrong place.
- Starting to sew without holding both thread tails. The first few stitches pull loose thread down into the hook race and create the bird's nest from underneath.
- Using the same needle for an entire project. A 90/14 universal goes dull by the end of a denim jacket. New needle = faster, cleaner stitching and far fewer skipped stitches.
- Setting stitch length to 0 by accident (often when selecting a stitch pattern) and then thinking the machine is broken because the fabric won't move.
- Reaching for the tension dial before rethreading. The dial rarely needs moving. The threading does.
If you're past the basics and working a specific problem, use the table above to route to the right guide. Most paths are short.
Questions answered
Why does my sewing machine make a loud clunking noise but still sews?
A rhythmic clunk usually points to a piece of broken needle in the hook race, a nick on the hook or bobbin case, or a loose throat-plate screw vibrating with each stitch. Remove the throat plate, pull the bobbin case, and inspect the hook race for metal fragments or a visible chip. A sharp metal edge in the hook path means stop sewing until it is found and resolved.
My tension dial is set correctly but stitches still look loose. What am I missing?
Almost certainly a threading problem rather than a tension calibration problem. The top thread must pass through every guide, through the tension discs (only possible with the presser foot UP when threading), and through the take-up lever in the correct direction - right to left on most machines. Skip any one of these and the dial reading is meaningless. Rethread from scratch with the foot raised and test again before adjusting the dial. If rethreading genuinely changes nothing, run your finger along each thread guide and around the spool cap edge - a small burr or rough spot on the cap can intermittently snag thread and mimic a tension fault. A nicked guide on an older machine does the same. Replace a damaged spool cap; smooth a minor guide nick with fine emery cloth or have the guide replaced.
Can I use WD-40 or 3-in-1 oil on my sewing machine?
No. WD-40 is a water displacer and solvent, not a lubricant, and it leaves a residue that gums up plastic and metal parts over time. 3-in-1 and household oils are too heavy and go rancid inside sealed mechanisms. Use only clear sewing-machine oil - a very light mineral oil - in the specific oiling points your manual identifies. See our why WD-40 damages sewing machines guide for the full explanation.
How often should I change the needle?
The common guidance from machine and needle manufacturers is every 8 hours of sewing time, every new project, or at the first sign of skipping or snagging - whichever comes first. Needles are among the cheapest consumables in sewing - a multi-pack of universals costs little more than pocket change, and the cost of a skipped stitch on a finished garment is far higher.
My machine was working fine and suddenly started skipping every few stitches. What happened?
The most likely single cause is a needle that bent slightly on a seam allowance edge, a pin, or a thick fabric layer. A barely bent needle is invisible to the eye but enough to desync from the hook at the moment of loop capture. Replace the needle first - a 90/14 universal - and retest. If skipping continues on a new needle with correct threading, see the full skipped stitches diagnostic.
- Singer official support (help.singer.com)
- Brother USA official support (support.brother.com)
- SCHMETZ Needles official site (schmetzneedles.com)
- Singer Machines UK official FAQ (singermachines.co.uk)
- iFixit repair guide (ifixit.com)feed-dog cleaning procedure, drop-feed lever check, throat-plate removal
The Stitchmend team
Every fix here is built from manufacturer service manuals and needle-maker specs, and fact-checked against those sources before it goes live. How we work