Sewing machine not picking up bobbin thread: fix it in four ranked steps
Needle goes down but won't catch the bobbin thread? Four ranked fixes: rethread with foot up, seat the bobbin correctly, swap the needle, clean the hook, plus when to suspect timing.
Your needle drops through the fabric and comes back up empty: no loop, no bobbin thread, just a single strand of top thread going nowhere. Nine times out of ten the fix takes under five minutes, because the cause is almost always one of four things: the upper thread was never seated in the tension discs, the bobbin is sitting in the wrong orientation, the needle is bent or inserted incorrectly, or the hook area is packed with lint. Work through them in the order below, and you will almost certainly be sewing again before you finish reading.
Step 1: Rethread the top, with the presser foot up
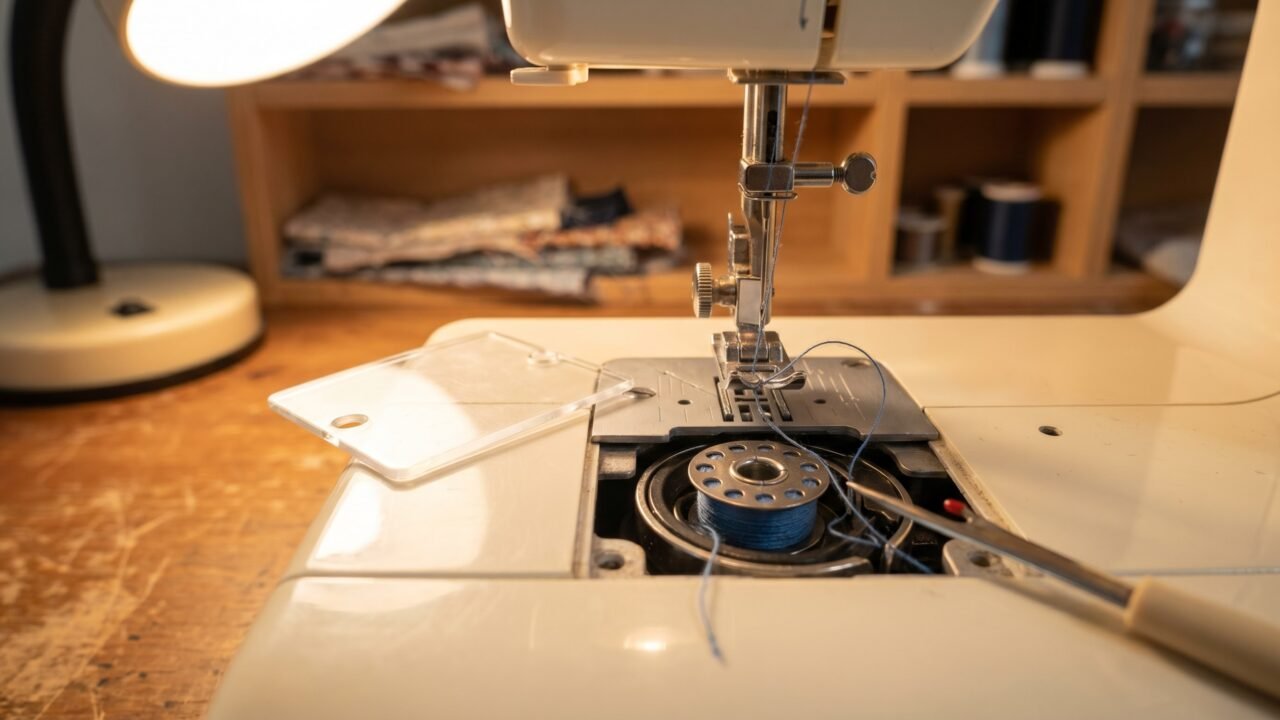
Pull every bit of thread off the machine and start fresh. Before you even touch the spool, raise the presser foot lever. This is the step most people skip, and it is the reason the problem keeps coming back.
The tension discs on your machine only open when the presser foot is up. Thread with the foot down and the thread never enters the discs; it just drapes over them. The needle goes down, and the hook below has nothing to catch because the top thread has no controlled tension behind it. Singer's official threading guide makes this point directly: raise the presser foot lifter before threading "so that the thread can be properly seated in the tension mechanism and take up lever."
With the foot up and the needle at its highest position, follow your machine's threading diagram precisely. Make sure the thread sits inside the take-up lever slot (you will hear a small click or feel slight resistance when it is properly seated on most machines). Leave a tail of about six inches hanging down from the needle.
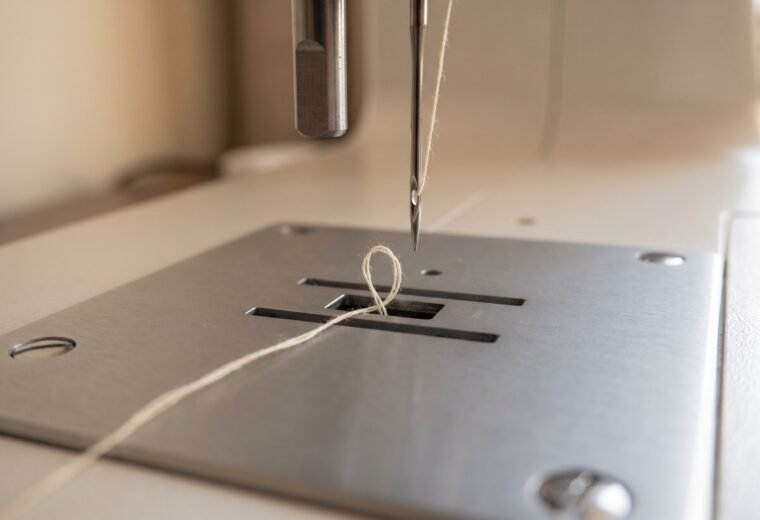
Now do the handwheel maneuver to pull up the bobbin thread. Hold that top thread tail lightly with your left hand (lightly, so the thread can run) and use your right hand to turn the handwheel toward you (counterclockwise). Singer's support documentation is clear on direction: "Always turn the handwheel towards you (counterclockwise). Turning it in the opposite direction can disrupt your machine's timing, requiring a visit to a service center." Turn it one full revolution. The needle will go down into the bobbin area and come back up, and the top thread will bring a small loop of the bobbin thread up through the needle plate. Pull that loop out with a seam ripper or pencil point, draw out about six inches of both threads, and lay them back behind the foot before you sew.
If no loop appears, the top thread is not engaging the hook at all, which means you need to check the next three steps before assuming anything is broken. See our full sewing machine troubleshooting guide for the broader decision tree.
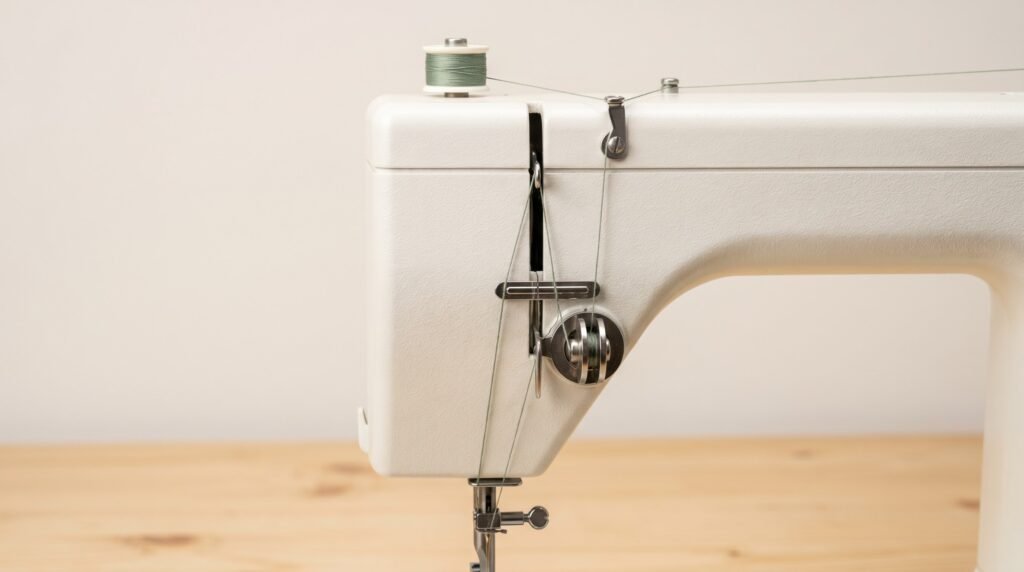
Step 2: Reseat the bobbin (direction matters more than you think)
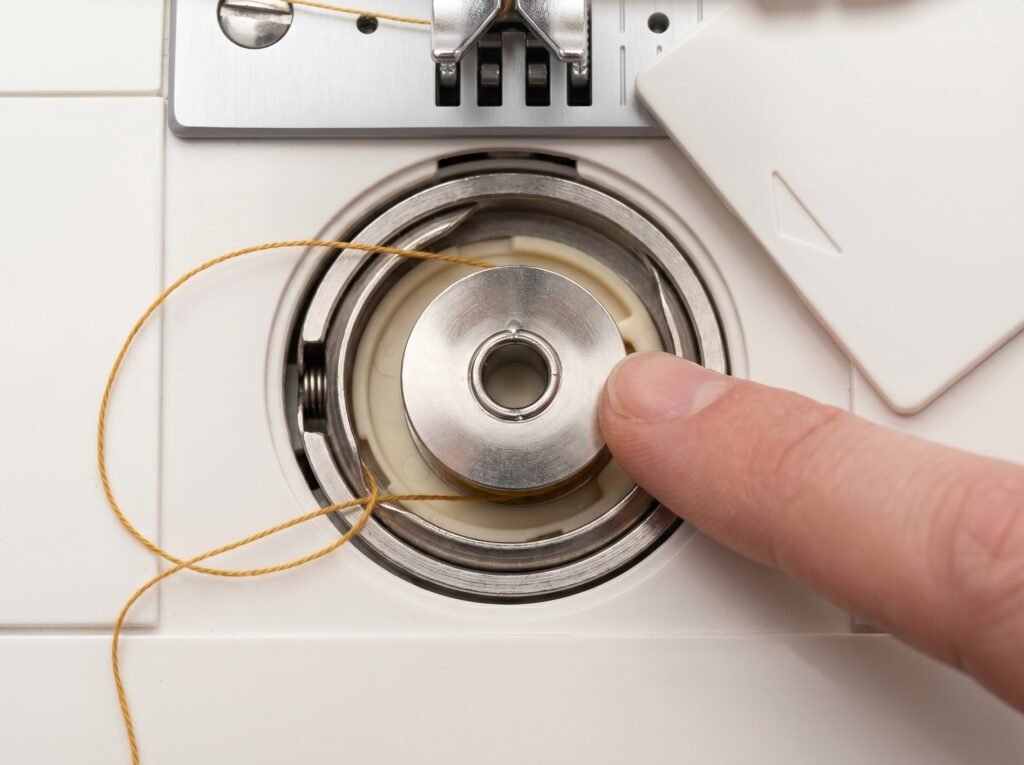
Remove the bobbin entirely. Look at the thread coming off it: on almost all drop-in (top-load) machines the bobbin thread must unwind to the left as you look down at it. Brother's support documentation for multiple models states this plainly: "Place the bobbin in the bobbin case so that the thread unwinds to the left." If the bobbin is oriented the other way, the thread tension is wrong and the hook cannot form a reliable stitch loop.
While the bobbin is out, run a fingernail or a small brush around the bobbin race and the area under the needle plate. Even a thin mat of lint here can deflect the thread just enough to miss the hook tip. Pull out any loose thread ends. A single stray strand caught in the race is enough to prevent the loop from forming cleanly.
When you drop the bobbin back in, guide the thread through the slot or tension spring on the bobbin case. Brother's service notes warn that simply laying the thread in the slit is not enough: "If the thread is simply placed in the slit in the needle plate cover, the bobbin thread will not be correctly threaded, resulting in poor sewing performance or incorrect thread tension." The thread needs to seat under the tension spring, not just touch it.
Leave four to six inches of bobbin thread hanging loose and replace the needle plate cover (if you removed it). Then repeat the handwheel maneuver from Step 1. Our bobbin threading guide covers class differences (Class 15, Class L, and others) if you are not certain which bobbin your machine takes; a mismatched bobbin sits slightly high or low in the race and can also cause pickup failure.
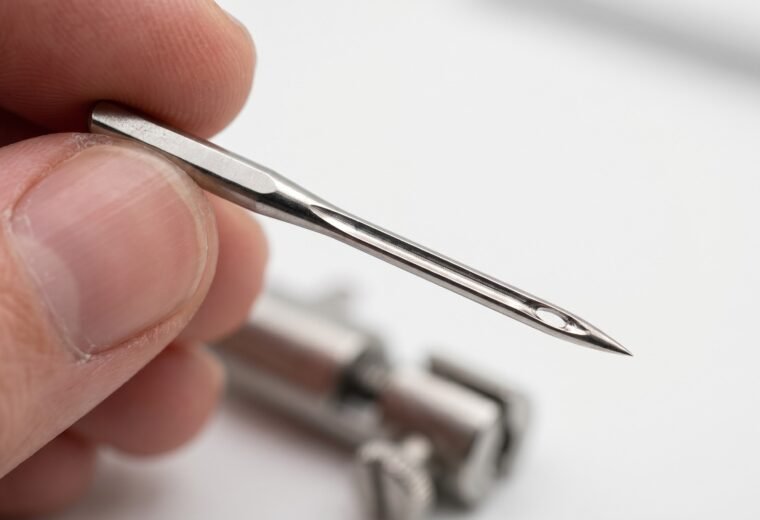
Step 3: Install a fresh needle, correctly oriented
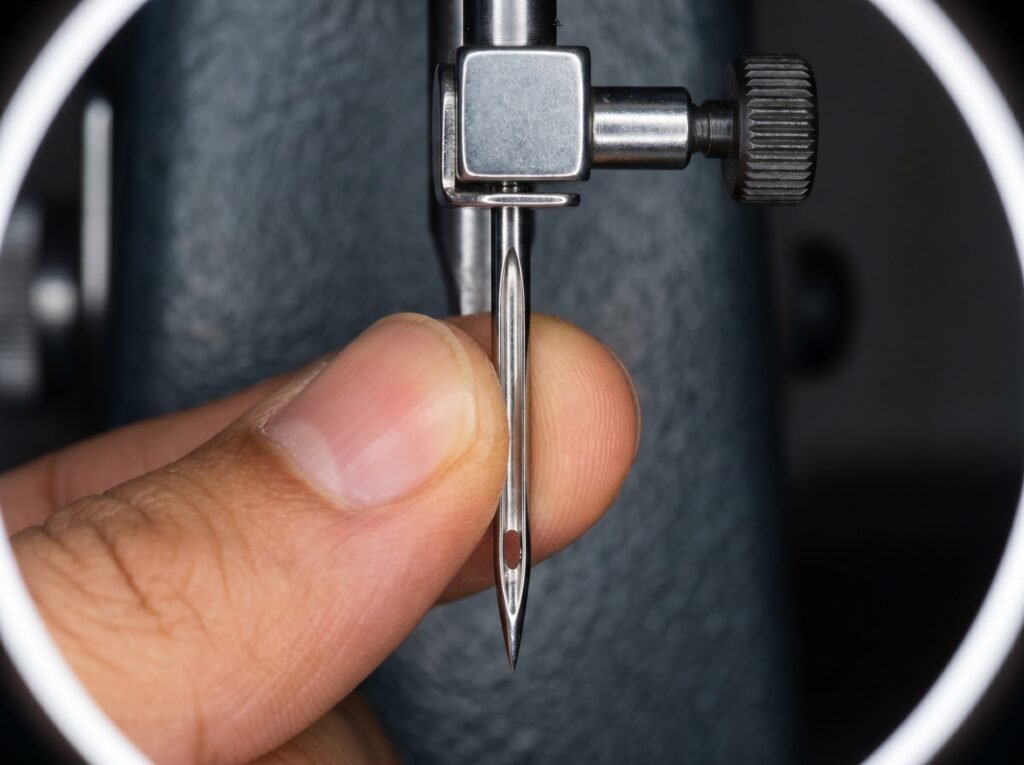
A needle that is bent, dull, or pushed in even a millimeter too low will consistently miss the hook. The hook tip passes through a very specific window in the needle's path, and if the needle is at the wrong height, the hook sweeps by too early or too late to catch the thread loop. Brother's troubleshooting documentation puts needle condition at the top of its check list for this exact symptom, recommending: "Install a new needle with the flat side of the needle facing the back."
Home machines use the 130/705 H system (also written HAx1), a flat-shank needle that fits every conventional home machine from Singer, Brother, Janome, Bernina, and others. Sizes run in dual Euro/US notation: an 80/12 is right for quilting cotton and lightweight wovens, a 90/14 handles medium-weight wovens like linen and light denim. Slide the new needle up into the clamp until it stops - there should be no gap between the needle shank and the top of the clamp slot - then tighten the thumb-screw firmly. If the flat of the shank is facing any direction other than straight back, the needle-to-hook geometry is off and pickup will fail even with a brand-new needle.
A note on stretch and knit fabrics: if you are sewing jersey, swimwear, or any elastic fabric, a standard universal needle (130/705 H) is often the wrong choice for this symptom. Schmetz's technical data for their stretch needle confirms that a shallower shank design "means that the needle is closer to the hook, which also helps to avoid skipped stitches," the same hook-miss geometry that produces pickup failure. Try a stretch needle (130/705 H-S, sizes 75 or 90) before assuming anything mechanical is wrong.
Some Singer machines are particularly sensitive to needle brand. A handful of Singer hook geometries have tighter tolerances on needle shank diameter, and certain third-party needles (even genuine 130/705 H) can sit fractionally off-center. If you have tried a fresh Schmetz and the machine still misses, swap to an Organ needle (Brother's recommended brand) or to a Singer-branded needle and test again. This is a known, if uncommon, interaction; it is not a sign the machine needs a service call.
For more on needle types and which works for which fabric, the needles overview is the starting point.
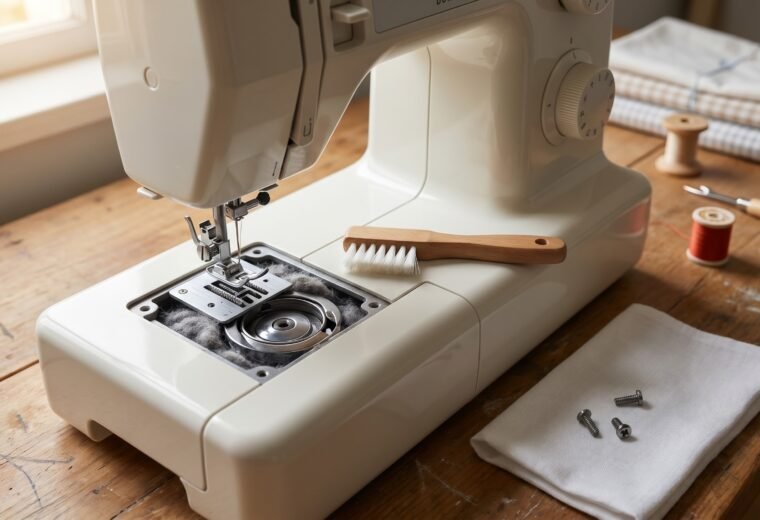
Step 4: Clean the hook area
If the first three steps did not solve it, the hook area itself may be blocked. Remove the needle plate (two Phillips screws on most machines), take out the bobbin, and use a stiff lint brush or a vacuum with a narrow nozzle to clear the race channel around the hook. Never use compressed air; it pushes lint deeper into the machine rather than removing it, and can drive debris into bearings and the feed-dog mechanism.
Look at the hook tip while you have the area open. A nick or burr on the hook (sometimes invisible without a magnifying glass) catches thread instead of looping it cleanly. Run a fingertip carefully around the hook point. If you feel a roughness, the hook is damaged and will need to be replaced or polished by a technician. That is the correct stop-line here: a damaged hook is not a home repair.
A clean machine picks up the bobbin thread reliably. Our guide on how to clean a sewing machine covers the full procedure, including the feed-dog slots and the take-up lever housing that most people miss.
When it is (and is not) a timing problem
If all four steps above fail (fresh needle correctly installed, clean machine, bobbin seated properly, rethreaded with foot up) timing is a real possibility. "Out of time" means the hook and the needle are no longer synchronized. The hook sweeps past the needle at the wrong moment and misses the thread loop entirely.
Timing failure can look identical to threading failure, which is why we work through everything else first. In the team's experience, many machines brought in for suspected "timing" turn out to have a simpler cause. A machine that sews correctly on some fabrics but misses on others is almost certainly a needle or thread issue. A machine that will not pick up the bobbin thread at all, on any fabric, after fresh threading and a new needle, is a more serious candidate for timing investigation.
The good news: basic timing adjustment on many older mechanical machines is a DIY procedure, and our is it timing or not guide walks through the diagnostic clearly. On most modern computerized machines the hook position is set at the factory and is not intended as a home-user adjustment, so the guide will help you identify which category your machine falls into before you attempt anything. The stop-line is the internal hook carrier: if the hook itself has to be repositioned on its shaft, that takes a dial indicator and calibrated feel that most home sewers should not attempt without training.
Quick reference: symptom-to-cause table
Use this table to map what you see to the most likely cause before you start pulling things apart. The "first check" column tells you where to start; work left to right.
| What you see | Most likely cause | First check |
|---|---|---|
| No loop appears after one handwheel turn, machine was just rethreaded | Top thread not in tension discs (foot was down during threading) | Rethread with presser foot fully raised |
| No loop; machine makes a clunking sound when needle goes down | Bobbin seated wrong direction, or lint jam in race | Remove bobbin, clean race, reseat thread-left |
| Inconsistent: sometimes picks up, sometimes misses | Bent or low-seated needle | Replace needle, push fully up, flat side back |
| Miss on knits only; works fine on wovens | Wrong needle type for stretch fabric | Install stretch needle (130/705 H-S, size 75 or 90) |
| No loop after all four steps above; misses on every fabric | Hook timing off, or hook tip damaged | Inspect hook for burr; check timing (timing guide) |
| Loop forms but tension is very loose or uneven on the underside | Bobbin not threaded through tension spring, or wrong bobbin class | Reseat bobbin through the tension spring; check class match (bobbin guide) |
A few things that do not help
Turning the tension dial is the first thing many people reach for. Resist it. The dial controls how tightly the discs grip the thread, but if the thread is not inside the discs at all (the foot-down threading mistake), the dial has nothing to grip. Adjusting tension before rethreading is like tightening a knot that is not tied yet. Get the thread properly seated first, and in most cases the default tension setting (usually marked 4 or "normal" on the dial) will be exactly right.
If you see skipped stitches rather than a complete failure to pick up, that is a related but different symptom with its own priority order (the needle is almost always the culprit there, too, but the full fix sequence differs slightly). If you end up with a tangle of thread underneath the fabric on the first few stitches, that is the bird's nest pattern, which has its own cause: read the bird's nest guide before adjusting anything.
Winding a fresh bobbin is worth doing if your current bobbin is unevenly wound or has thread built up at the edges; an irregular spool can cause the thread to drag or jump in the race. Our bobbin winding guide shows what an even wind looks like and how to fix the common winding mistakes.
The Stitchmend team compiled this from Singer and Brother official support documentation and Schmetz needle specifications, cross-checked against manufacturer service manuals before publishing.
Questions answered
Why does my sewing machine pick up the bobbin thread sometimes but not every time?
Intermittent pickup almost always means the needle. A slightly bent needle will catch the hook on some strokes but miss on others, depending on the exact position of the fabric. Replace the needle with a fresh 130/705 H, seat it fully in the clamp with the flat side facing back, and test on a scrap. Consistent pickup returns in most cases immediately.
My bobbin thread comes up but then the machine jams after one or two stitches. What is going on?
The bobbin thread is not passing through the tension spring in the bobbin case. It may be resting in the slot but not seated under the spring. Remove the bobbin, re-thread it so the thread slides under the tension spring (you will feel a slight resistance), and replace. The jam-after-one-stitch pattern is the classic sign that the bobbin tension has no control over the thread.
Can I use any brand of 130/705 H needle in my machine?
Schmetz, Organ, and Klasse all fit the 130/705 H system and work on virtually every home machine. For most machines the brand difference is minor. A small number of Singer machines have tighter hook tolerances and occasionally show pickup problems with certain third-party needles. If a fresh needle of one brand misses, try a Singer-branded or Organ needle before assuming a mechanical fault.
Is it safe to skip the handwheel step and just lower the presser foot and start sewing?
On many modern machines with automatic thread cutters (the blade inside the machine that clips thread at the end of a seam), you can begin sewing without manually pulling up the bobbin thread; the machine handles it on the first stitch. On older machines and any machine without an auto-cutter, skipping the handwheel step often causes a tangle on the first two or three stitches. Two seconds of handwheel work reliably prevents that first-stitch bird's nest.
The Stitchmend team
Every fix here is built from manufacturer service manuals and needle-maker specs, and fact-checked against those sources before it goes live. How we work
Read next
 Bobbins & Threading
How to wind a bobbin correctly and avoid tension problems
 Bobbins & Threading
Bobbin threading: drop-in vs front-load, classes, and common mistakes
 Troubleshooting
Skipped stitches: the needle is almost always the cause
 Cleaning & Maintenance