How to wind a bobbin the right way, step by step
Wind a smooth, even bobbin every time. Step-by-step guide covers the full thread path, winding tension disc, clutch engagement, and why uneven winding wrecks your stitch.
The bobbin is the smallest moving part in the stitch, and it causes a disproportionate share of trouble when it is wound badly. A loose wind feeds unevenly. Thread piled in a mountain at the center slips off mid-seam. A bobbin wound without going through the tension disc has no consistent pressure at all. Most tension complaints people blame on the bobbin case actually trace back to how the bobbin was wound in the first place. Fix the winding and a whole category of problems disappears before it starts.
The steps below work for the vast majority of home machines - front-load and drop-in alike. Where a detail varies by machine type, we note it. Always confirm with your specific model's manual, especially for clutch engagement on older machines.
What you need before you start
Three things to confirm before you thread anything:
- The right bobbin for your machine. Bobbins are not interchangeable. Use the class your machine specifies - Class 15 (and Class 15J, which is the same physical size - the J refers to the hook style, not a different bobbin), Class L, Class M, or whatever is listed in your manual. The real incompatibility is between Class 15 and Class 66, or between metal and plastic bobbins where the machine specifies one type. A bobbin that is even slightly the wrong height or diameter throws off tension and can jam the case. If you are unsure which class you need, our guide on which bobbin fits your machine walks through every common class with measurements.
- Thread that matches your top thread weight. If you wind a bobbin with heavy thread and sew with lightweight on top, the machine cannot balance the tension.
- A bobbin with no cracks, chips, or old thread left on it. Old partial winds cause uneven layering. Start clean.
The thread path: the step most people skip
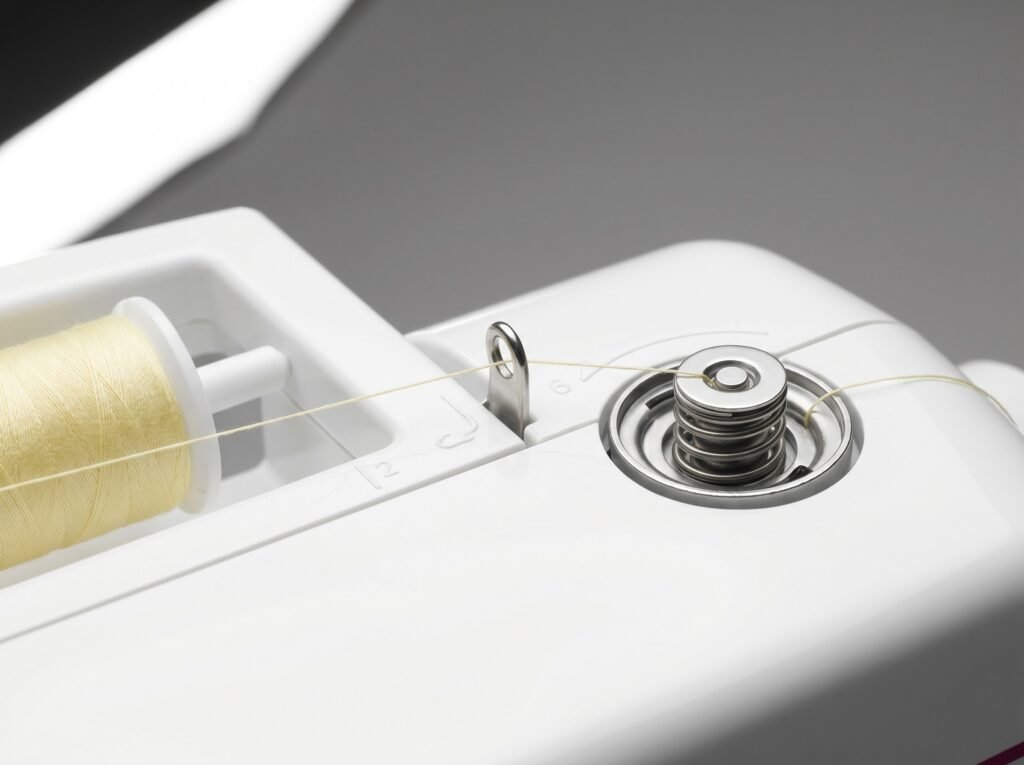
Every home machine routes the thread through at least two points before it reaches the bobbin: a primary thread guide (near the spool pin) and a winding tension disc. Many machines add a third - a small hook or notch between the spool and the disc that the diagram in the manual labels as the "bobbin winding thread guide." This intermediate guide is the one that most people skip because it is easy to miss on a quick glance at the machine.
Skipping that guide means the thread never gets the preliminary alignment it needs before it contacts the tension disc. The disc cannot apply consistent drag without it. The result is a bobbin wound at uneven tension - tight in some spots, slack in others - and that unevenness shows up as erratic bobbin feed once the bobbin is in the case.
The full path, in order:
- Place the spool on the spool pin. If your machine has a spool cap, fit it so the spool does not wobble or spin freely.
- Pull the thread toward the bobbin winding thread guide (the small hook or notch, usually marked with a number or arrow in the manual's winding diagram). Thread it through or around this guide.
- Pull the thread through the winding tension disc. On most machines this is a small spring-loaded disc or set of plates, separate from the main sewing tension assembly. The thread slots between the plates; you usually feel a slight resistance when it seats correctly.
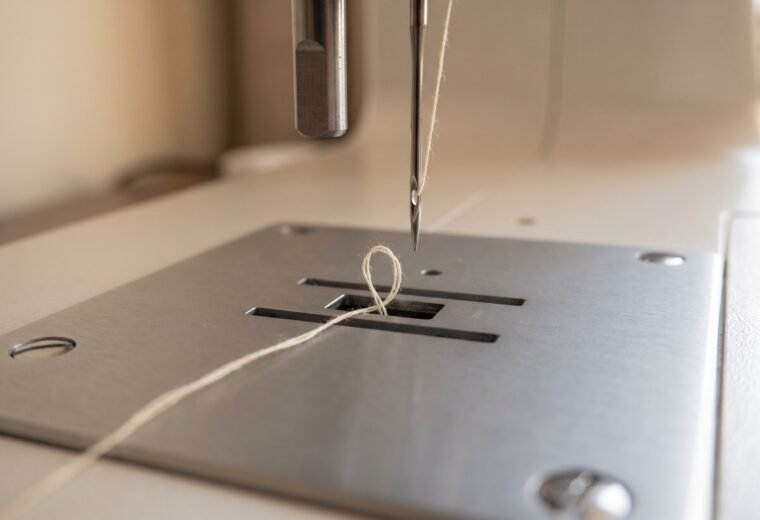
- Pull the thread down to the bobbin. Pass the end through the small hole in the bobbin from inside to outside (the thread should exit through the top of the bobbin when it is mounted on the winder spindle).
That thread path - spool, intermediate guide, tension disc, bobbin hole - is what gives you a properly tensioned wind. If the manual shows a different sequence for your specific machine, follow the manual. Singer, Brother, Janome, and Bernina all show this path in their winding diagrams, though the physical location of the disc varies by brand and model.
Step-by-step: winding the bobbin
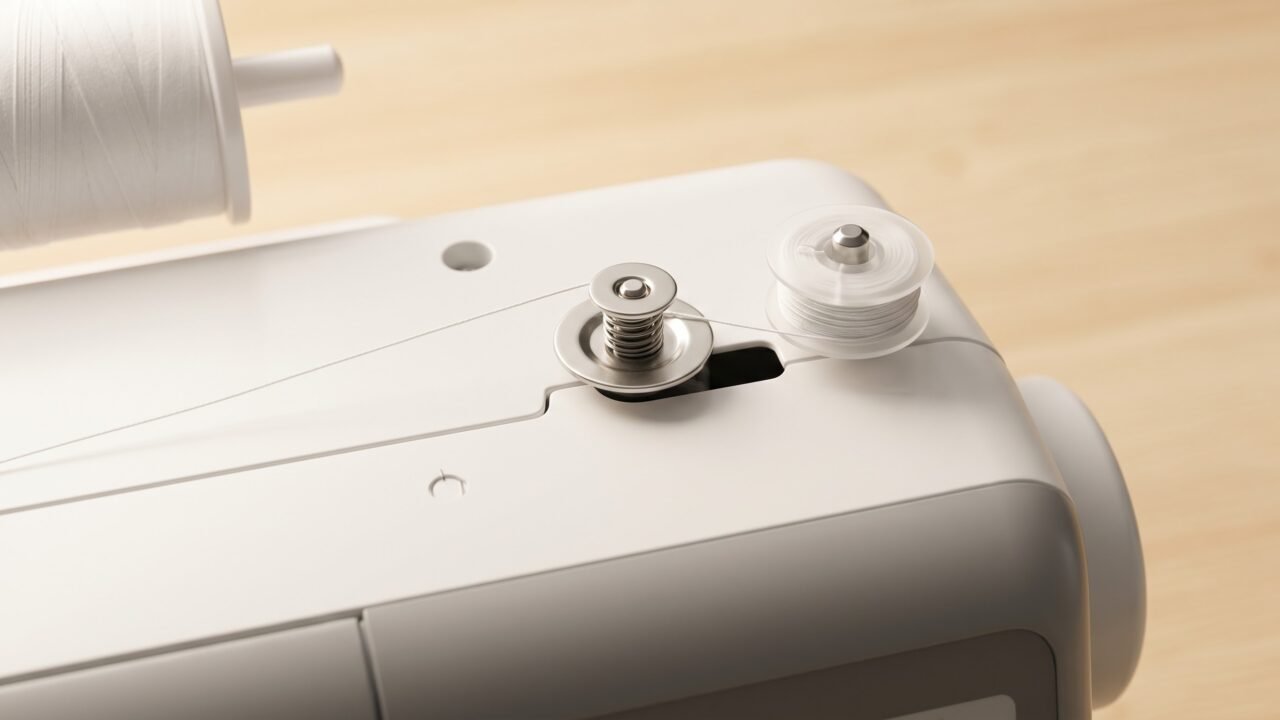
- Snap the bobbin onto the winder spindle. On most modern machines the spindle is on the top right of the machine. Push the bobbin firmly onto the pin so it is seated flat and does not rock.
- Slide the winder spindle to the right (or engage the winding mechanism). On most machines this is a lateral click - push the spindle toward the right edge of the machine until it clicks into the winding position. Some older machines have a separate clutch wheel on the handwheel: loosen it (unscrew the inner knob - turn it counterclockwise, or away from you, while holding the outer wheel) to disengage the needle mechanism. Check your manual for the exact method. The key point is that the needle should not move while you are winding; if it does, the clutch is not engaged correctly.
- Hold the thread end. Hold the free end of the thread - the tail coming from the bobbin hole - with your finger or pinch it against the bobbin. This prevents the thread from slipping off at the start of winding.
- Start the machine slowly. Press the foot pedal gently or press the start button if your machine has one. Let the machine wind a few wraps, then let go of the thread tail. The wraps will lock the tail in place.
- Wind at a moderate speed. You do not need full speed. A moderate pace gives the thread time to lay down evenly across the bobbin. Very high speed can cause thread to pile in the center or ride up toward one edge.
- Stop when the bobbin is full. Most machines have an auto-stop: a small pin or lever that contacts the bobbin rim when the thread reaches the correct level, disengaging the winder or simply halting the bobbin's rotation. If your machine does not auto-stop, watch the bobbin and stop when the thread is about 1 to 2 mm from the rim - not flush with the rim, and never overloaded past it.
- Slide the spindle back to the left. This re-engages the sewing mechanism (or re-tighten the handwheel clutch on older machines). Clip the thread close to the bobbin.
How to tell if the bobbin is wound correctly
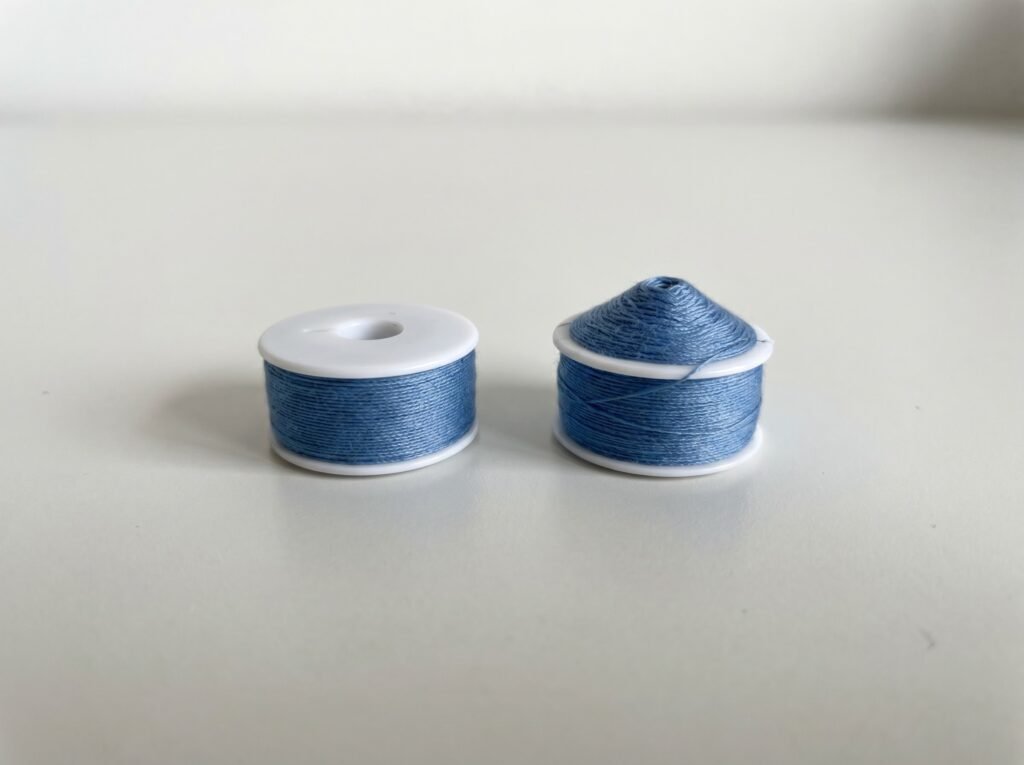
A correctly wound bobbin has thread that is smooth, even, and firm across its full width. Run a finger over the surface: it should feel consistent, with no soft spots, no ridges, and no section where the thread dips lower than the rest. The thread should not be so tight that the bobbin sides bulge, and it should not feel loose enough to shift when you press on it lightly.
Two failure patterns cause the most downstream stitching trouble:
- The "mountain" or center pile. Thread mounded in the middle, sloping away toward the edges. This happens when the thread goes straight from the spool to the bobbin without passing through the tension disc - or when the intermediate guide was skipped and the thread was not tracking straight. A mountain-wound bobbin will slip thread off the pile unpredictably and cause looping or tension spikes mid-seam.
- A loose, spongy wind. If you can compress the thread layers with light finger pressure, the bobbin was wound without enough tension. Loose bobbin thread feeds inconsistently, and you will see loops on the underside of your fabric that look like a bobbin tension problem but are actually a winding problem. Re-wind the bobbin, making sure the thread is seated in the tension disc.
If you are troubleshooting why the machine is not picking up bobbin thread at all, that is a separate issue from winding - our article on not picking up bobbin thread covers the diagnosis in detail.
Bobbin winding comparison: correct vs. common errors
Use this as a quick reference: look at your bobbin, match what you see in the first column, and follow the fix.
| What you see on the bobbin | Likely cause | Effect on sewing | Fix |
|---|---|---|---|
| Smooth, even layers across the full width; thread firm but not bulging | Correct thread path, correct speed, auto-stop used | Consistent bobbin feed, balanced stitch | None needed |
| Thread piled high in the center ("mountain" shape) | Skipped intermediate thread guide or tension disc; thread not tracking straight | Thread slips off the pile mid-seam; looping; tension spikes | Re-wind using the full thread path (intermediate guide + tension disc) |
| Uneven layers - high on one side, lower on the other | Thread not seated squarely in the tension disc, or spool spinning freely without the spool cap | Erratic bobbin tension; occasional loop or skip | Re-seat thread in tension disc; fit spool cap; re-wind |
| Soft, spongy feel; thread compresses under light pressure | Thread bypassed the tension disc entirely; disc not seated correctly | Loose bobbin feed; loops on underside of fabric | Check thread is actually between the tension disc plates; re-wind |
| Thread flush with or over the bobbin rim | Auto-stop not functioning or overridden; winding past the correct fill level | Bobbin may not fit in the case; thread catches on the case edge | Remove excess thread; do not fill past 1 to 2 mm from the rim |
Inserting the bobbin after winding
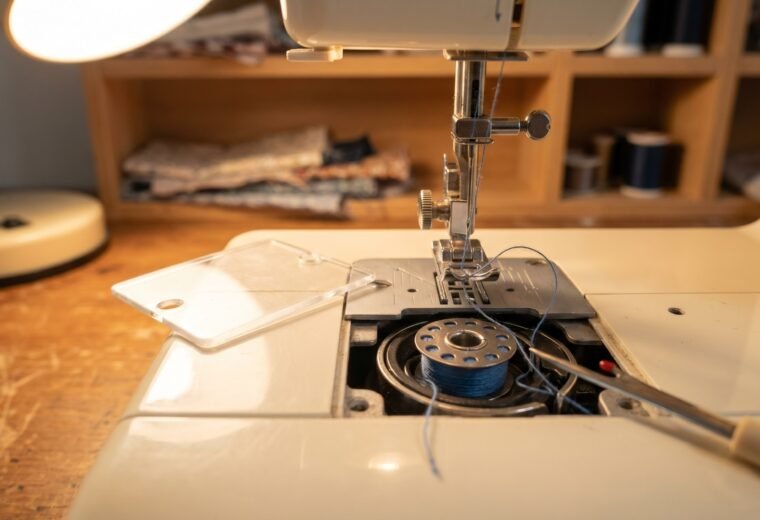
A correctly wound bobbin still causes problems if it is inserted the wrong way. The thread must unwind in the correct direction for your machine, and this varies by brand, model, and bobbin style - there is no single rule that covers all machines. The fastest check: look at the inside of the bobbin compartment lid. Most drop-in machines have a small arrow printed or molded there that shows the correct unwinding direction at a glance. Pull about 6 inches of thread out, lower the bobbin into the case, and follow the thread path shown in the diagram or on the lid (typically through a slot, under a spring, and out a small guide).
For the full process of inserting the bobbin and threading it correctly, see our guide on bobbins and threading. And if you are seeing loops or puckers in the finished stitch after correctly winding and inserting, the issue is often upper thread tension rather than the bobbin - the breakdown in upper thread tension explains how to read the stitch and adjust the dial from a correct starting point.
One thing worth knowing: what looks like a bobbin tension problem is the top thread about nine times out of ten. Before you reach for the bobbin-case adjustment screw, rule out a threading error on top (rethread with the presser foot up), a dull or wrong needle, and a dirty tension disc. Those three checks resolve the vast majority of apparent "bobbin" issues. The full step-by-step diagnostic sequence is in our sewing machine troubleshooting guide.
Questions answered
Why does my bobbin thread keep running out faster than the top thread?
If the bobbin empties noticeably faster than expected, the most common real-world cause is a substituted bobbin that is the wrong class for the machine - a Class L bobbin in a Class 15 machine, for example, holds less thread by volume and will run out faster no matter how well it is wound. Confirm you are using the correct class first. If the class is right, the bobbin was likely wound loosely - fewer actual yards fit on a loosely wound bobbin than a firmly wound one. Re-wind with the thread correctly seated in the tension disc. If thread use still seems unbalanced, check that the top tension is not set unusually high, which draws more bobbin thread up into the stitch.
Can I wind a bobbin without putting it on the machine - by hand or with a separate bobbin winder?
Stand-alone bobbin winders exist and work well, but they must also have a tension mechanism (usually a small tension disc or felt pad) built in. Winding by hand produces a loose, uneven result. If you use an external winder, the same principle applies: thread must pass through a tensioning element before reaching the bobbin.
My machine winds the bobbin but the thread comes off in a loose pile at the start. What went wrong?
This almost always means you did not hold the thread tail at the start of winding. The first few wraps need to be locked down manually; without tension on that tail, the thread loops loosely before the layers pile up. Unwind those first loose wraps, hold the tail, and restart.
Does thread type matter for winding? Can I wind any thread the same way?
The winding process is the same, but slippery threads (polyester, rayon, metallic) need slightly more care. These threads can slip in the tension disc if the disc is worn or if the thread is very fine. If you see uneven winding with specialty thread, slow down the winding speed and ensure the thread is firmly seated in the disc. Metallic threads in particular wind better at low speed to avoid kinking.
- Singer Instruction Manuals (various models including Heavy Duty 4423, 4452, Quantum 9960)
- Brother USA SupportMachine Manuals (CS6000i, XM2701, and related models)
- Janome SupportUser Guides (Janome 2212, HD1000, HD3000)
- iFixitSewing Machine Repair Guides
- Old Singer Sewing Machine Blog
The Stitchmend team
Every fix here is built from manufacturer service manuals and needle-maker specs, and fact-checked against those sources before it goes live. How we work