Upper thread tension: how to adjust the dial correctly (and when not to touch it)
Rethread with the presser foot UP first. Then learn what the dial numbers do, how to test-sew and read the result, and when tension is really a needle problem.
Reach for the tension dial last, not first. That sounds backwards, but it is the single adjustment most sewers make too early - usually because the real fix takes 30 seconds and requires no dial at all. Raise the presser foot, pull all the thread back out, and rethread the machine from scratch. Nine times out of ten the problem disappears before the dial ever enters the picture.
This guide covers how the upper tension dial actually works, how to read a test stitch so you know exactly which direction to turn and by how much, and the clear line between problems the dial can fix and problems it cannot.
Why the presser foot position matters more than the dial
The tension discs are two metal plates that squeeze the thread as it travels up toward the take-up lever. When the presser foot sits up, those discs stand open. When you lower the foot, they close and grip the thread. Singer's official support puts it plainly: "Make sure the presser foot is up when seating the thread through the upper tension."
Thread through a closed disc does not seat properly. The machine will sew, but the thread sits in front of the discs rather than between them - so no amount of dial adjustment will produce balanced stitches. This is the root cause behind a large share of "tension problems" that are really threading problems in disguise.
A quick test confirms disc engagement. With the foot raised, pull the top thread. It should glide easily. Lower the foot and pull again. Singer's support describes it this way: there "should be a significant increase in the tension." If the resistance does not change when you lower the foot, the thread missed the discs during threading.
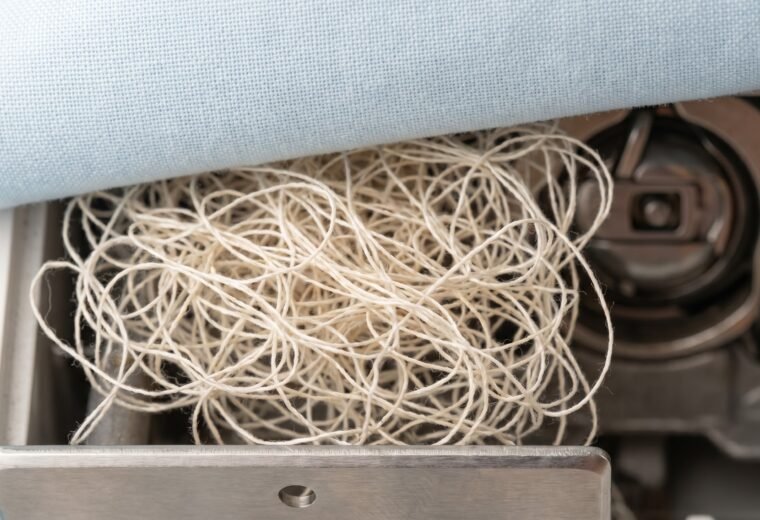
The fix is simple: raise the foot, pull all the thread back out of the machine completely, and rethread from the spool pin forward, following every guide and the take-up lever in sequence. Bird's nests under the fabric - that tangle of loops on the wrong side of your work - are almost always a top-thread threading problem, not a bobbin problem. Rethread with the foot up and the nest usually vanishes.
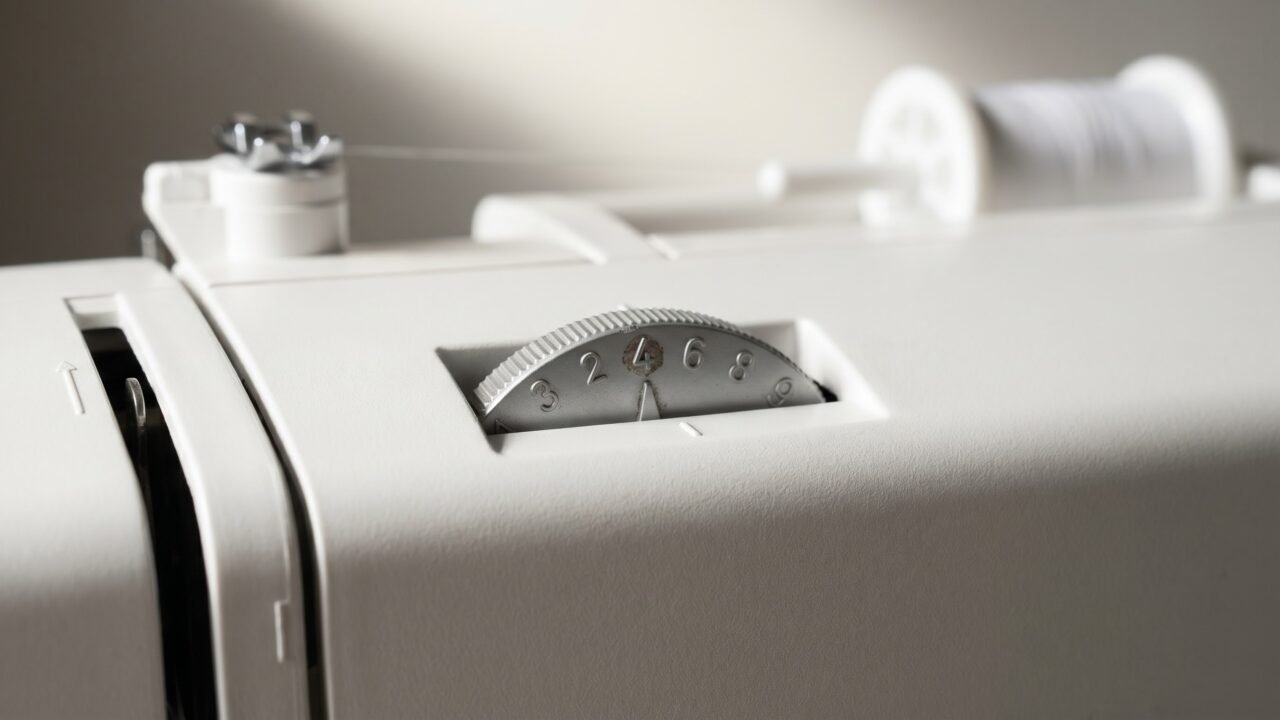
What the dial numbers actually do
Higher numbers grip the top thread tighter. Lower numbers release it. The dial controls how hard those two discs squeeze.
Most home machines run a scale from 0 (or 1) to 9. The Singer 4423 Heavy Duty manual specifies a default of 4, and adjustment one number at a time: "To increase the tension, turn the dial to the next number up. To reduce the tension, turn the dial to the next number down." BERNINA machines typically default near the middle of their scale - the BERNINA 770 QE, for example, ships set at 5.25 for straight stitch and 4.25 for zigzag. In both cases the logic is identical: you are squeezing harder or softer on a thread that is already (assuming correct threading) running through the discs properly.
The direction of the adjustment follows directly from what you see in the stitch. Brother's official support describes the two failure modes clearly. If bobbin thread is visible from the right side of the fabric, the upper thread is too tight - loosen by turning the dial to a lower number. If the upper thread is visible from the wrong side, it is too loose - tighten by turning to a higher number. On machines with a numbered dial, one increment at a time is the right move; sew a test line, inspect, then decide whether to move another number.
For the mechanics of reading what your stitch is actually telling you, our stitch-reading guide walks through each pattern in detail.
How to test-sew and read the result
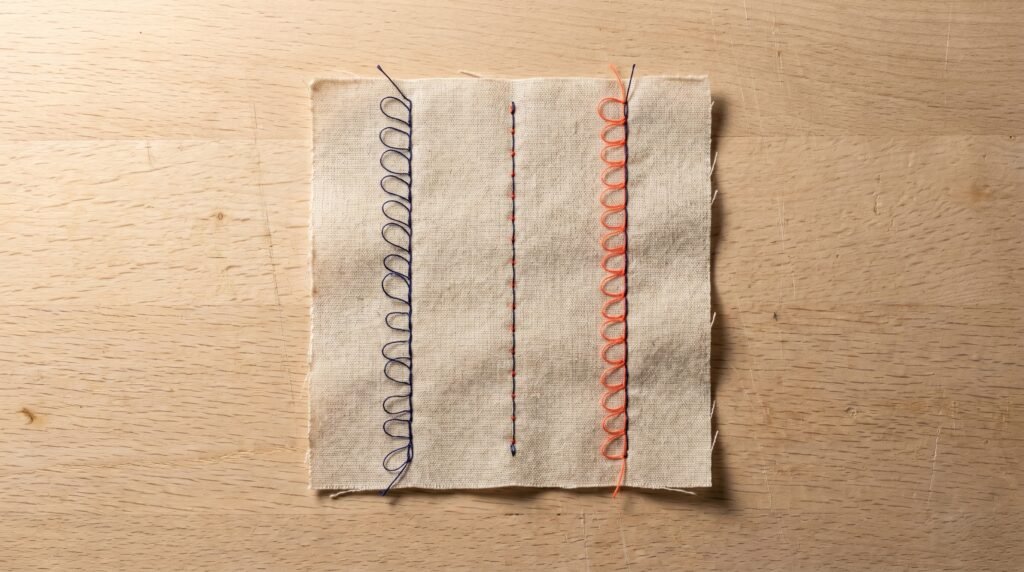
Use a scrap of the actual project fabric - different weaves and weights behave differently under tension. Cut two layers the way the project sits. Load a contrasting bobbin thread so the two threads are easy to tell apart when you inspect the back.
Sew a straight line at normal speed and remove the piece. Flip it over and look at the underside.
| What you see on the underside | What it means | First move |
|---|---|---|
| Loops of top thread visible | Upper tension too loose, or thread missed the discs | Rethread with foot UP; if persists, raise dial 1 number |
| Stitches look correct | Upper tension balanced | No adjustment needed |
| Bobbin thread pulled to the top surface | Upper tension too tight | Drop dial 1 number and test again |
| Bird's nest or bunching at stitch start | Threading error (foot was down during threading) | Rethread with foot UP; hold both thread tails at start |
The goal is balanced tension: the knot where top and bottom thread meet sits invisibly inside the fabric layers, visible on neither face. When it is right, both sides of the fabric look nearly identical.
One increment per test is the discipline that saves time. Moving the dial from 4 to 7 in one go makes it impossible to know which number fixed the problem - or which one overshot it. One number, one test line.
When "tension" is really a needle problem
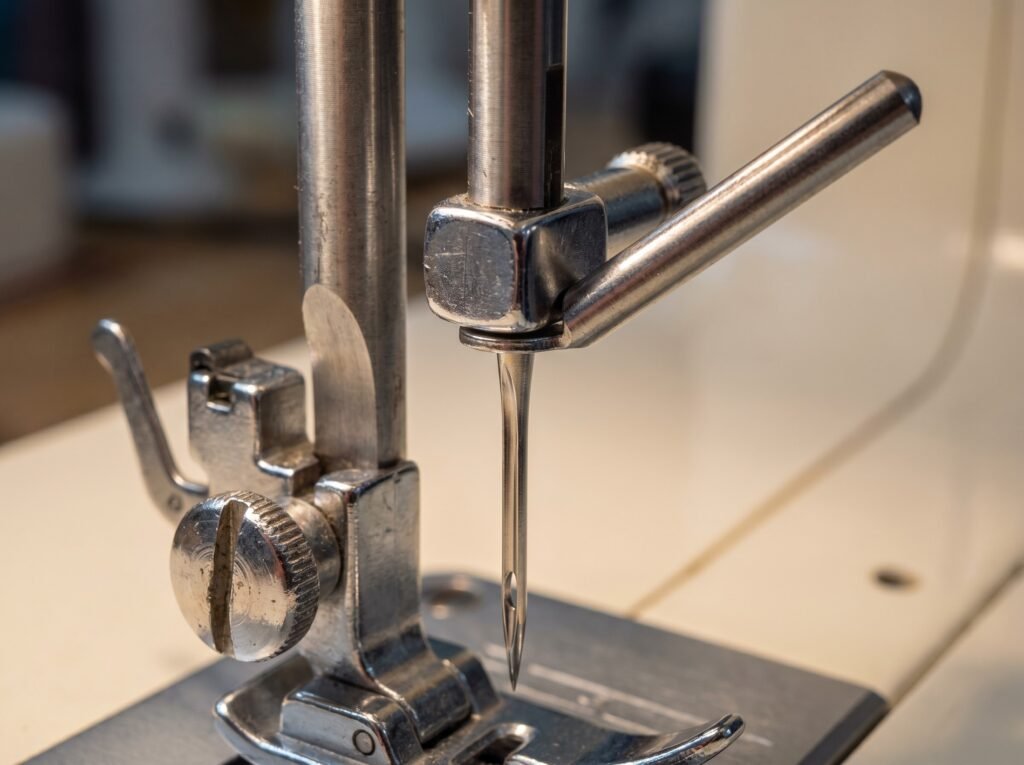
A dull, bent, or incorrectly installed needle creates a stitch that reads like a tension problem. The hook cannot grab the top thread loop at the right moment, so the stitch skips or forms loose loops. Before adjusting the dial on a machine that was sewing fine yesterday, swap in a fresh needle.
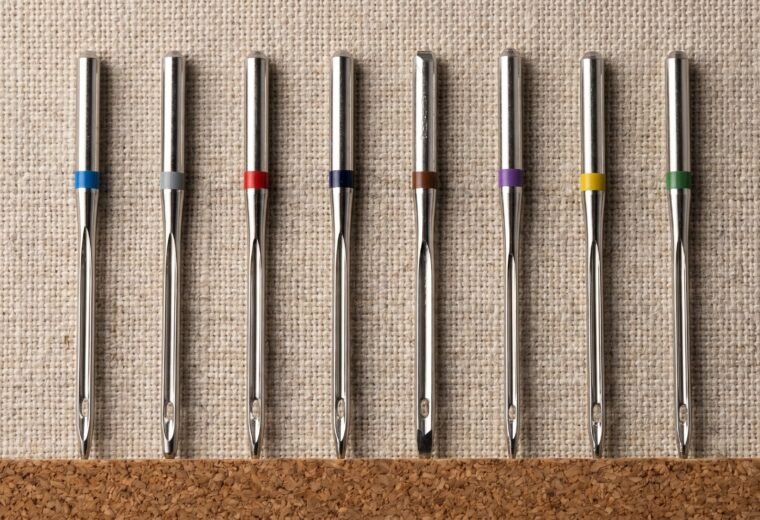
Home machines use the 130/705 H system (also labeled HAx1 or flat-shank). The sizing is always given in both European and US notation: a 90/14 is the same needle in both systems, just named differently. Needle brands - Schmetz, Organ, Klasse - all fit this system and are broadly interchangeable; the real risk is wrong needle type for the fabric (knits need a ballpoint or jersey needle, not a universal) or wrong size (too thick a needle on lightweight fabric, too thin on denim). A complete breakdown of when type and size choices affect stitch quality lives in the needle-types guide.
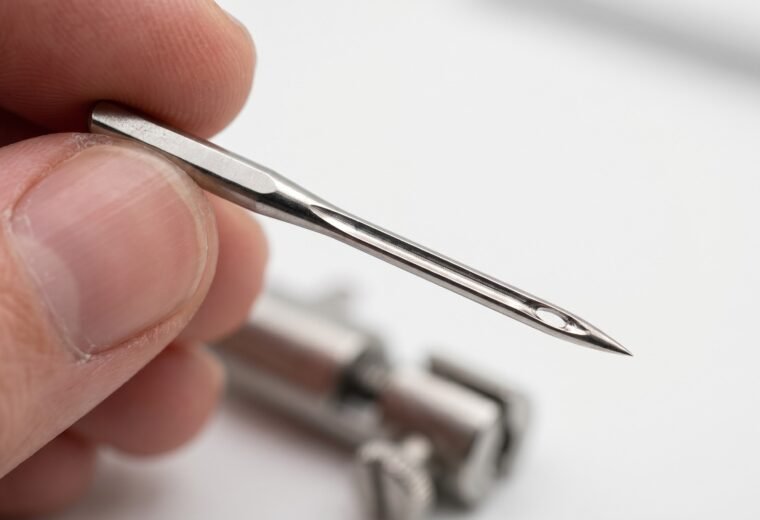
Install the needle with the flat of the shank facing the back (verify against your specific machine's manual - a small number of models differ) and slide it fully upward until the shank shoulder sits flush against the stop in the clamp. A needle that is even slightly low sits at the wrong height relative to the hook, producing loops that look like loose upper tension. Change the needle at the first sign of skipped stitches, after every 6 to 8 hours of sewing, or when starting a new project - the sewing-hours and new-project triggers are independent; whichever arrives first is the signal to swap.
Skipped stitches that appear suddenly mid-project are almost always a needle issue: bent from hitting a pin, dulled from sewing multiple layers, or wrong for the fabric.
The correct order: rethread, then needle, then dial
Brother's support documentation makes the sequence explicit: "If the upper threading and lower threading are incorrect, the thread tension cannot be adjusted correctly, even by turning the upper tension-control dial." The dial is the last resort in a short checklist, not the first response.
Work through this order before touching the dial:
- Raise the presser foot and rethread the entire top path from scratch, making sure the thread passes through every guide, the tension discs, and the take-up lever in sequence.
- Check the needle: is it the right type for this fabric, the right size, installed flat-side back, pushed fully up, and undamaged?
- Check the bobbin: is it wound evenly, seated correctly, and threaded out through the guide in the bobbin case? The drop test tells you whether bobbin tension is contributing to the problem.
- Clean the area around the feed dogs and bobbin case - lint packed against the tension spring changes how the bobbin thread feeds.
- Only after all four pass: sew a test line and read the result, then adjust the dial one number at a time.
The full tension troubleshooting guide covers every tension symptom end to end, including thread breakage and the rarer cases where the bobbin-side tension genuinely needs attention.
Automatic-tension machines: the foot-up rule still applies
Some computerized machines - higher-end Janome, BERNINA, and Brother models - handle most of the tension adjustment automatically. They read the stitch being sewn and adjust on the fly; for basic straight stitch and zigzag on normal fabrics you may never need to touch a dial at all. The manual dial (or digital setting) is still there for when the automatic system cannot compensate: very slippery thread, specialty fabrics, heavily embroidered work, or conditions extreme enough to confuse the sensor.
If your machine has automatic tension and you are still seeing loops or pulling, the order of operations stays the same - rethread first, check the needle, then consider overriding the auto setting manually.
Where to stop and when to call a technician
The upper tension disc assembly itself can wear or accumulate lint packed in over years of use - a buildup the dial cannot compensate for. If rethreading, a fresh needle, and dial adjustment all fail to produce balanced stitches - especially if the machine recently sewed through something too thick, was dropped, or has not been cleaned in years - the tension mechanism may need professional cleaning or a replacement disc assembly. The tension assembly replacement guide covers what that involves.
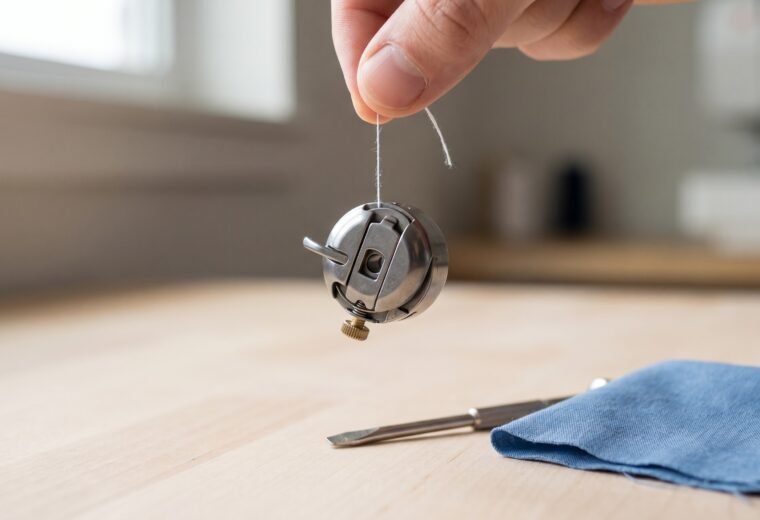
Bobbin-case tension is a separate adjustment, controlled by a small screw on the bobbin case itself. Some manufacturers - particularly Brother - use a factory paint dot on that screw to mark the original position; Singer, Janome, and older machines often have no paint mark at all. Either way, the screw is set at the factory for the machine's hook geometry and should be left alone. Adjusting it without a baseline reading and the patience to move in tiny fractions is easy to get wrong and hard to recover from. If you have ruled out upper threading, needles, and the dial and the problem persists, that adjustment belongs with a technician.
Electrical faults - the machine not responding to foot pressure, cutting out, or sparking - are a hard stop. Unplug immediately. No tension problem requires working on a live machine; all mechanical adjustments are done with the power off and, for anything involving the hook or timing area, with the machine unplugged (manufacturer safety guidance across all major brands).
Questions answered
What is the correct tension number for my machine?
Most machines default between 4 and 5 for straight stitch on normal-weight fabric. Singer specifies 4 as the starting point for the 4423 Heavy Duty; BERNINA sets the 770 QE at 5.25 for straight stitch. Rather than chasing a number, sew a test line with contrasting threads and read the result - balanced stitches at whatever number that produces is the right number for your combination of fabric and thread.
Why do loops form under my fabric even when the dial is at a normal setting?
Loops under the fabric almost always mean the top thread was not seated in the tension discs - typically because the machine was threaded with the presser foot down. Rethread completely with the foot raised. If loops persist after correct rethreading and a fresh needle, then increase the dial one number at a time and test.
Can I fix tension by only adjusting the bobbin side?
Adjusting the bobbin-case screw to compensate for an upper-thread problem is the wrong direction. The upper tension dial has a wide range specifically so the bobbin-side setting can stay at its factory value. Adjust upper tension first; touch the bobbin screw only after confirming the upper path is correctly threaded and the problem is genuinely on the lower side. To check, thread the bobbin into the case, hold the thread end, and give a gentle downward shake: proper tension means the case drops roughly 1 to 3 inches and then holds; too tight means the case stays frozen in place; too loose means the case falls completely freely. Either extreme - frozen or free-falling - points to a bobbin tension problem. The full procedure is at the drop-test guide.
My machine shows "auto tension" - do I still need to rethread with the foot up?
Yes. Automatic tension systems compensate for fabric-weight variations, but they cannot fix thread that bypassed the tension discs during threading. The foot-up rule applies to every home machine regardless of how sophisticated the tension system is.
The Stitchmend team
Every fix here is built from manufacturer service manuals and needle-maker specs, and fact-checked against those sources before it goes live. How we work