Sewing machine keeps jamming: how to free it and stop it happening again
Thread jammed under the throat plate mid-seam? Here is the safe way to clear it, the four ranked causes, and a simple prevention checklist that takes 60 seconds.
Reach for the handwheel as little as possible. That is the first rule of a jammed sewing machine, because forcing it even a quarter-turn when thread is wound around the hook can bend the needle, damage the hook, or knock the machine out of time. The fix is almost always simpler than it feels mid-project: release the fabric first, clear the jam with the machine unplugged, find the actual cause, and you are back sewing in under ten minutes.
Most jams fall into four categories, and they arrive in this order of frequency: a bird's nest of top thread trapped under the throat plate, lint packed into the hook race, a wrong or dull needle, and a bobbin seated incorrectly. Work through them in that sequence and you will solve it before touching a screwdriver. For the rarer situation where the handwheel itself will not turn at all, our handwheel-stuck guide covers mechanical seizure and the clutch-knob check.
How to free a jammed machine safely
Unplug the machine before touching anything below the needle plate. Electrical safety first, always.
- Raise the presser foot. The lever on the back of the machine. This releases clamping pressure on the fabric and opens the tension discs, which gives you slack to work with.
- Cut the thread above the needle. Use scissors, not the built-in cutter yet. You want clean ends to pull out individually.
- Ease the fabric backward, gently. Pull toward you and slightly down, following the natural feed-dog direction. If it resists, do not yank. Move to the next step first.
- Remove the throat plate. On most machines a coin turns two flat-head screws, or you slide the plate forward. Set it aside.
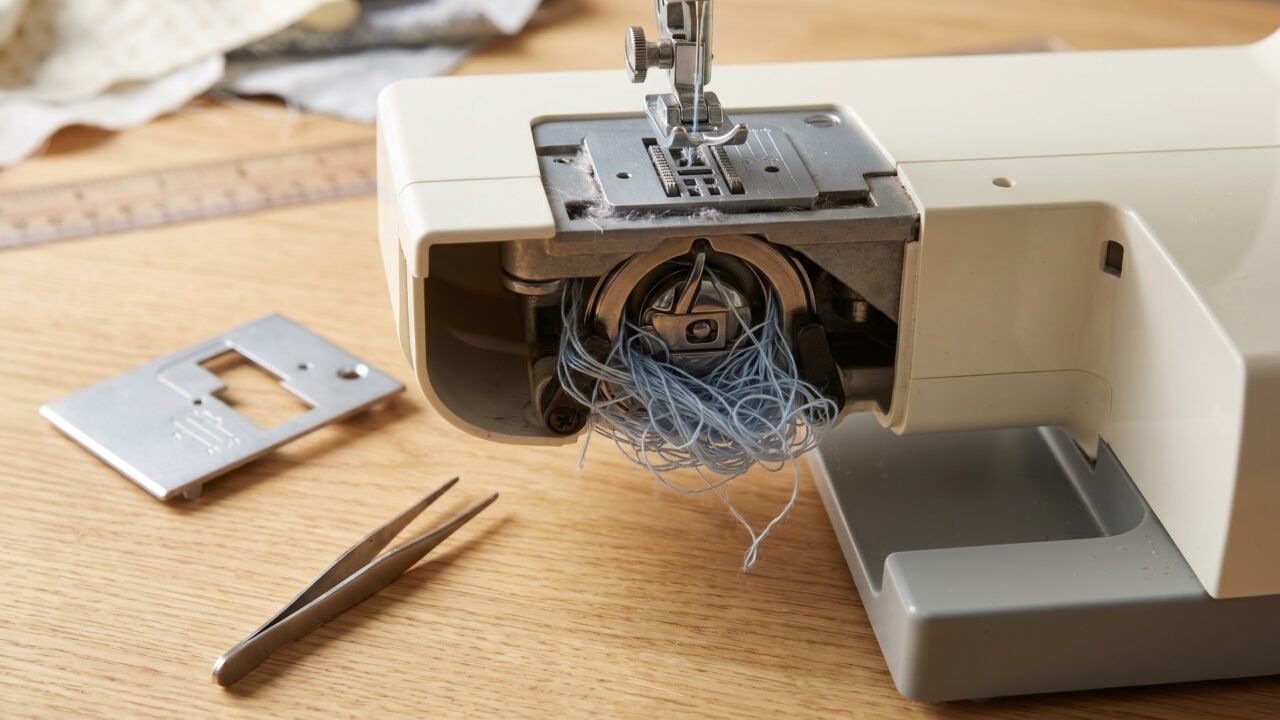
- Look at the bobbin area. You will almost certainly see a wad of thread looped around the bobbin case or caught in the hook race. Lift the thread mass out with tweezers or your fingers. Do not cut blindly; pull it free in one piece if you can so nothing stays caught in the hook.
- Remove the bobbin and bobbin case. Check both for wound thread and wipe the bobbin seat clean with a dry cloth.
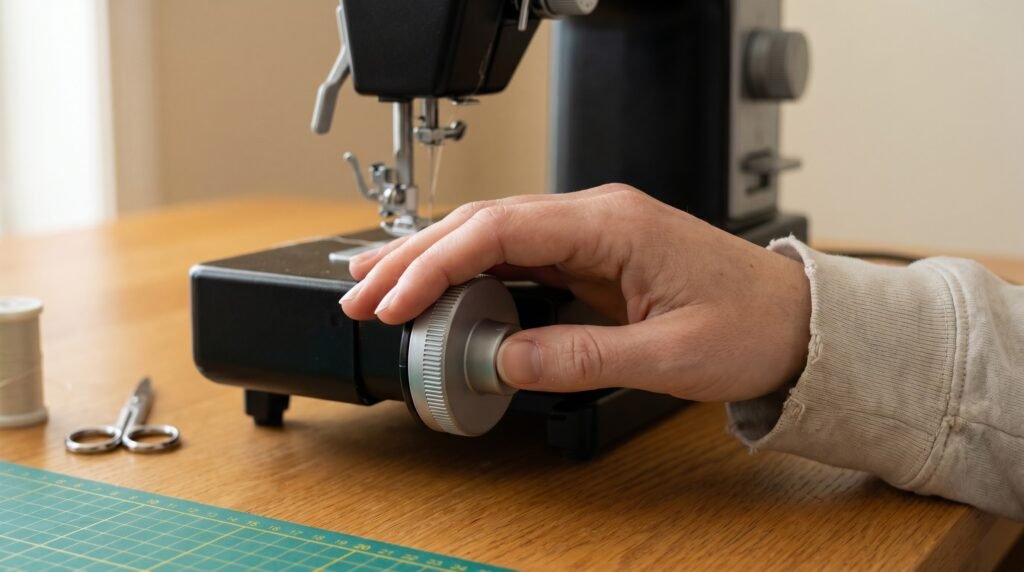
- Turn the handwheel one slow revolution by hand. It should move smoothly. If it resists, there is still thread in the hook race or the needle is bent. Stop and inspect again.
- Check the needle. Roll it on a flat surface. A bent needle rocks or wobbles. Replace it if there is any doubt - needles for the 130/705 H system (the standard home-machine needle, used on Singer, Brother, Janome, and virtually every other household brand) cost pennies.
Once the machine turns freely, you are ready to rethread correctly before sewing another stitch. Threading is where most jams are born, which brings us to the causes.
The four ranked causes of thread jams
Understanding why jams happen is what keeps them from coming back. Each cause has a different fix, and they genuinely rank this way in practice.
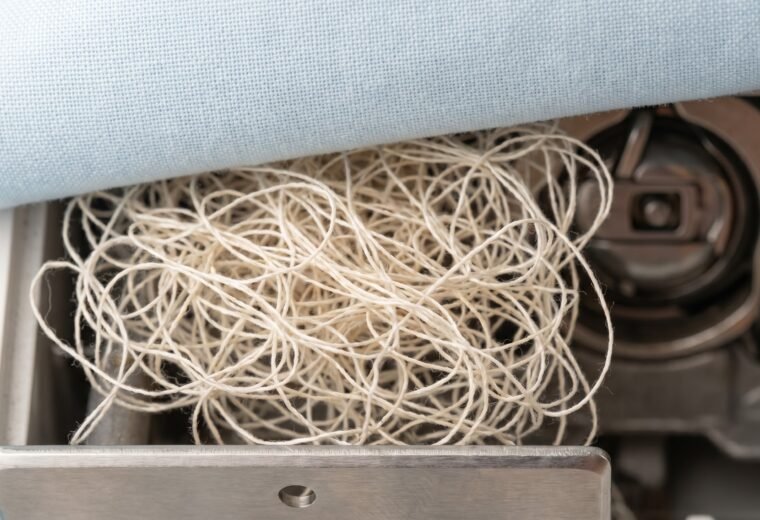
Cause 1: top-thread bird's nest (the most common culprit)
Threading with the presser foot in the lowered position is almost always where this problem starts. A lowered foot holds the tension discs clamped together, so thread slips through the path without ever sitting between them - meaning there is nothing pulling the top thread taut as each stitch forms. That loose thread pools under the fabric with every pass of the needle until it winds around the hook and locks into a hard knot.
The fix is not to adjust the tension dial. Rethreading is the fix, and it costs nothing. Raise the presser foot first, then follow the threading path from the spool pin all the way to the needle. Hold both the top thread and the bobbin thread tail behind or to the side as you make the first stitch. A full explanation of why this bunching always looks like a bobbin problem when it is really a top-thread problem is in the bird's nest bunching guide.
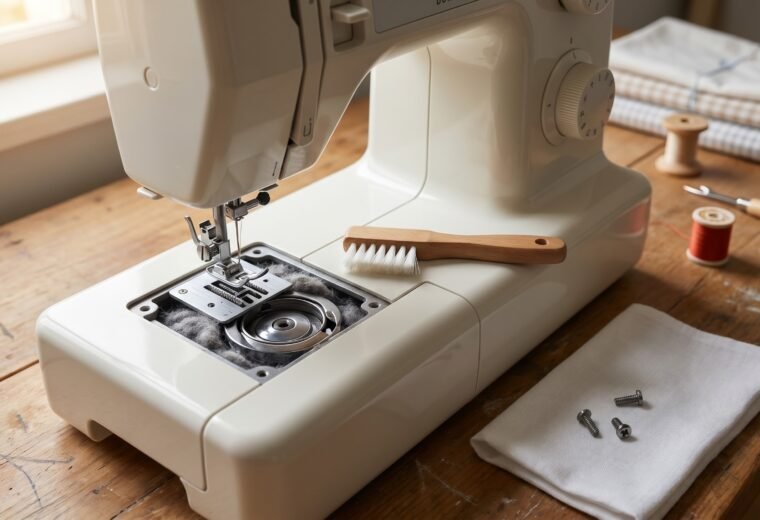
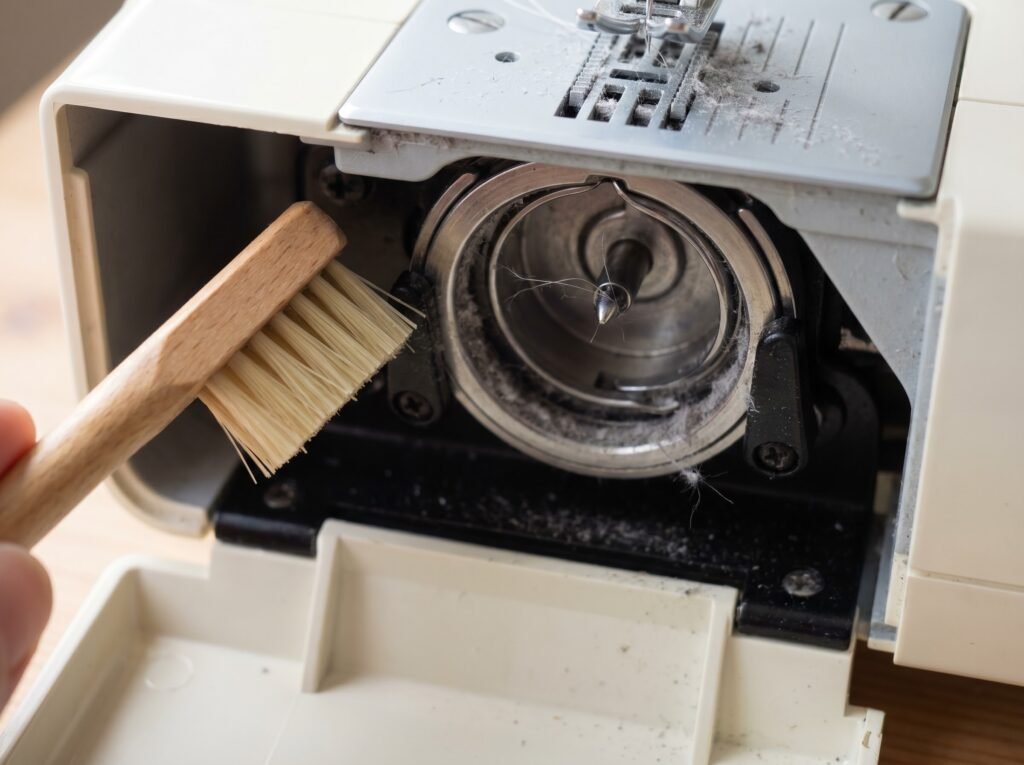
Cause 2: lint packed into the hook race
The hook race is the circular track the hook travels as it catches the top thread loop and pulls it around the bobbin to form a stitch. Lint from fabric and thread builds up in this groove with every project. Enough lint and the hook drags or misfires, snagging the thread into a jam instead of completing the stitch.
Remove the throat plate and bobbin case, then look into the hook race with a light. Use a small brush (the one that came with your machine, or a clean watercolor brush) to sweep lint out. Avoid canned compressed air: it tends to drive lint deeper into the race rather than clearing it, and it can push debris into bearings where it is even harder to dislodge. A brush or small vacuum is the right tool here. Never use WD-40 or household oil in the hook-race area either - both gum up and attract more lint over time. The what not to use on your machine guide covers both in detail. A step-by-step cleaning guide covers the full procedure, including how to clear the feed-dog slots at the same time. Cleaning the hook race after every two or three projects prevents this jam from recurring.
Cause 3: wrong needle or a dull one
A dull needle deflects instead of piercing cleanly. It pushes fabric down into the throat-plate hole rather than passing through it, which can drag the thread into a jam. A needle that is wrong for the fabric (a universal in a knit, for example, or too fine a size for heavy denim) misfires in the same way.
Home machines use the 130/705 H needle system. Sizes run in dual notation: 80/12 for light cotton, 90/14 for medium-weight fabric, 100/16 for mid-weight denim. For heavier denim or canvas, needle TYPE matters as much as size: a Jeans/Denim needle (same 130/705 system, reinforced shank, sharper point) at 90/14 to 110/18 is the right choice - a Universal of the same size tends to deflect on tightly-woven fabric rather than piercing cleanly, which puts you right back in jam territory. The flat side of the shank faces the back on most machines, though always confirm in your manual. Seat the needle fully - slide it up until it stops moving, then tighten the clamp screw. Schmetz, Organ, and Klasse all fit this system; quality differences between brands are minor. Change the needle at the start of any new project, or when you notice symptoms: skipped stitches, shredded thread, fabric puckering, or a popping sound as the needle enters the fabric - those are the real signals that it is time.
If you are sewing stretch or knit fabric, a universal needle is a common contributor to jams and skipped stitches alike. A ballpoint or jersey needle (same 130/705 system, just a rounded tip) is what those fabrics need. The skipped stitches guide goes into needle-to-fabric matching in detail if that is the recurring pattern.
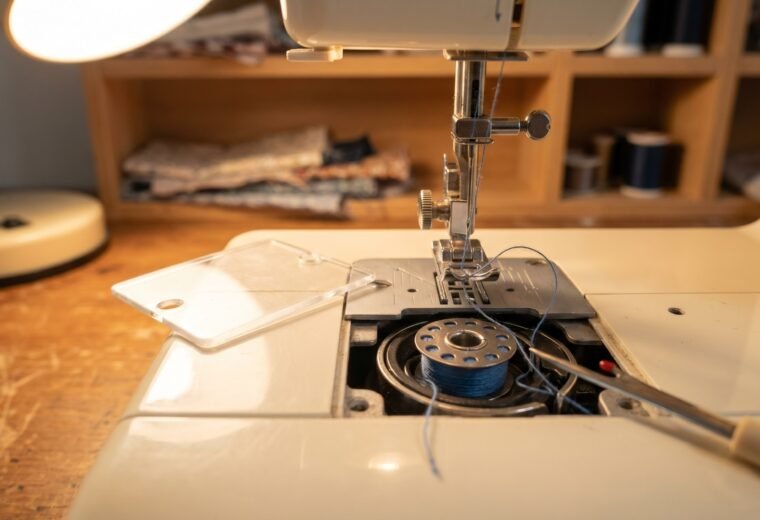
Cause 4: bobbin inserted incorrectly
A drop-in (top-loading) bobbin inserted in the wrong orientation, or a front-loading bobbin not clicked fully into the case, sits slightly off-axis in the hook race. The hook grazes the bobbin rather than catching the thread loop cleanly, and the result is either a jam or skipped stitches that quickly become a jam.
Drop-in bobbins almost always insert counterclockwise when viewed from above, with the thread pulling off to the left and into a small notch in the bobbin seat. Front-loading bobbins click into the bobbin case, and the bobbin case clicks into the machine with an audible snap. Check your manual's diagram for the exact orientation. If the bobbin drops in but sits slightly proud, it is the wrong class for your machine. Bobbins are not universal: Class 15 and Class 15J share the same bobbin dimensions - the "J" designation describes the hook-case design, not a change in the bobbin itself - so they work in either machine, but Class 15 and Class 66 are not, and metal versus plastic matters on machines that specify one type. Class L and Class M are different sizes again. The guide to picking up the bobbin thread has a full table of which bobbins fit which machines.
Jam-prevention checklist

Most jams can be prevented with four habits that together take under a minute at the start of each sewing session: presser foot up before threading, needle condition check, bobbin orientation, and a glance at the hook race for lint - the same four causes ranked above, now as a quick-start routine.
| Check | What to look for | How often |
|---|---|---|
| Presser foot UP before threading | Foot lever fully raised before you thread from spool to needle | Every time you thread or rethread |
| Needle condition | Roll it on a hard surface; replace if it wobbles or rocks, or if you notice skipped stitches, shredded thread, or a popping sound | Every new project, or at the first sign of symptoms |
| Bobbin orientation | Thread pulls off in the direction your manual specifies; clicks or seats fully | Every time you reload the bobbin |
| Hook race lint | No visible lint or fuzz in the circular groove around the bobbin | Every 2-3 projects, or when you notice slower stitching |
One more item worth building into the habit: hold both thread tails (top and bobbin) behind or to the side of the presser foot when you start a new seam. Letting them hang free lets the first stitch drag them under the plate, which seeds a jam before the seam even begins.
When the jam keeps coming back
If you have cleared the thread, rethreaded with the foot up, installed a fresh needle, and confirmed the bobbin, but jams recur within a few seams, the machine likely needs a deeper clean. Built-up thread fibers and oil residue in the hook race can leave a gummy film that grabs thread even after you brush visible lint away. The full cleaning routine in the cleaning guide covers removing the hook race on machines where it lifts out (many drop-in models) and wiping the race itself.
Tension problems can also mimic or contribute to jams. If you see the upper thread looping loosely under the fabric consistently, the tension discs may not be engaging even with the presser foot raised, which can point to a worn tension assembly. The tension troubleshooting guide walks through reading your stitch to diagnose which thread is causing the problem before assuming a mechanical fault.
And if the handwheel is turning but grinding or requiring unusual force after the thread is fully cleared, that is a different problem. Gummed or dry oil in the main shaft, or a broken drive belt on belt-drive models, can make the machine feel jammed when the actual cause is mechanical friction. Handwheel-stuck diagnosis covers exactly that scenario.
For a broader symptom map that routes you to the right guide for any machine behavior, the sewing machine troubleshooting hub is the starting point.
The Stitchmend team compiled this from Singer, Brother, and Janome owner's manuals, Schmetz needle technical documentation, and iFixit mechanical repair guides, cross-checked and edited before publishing.
Questions answered
Can I force the handwheel to clear a jam?
A very gentle turn to check if the machine now moves freely is fine after you have removed all visible thread. But if you feel real resistance, stop. Forcing a still-jammed machine bends needles, damages the hook, and can pull the machine out of time. Clear the thread first, then test the handwheel.
Why does my machine jam only at the start of a seam?
Almost always the thread tails. When the top thread and bobbin thread hang free at the needle plate, the first stitch pulls them under the plate and around the hook. Hold both tails behind the presser foot for the first few stitches, or start an inch from the fabric edge and backstitch to the edge.
My machine jammed and now makes a grinding noise. What happened?
A hard jam can bend the needle into the hook or the throat plate, or shift the hook's position slightly. Unplug the machine, clear all thread, check and replace the needle, and turn the handwheel slowly by hand through one full revolution. Before calling a technician, do one more visual check: with the throat plate removed, inspect the hook tip closely for any thread still wound around it or for a rough burr on the metal - a burr from a needle strike is a common cause of post-jam grinding and is visible to the naked eye. If the hook tip looks clean and undamaged but grinding continues with no thread in the machine at all, the hook position or timing may be affected and a technician check is the right next step.
Is a jam more likely with cheaper thread?
Cheap or old thread sheds more fiber into the hook race, which speeds up lint buildup and raises jam frequency. It also breaks more easily, leaving loose ends in the hook area. Among branded threads, Gutermann and Mettler are consistently rated low-lint by the quilting and sewing community; Coats and Clark, while a well-known name, produces noticeably more lint than either and is grouped closer to budget thread in community testing (Suzy Quilts and Threads Magazine forum comparisons bear this out). More important than brand, though, is thread weight matched to needle size and fabric weight.
- Singerofficial machine support and maintenance guidance
- Singer
- Brother Internationalofficial user manuals (CS6000i, LS2350, and related models)
- Brother Support
- Schmetzneedle technical guide
- Schmetz
- Schmetzfabric-to-needle guide
- Schmetz Needles
- Schmetz
- Schmetz Needles
- Suzy Quiltsthread quality comparison
- Suzy Quilts
- Sewing WorkerGutermann vs Mettler thread comparison
- Sewing Worker
- Janome Americaofficial support
- Janome
- iFixitsewing machine repair and troubleshooting procedures
- iFixit
The Stitchmend team
Every fix here is built from manufacturer service manuals and needle-maker specs, and fact-checked against those sources before it goes live. How we work