How a sewing machine works: every system explained plainly, with parts glossary
What actually happens when you press the pedal - needle path, hook system, feed dogs, tension discs, and drive. Every part named, every system explained.
Press the foot pedal and roughly 700 to 900 needle strokes happen every minute. Each one punches thread through the fabric, a rotating hook intercepts that thread a fraction of a second later, and the two threads lock around each other inside the layers - a stitch. The whole sequence relies on five cooperating systems, and when any one of them is off, you get skipped stitches, bird's nest tangles, tension problems, or a handwheel that won't budge. Knowing what each system does - and which part belongs to it - is the fastest way to diagnose any problem before you touch a single screw.
What follows is a plain-English map of the machine, working from the thread spool down to the fabric. Every part named here appears in our full parts glossary with photos, replacement notes, and part-number guidance. This article explains the function; the glossary covers identification and sourcing.
System 1: the upper-thread path
Thread travels from the spool through a precise sequence of guides before it reaches the needle. Miss any guide - or thread the machine with the presser foot lever down - and the stitch will fail every time.
The path on virtually every home machine runs like this: spool pin, thread guides on the spool cap or top of the machine, the tension assembly (two metal discs that press against the thread), the take-up lever (a hook-shaped arm that moves up and down with the needle), a lower thread guide, and finally down through the needle eye. The take-up lever is the critical gate: it pulls a fresh loop of thread upward after each stitch is formed and draws the knot tight into the fabric layers. Thread must be seated in the take-up lever or the stitch will never lock.
The single most important threading rule applies here. Brother's support documentation is unambiguous: "If the presser foot is not raised, the sewing machine cannot be threaded correctly." With the presser foot lever down, the tension discs stay clamped shut and thread runs past them without seating between the plates. The discs cannot grip what was never placed between them. Raise the presser foot first, every time, before you put thread anywhere near the machine.
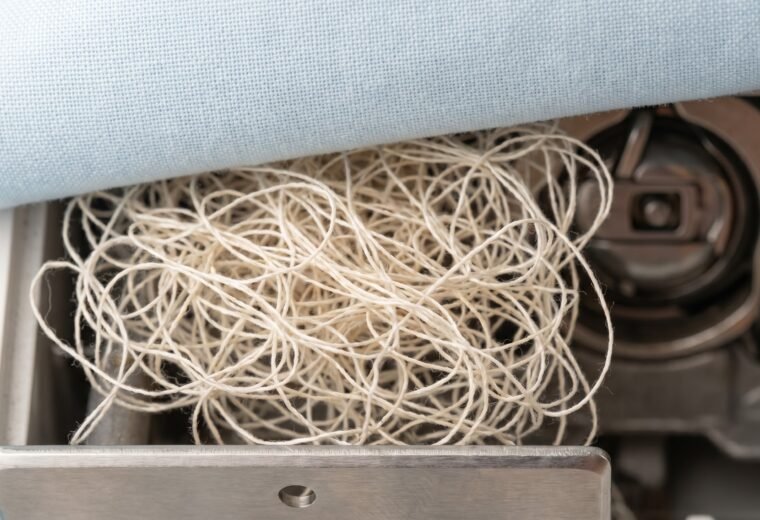
This one rule explains most bird's nest tangles underneath the fabric. When the upper thread bypasses the tension discs, nothing holds it back at the top, so the machine yanks excess thread downward with each stitch and piles it under the throat plate. See the bird's nest guide for the full fix sequence.
System 2: the needle and its job
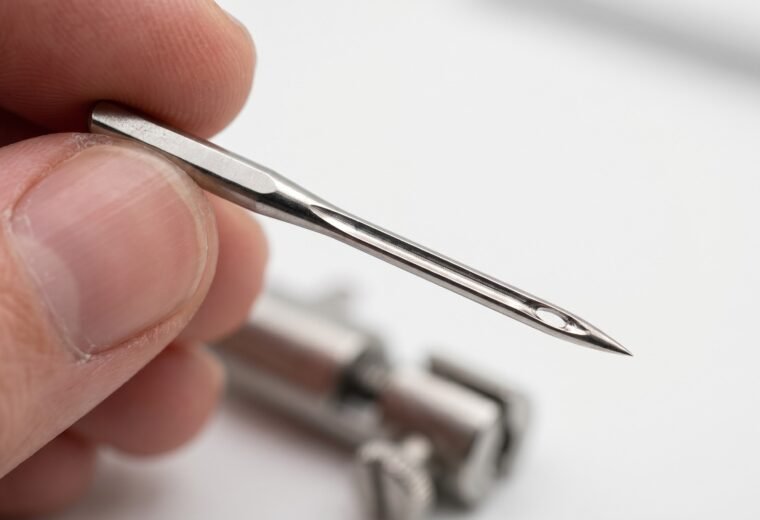
The needle does three things simultaneously. It punches a path through the fabric layers. It carries the upper thread down through that path. And it sets up the loop the hook will catch. As the needle reaches the bottom and begins to rise, a small loop of thread forms on its back side - the needle reverses direction while friction in the fabric and slack from the take-up lever briefly hold the thread, so it bows outward into a loop. The scarf is a shallow recess on the back of the needle just above the eye, and its job is clearance: it lets the rotating hook pass extremely close to the needle, a fraction of a hair behind the eye, to enter that already-formed loop without striking the needle. A bent, dull, or wrong-type needle causes skipped stitches mainly because it disturbs how that loop forms and how close the hook can get - not because the scarf stops "making" a loop.
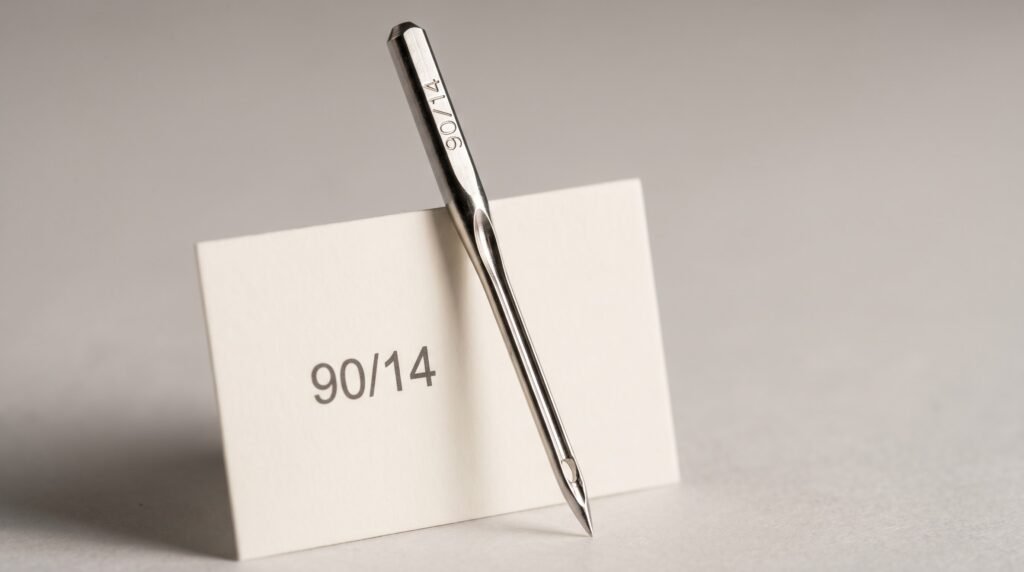
Every home machine - Singer, Brother, Janome, Bernina, Pfaff, Kenmore, Husqvarna Viking, Juki - uses the 130/705 H needle system, also labelled HAx1. Schmetz puts the market share at 99% of home machines. The number "130/705" describes the shank geometry (flat, so the needle cannot be rotated incorrectly), and the H designates the scarf, that little indentation on the back of the needle above the eye. The flat of the shank usually faces the back, and the needle must be seated as far up the needle shaft as it will travel before you tighten the clamp screw - but the orientation is machine-specific (a few machines face the flat to the side or front), so check your manual rather than assuming. Push the needle as far up the shaft as it will go regardless.
Needle size uses dual notation: a 90/14 has a blade diameter of 0.90 mm (the metric NM number) and a US size of 14. The table below covers the most common pairings. These are starting points; always check against the fabric you are actually sewing.
| Fabric type | Needle size | Needle type | Notes |
|---|---|---|---|
| Fine silk, chiffon, organza | 60/8 or 70/10 | Universal or Microtex | Microtex has a sharper point for cleaner pierce |
| Quilting cotton, shirting | 75/11 or 80/12 | Universal | Standard starting point for most wovens |
| Medium-weight woven, linen | 90/14 | Universal | Most versatile everyday size |
| Medium-weight denim, canvas (lighter) | 90/14 or 100/16 | Jeans/Denim | Denim needle has stronger shaft; go up a size if thread shreds |
| Heavy canvas, upholstery | 100/16 or 110/18 | Jeans/Denim | Schmetz lists 90/14 as minimum for canvas; heavy canvas needs 100/16+ |
| Knit, jersey, stretch | 80/12 or 90/14 | Ballpoint or Stretch (Jersey) | Rounded point passes between knit loops; universal point causes skips |
| Lycra, spandex, highly elastic | 75/11 or 90/14 | Stretch (Schmetz 130/705H SUK) | Deep scarf prevents skipped stitches on elastic fibers |
| Leather, vinyl, faux leather | 90/14 or 100/16 | Leather | Cutting point; do not use on woven fabric (leaves permanent holes) |
Change the needle roughly every eight hours of sewing as a working rule of thumb, at the start of a new project, or the moment you hear a popping sound as the needle enters the fabric (that sound is a dull needle punching through rather than piercing cleanly). Schmetz's FAQ lists the warning signs: skipped stitches, shredded thread, puckering, large stitch holes, and that clicking or popping sound.
The needle is the leading cause of skipped stitches - ahead of threading errors and far ahead of timing problems. Our skipped stitches guide walks through the ranked fix order when the machine starts missing.
System 3: the bobbin and hook system
While the needle handles the upper thread, a second thread loaded into the machine from below forms the underside of the stitch. This is the bobbin system, and it is where most beginners place blame when the real culprit is almost always the upper thread.
The bobbin sits in a shuttle or bobbin case beneath the throat plate. As the needle pushes downward and then begins to rise, the rotating hook (or oscillating hook on older machines) sweeps past the back of the needle and catches the tiny loop of upper thread that has formed there, passing just behind the eye where the scarf gives it room. It then loops that upper thread around the bobbin thread. When the take-up lever pulls the upper thread back up, both threads cinch together in the middle of the fabric layers - that locked knot is a lockstitch. Singer Machines UK describes the precise timing: the hook point passes the needle when "the needle moves exactly 2.2 mm higher than its lowest position," with the needle eye just below the hook point at that instant. Miss that window by even a fraction and stitches skip.
There are two bobbin loading systems in common use. Drop-in (top-loading) machines have a horizontal bobbin compartment beneath the throat-plate cover; you lift the cover, set the bobbin in, and a transparent lid lets you watch the thread level. Front-loading (vertical) machines use a removable metal bobbin case that clicks into a hook shuttle; these tend to appear on older machines and some heavy-duty models. The two systems are not interchangeable - the bobbin class must match the machine. One point worth knowing: the "J" in Class 15J identifies the hook and case design on the machine side, not any change to the bobbin itself - the bobbin dimensions are identical, so a Class 15 and a Class 15J bobbin seat and function the same way. The real incompatibilities are between Class 15 and Class 66, and between metal and plastic bobbins where the machine specifies one type. A wrong-class bobbin causes tension problems, jamming, or a hook that won't pick up the thread at all. The drop-in vs front-load comparison covers which class fits which machines.
Bobbin tension is factory-set and, for most sewers on most machines, should stay that way. Singer's documentation is clear on this: "The bobbin tension is pre-set at the factory and usually never needs adjusting." Many bobbin-case tension screws carry a factory paint seal (sometimes yellow, sometimes red) precisely to discourage casual adjustment. If the bobbin case screw is involved, that is technician territory - the adjustment window is a fraction of a turn and the consequences of going too far include a machine that will not form a stitch at all. Our drop-test guide shows you how to assess whether bobbin tension is within range without touching the screw.
Full threading instructions for both bobbin types are in the bobbins and threading guide.
System 4: the feed dogs and presser foot
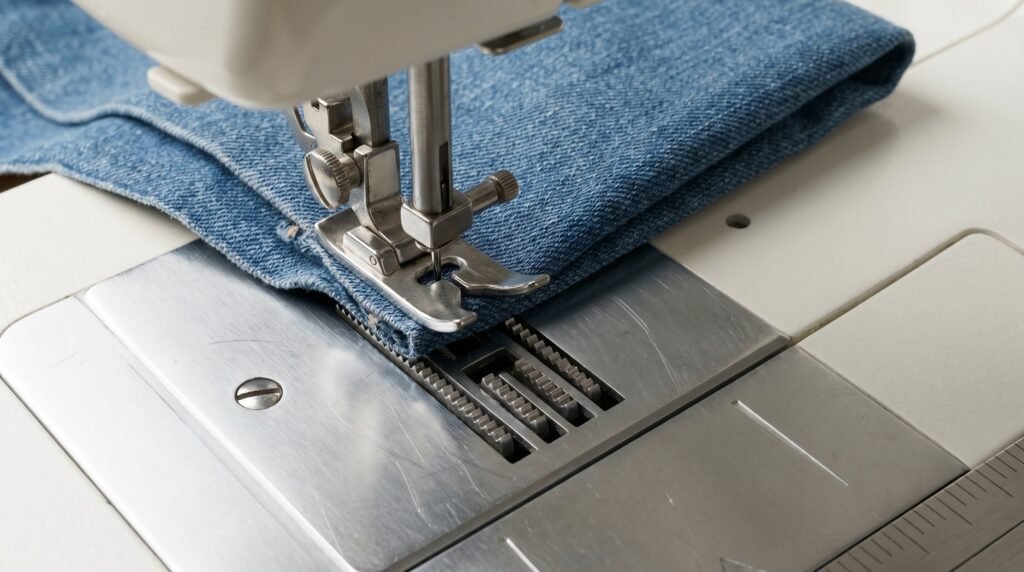
Stitches form in place; fabric has to be moved between them. That job belongs to the feed dogs - a set of serrated metal teeth that rise through slots in the throat plate, grip the fabric against the presser foot, and advance it a precise distance before dropping back below the plate to reset. The distance they move per cycle is the stitch length.
The presser foot provides the counter-pressure that makes the grip work. Without the presser foot pressing down, the feed dogs have nothing to push against, and fabric slides around freely. The presser foot also guides specific fabric types: a walking foot adds a second set of feed-dog-like action on the top of the fabric for quilts and slippery layers; a zipper foot positions the needle right beside a zipper coil; a satin-stitch foot has a groove underneath for dense zigzag stitching to pass through without piling up. The presser feet guide covers the full set.
Feed problems - fabric not advancing, or advancing unevenly - have four quick checks before assuming anything is broken. First, confirm the stitch-length dial is not set to zero (a stitch of zero length means the feed dogs move no distance per cycle). Second, check that the feed-dog drop lever is in the raised position, not the lowered/embroidery position. Third, confirm the presser foot is actually lowered onto the fabric. Fourth, remove the throat plate and brush out any lint packed around the feed-dog teeth - lint buildup is the most common cause of sluggish feeding on a machine that was fine last week.
When the feed dogs move fabric and the hook intercepts the thread at exactly the right moment, those two rhythms must stay synchronized. That synchronization is timing.
System 5: tension discs and how the stitch locks
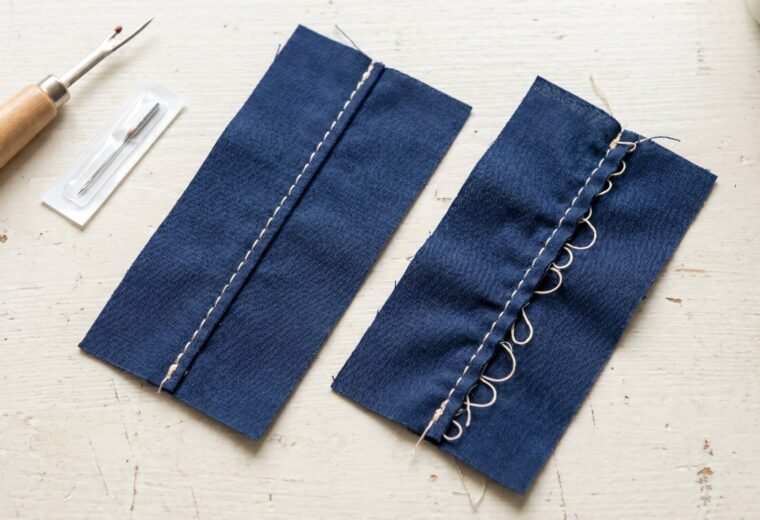
Tension gets blamed for almost everything, but its job is specific: apply consistent resistance to the upper thread so the take-up lever can pull the correct amount of thread through after each stitch. Too little resistance and the upper thread feeds too freely, producing loops on the underside. Too much and the upper thread pulls the bobbin thread through to the top surface.
The tension assembly usually sits on the front face of the machine behind a numbered dial. Inside, two metal discs press against the thread with a spring-controlled force. When the presser foot lever is raised, those discs open slightly - wide enough to let you seat fresh thread between them. Lower the lever and they close, engaging the thread. This is why threading with the foot down defeats the entire mechanism. Brother's documentation states plainly: "If the presser foot lever is lowered, the thread guide spring is shut and you cannot hang the thread on the thread guide spring correctly."
A balanced stitch is easy to read. Both sides of the fabric should look identical, with the thread join sitting inside the layers. Brother's guidance defines it: "the upper thread and the bobbin thread should cross near the center of the fabric." Loops or slack on the underside are almost always a threading problem, not a dial problem: Singer's support states that thread looping under the fabric is "ALWAYS an indication that the upper thread is not correctly threaded." Rethread from scratch with the presser foot up, try a fresh needle, and clean the tension area before you touch the dial. Bobbin thread pulled through to the top surface means the upper thread is too tight - but again, rethread first and try a new needle; the dial is the last resort, not the first. The tension guide has a full diagnosis table and the correct fix order.
The drive: what ties all five systems together
All five systems run from a single electric motor. The motor turns a main shaft that connects to a drive belt (on belt-driven machines) or a set of gears, which in turn rotates the handwheel. The handwheel drives the needle bar up and down, rotates the hook mechanism below the throat plate, and moves the take-up lever - all in precise phase with each other. The feed dogs get their timing from a cam on the same shaft.
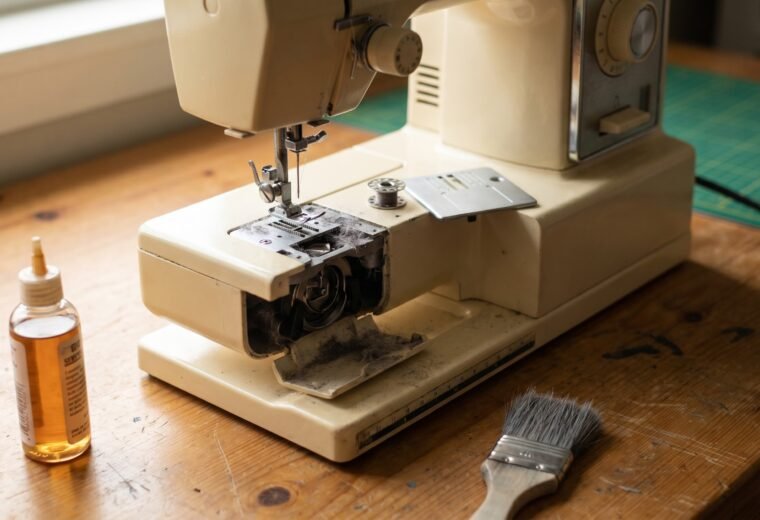
This whole drive train needs the right lubricant and nothing else. Use sewing machine oil only - never WD-40, 3-in-1 oil, or any household oil, which gum up and seize the mechanism over time. And never blow compressed or canned air into the machine to clear lint: it drives debris deeper and its propellant can mix with oily lint into a sludge that locks the works. Use a brush or a vacuum instead. The cleaning and oiling guide covers the points to oil and the lint traps to clear.
Because everything is geared off a single rotation, the relationships are fixed. The hook intercepts the upper thread at exactly one moment in the needle's travel - 2.2 mm up from the bottom, per Singer UK's specification. If you force the machine through too-thick fabric, snag the thread in the mechanism, or run the machine with the bobbin jammed, something absorbs the strain. Usually it is the needle (it bends). Occasionally the drive belt slips or breaks. In rare cases the hook and needle shaft lose their phase relationship - that is what "out of time" means, and it produces consistent skipped stitches that no amount of rethreading or needle changes will fix.
The timing guide explains how to tell whether a problem is actually timing (a much rarer diagnosis than beginners assume) versus the far more common needle and threading causes.
How a stitch forms: step by step
This is the complete cycle, running from one stitch to the next. It takes about 80 milliseconds at 750 stitches per minute.
- The take-up lever moves down, releasing slack in the upper thread as the needle descends.
- The needle pierces the fabric and continues to its lowest point, carrying the upper thread through.
- As the needle begins to rise, a small loop of thread forms on its back side; the scarf is the recess above the eye that lets the hook pass close enough to catch that loop.
- The rotating hook passes through that loop, expanding it around the bobbin assembly.
- The hook continues rotating, looping the upper thread fully around the bobbin thread.
- The take-up lever rises sharply, pulling the upper thread back up and drawing both threads tight so the knot seats inside the fabric layers.
- The feed dogs advance the fabric by one stitch length.
- The cycle repeats.
Every symptom you encounter maps to a failure in one of these eight steps, and to the system that owns that step. That mapping is the whole point of understanding the machine: it tells you where to look first instead of guessing. The matrix below is the diagnostic shortcut - read the symptom, jump to the step and system that fails, and start with the first-look fix in the order given. It is deliberately ordered by how often each cause is the real one, which is almost never the dramatic one.
| Symptom | Step that fails | System | First-look fixes, in order (most common first) |
|---|---|---|---|
| Skipped stitches | Step 3-4 (loop forms / hook catches it) | Needle | Roughly 90% needle: replace with a fresh needle, confirm it is the right type (ballpoint for knits) and pushed fully up; only then suspect timing |
| Bird's nest / loops under the fabric | Step 1 (upper thread not seated in tension discs), visible at Step 6 | Upper-thread path / tension | Almost always the top thread: rethread from scratch with the presser foot UP so the tension discs grip; check the take-up lever is threaded; never start a seam with thread tails loose |
| Fabric not feeding / advancing | Step 7 (feed dogs move the fabric) | Feed system | Raise the feed-dog drop lever out of the lowered position; set stitch length above zero; lower the presser foot; brush lint from the feed-dog teeth |
| Loops on the TOP surface (bobbin thread pulled up) | Step 6 (knot seats off-center) | Tension | Upper tension too tight: rethread top with foot UP, try a fresh needle, clean the bobbin area - then lower the tension dial one step at a time if loops persist; read the stitch after each change |
| Hook will not pick up the bobbin thread at all | Step 4 (hook enters the loop) | Bobbin / hook | Reseat the bobbin in the correct direction; confirm the bobbin class fits the machine; clear lint from the hook race; on a Singer, try the original needle brand |
| Needle keeps breaking | Step 2 (needle pierces the fabric) | Needle | Stop pulling the fabric through by hand; size up for the fabric; confirm the needle is fully seated and the throat plate is right for the stitch |
| Handwheel will not turn | Drive locked before step 1 | Drive / bobbin | Disengage the bobbin winder stopper first; check for thread jammed in the hook race before forcing anything |
| Skips on EVERY stitch, every fabric, new needle, freshly threaded | Step 4, every cycle | Timing | Only here does timing become the likely diagnosis; rule out needle and threading first, then assess the hook timing |
Skipped stitches almost always mean step 4 failed - the hook missed the loop, usually because the needle was bent, positioned wrong, or the wrong type for the fabric. A bird's nest under the fabric means step 6 pulled nothing tight because the upper thread was not seated in the tension discs. Fabric not advancing means step 7 is impaired. Our full troubleshooting guide maps symptoms to steps and gives the ranked fix order for each.
Parts you will hear about on this site
Knowing the names avoids confusion. Every term in this list links to a deeper explanation in the parts glossary or a repair guide where applicable.
| Part name | System | What it does |
|---|---|---|
| Spool pin | Upper thread path | Holds the thread spool; vertical or horizontal depending on machine |
| Tension discs / tension assembly | Upper thread path / tension | Two spring-loaded discs that grip the thread; controlled by the tension dial |
| Take-up lever | Upper thread path / tension | Rising arm that pulls the thread tight after each stitch; must be at its highest point when you stop sewing |
| Needle bar | Needle system | The vertical shaft the needle clamps to; driven by the main shaft |
| Needle clamp / screw | Needle system | Holds the needle; loosen to change needles |
| Needle (130/705 H system) | Needle system | Carries upper thread, creates the loop the hook catches; flat shank, sized in dual Euro/US notation |
| Throat plate (needle plate) | Feed system | The metal plate the feed dogs rise through; has the needle hole and stitch-width markings |
| Feed dogs | Feed system | Serrated teeth that advance the fabric; can be lowered for free-motion or darning |
| Presser foot | Feed system | Presses fabric against feed dogs; interchangeable for different tasks |
| Presser foot lever | Feed system / tension | The lever at the back-right of the machine; raising it opens the tension discs |
| Bobbin | Bobbin / hook system | Small spool holding the lower thread; class must match machine (Class 15 and 15J are the same physical size and interchangeable; the incompatible splits are 15 vs 66, and metal vs plastic) |
| Bobbin case | Bobbin / hook system | Metal holder for the bobbin (front-load machines); has the bobbin-tension screw |
| Hook (rotary hook) | Bobbin / hook system | The rotating tip that intercepts the upper-thread loop and forms the lockstitch |
| Hook race / shuttle race | Bobbin / hook system | The track the hook rotates in; lint collects here and must be cleaned regularly |
| Bobbin winder | Drive | Fills empty bobbins; engages a separate drive mechanism; must be disengaged before sewing |
| Handwheel | Drive | Large wheel on the right; turn it toward you to lower/raise the needle manually (the standard direction on nearly all machines; check your manual if unsure) |
| Drive belt | Drive | Rubber loop connecting the motor to the main shaft; a broken or slipped belt stops the machine |
| Foot pedal (speed controller) | Drive | Rheostat that controls motor speed; if the machine runs intermittently, check the pedal cable connection first |
The parts glossary has photos of each part on several common machine types, replacement part numbers, and notes on which parts are interchangeable across brands.
What the machine cannot tell you (the honest stop-line)
Everything described above is DIY territory. You can rethread, change the needle, reseat the bobbin, clean the hook race, check the feed-dog lever, and read the stitch to diagnose tension. These steps fix the majority of problems on the majority of machines.
Three areas mark the stop-line for a capable home user. First, true timing adjustment - repositioning the hook and needle shaft so they meet at the correct 2.2 mm window - requires opening the machine and moving components in fractions of a millimeter. It is possible to do without a technician, but it has an honest failure mode: set it wrong and the machine stitches badly in a new way. The timing fix guide lays out the full procedure along with the exact point to stop and call a professional. Second, internal electrical work - a frayed motor lead, a circuit board fault, a shorted foot pedal - should not be opened or probed by anyone without electronics training. Unplug first, check the cable and the pedal connector, and stop there. Third, the bobbin-case tension screw (the tiny screw on the metal bobbin case of front-load machines) often carries a factory paint seal for a reason. Adjusting it is a sub-turn exercise; the drop test will tell you whether it is the actual problem before you consider touching it.
For everything else, a clean, oiled, correctly threaded machine with a fresh needle in the right size handles far more than most sewers expect. Starting there - before any adjustment - is how the Stitchmend team approaches every problem on this site.
Questions answered
Why does my machine make a clicking sound?
A dull or bent needle is the most common cause. Schmetz lists a "popping or clicking or clunking sound" directly in its list of signs that a needle needs replacing. If the sound persists after a fresh needle, check that the throat plate is properly seated and that no thread is caught in the hook race.
Can I use any 130/705 needle in my machine?
Yes. All 130/705 H needles are physically interchangeable across major brands - the shank geometry is standardized. What varies is needle type and tip shape: a universal tip works on most wovens, a ballpoint tip spreads knit loops rather than piercing them, a stretch needle (Schmetz 130/705H SUK) has a deeper scarf for elastic fabrics, and a leather needle has a cutting wedge point. Within specialty types, different makers grind the tip geometry slightly differently - Schmetz Jersey and Organ HG ball points are not identical under a microscope, so if you keep getting skipped stitches on a specific knit after switching brands, try the other maker's version of the same type before blaming the machine. There is a more specific, hard-won case worth naming: some Singer machines (the front-loading Class 66 and Class 15 vintage models, and a few of the heavy-duty plastic models built on that hook geometry) will skip or fail to pick up the bobbin thread with certain needle brands because of the way that brand's shank length and scarf depth line up with Singer's hook. On those machines, Singer-branded needles or Organ needles often pick up cleanly where a Schmetz of the identical size and type does not - it is a shank-and-hook geometry mismatch, not a defective needle. So if you ever switch needle brands and a new problem appears on a Singer, go back to the brand it ran fine on before adjusting anything else. Organ needles are Brother's official recommendation and tend to be slightly cheaper; Schmetz offers the widest type selection.
My handwheel is stiff. What does that mean?
Check the bobbin winder first. If the bobbin winder stopper is still engaged from the last time you wound a bobbin, the handwheel will not turn the needle shaft freely. Slide the winder back to its home position. If the handwheel is stiff even with the winder disengaged, thread may be jammed in the hook race or the machine may need oiling. The handwheel stuck guide covers both causes.
How do I know if my timing is actually off?
Consistent skipped stitches on every stitch, on every fabric, with a new correctly installed needle and a freshly threaded machine, are the main indicator. Occasional skips on knits are almost always the needle type (use ballpoint). Occasional skips on thick layers are almost always the needle size (go up one size). True timing failure is rarer than most sewers assume. The timing-or-not diagnostic walks through the ruling-out process step by step.
Does the bobbin thread tension ever need adjusting?
Rarely. Singer states that bobbin tension is "pre-set at the factory and usually never needs adjusting." Before concluding the bobbin-case screw is involved, rethread the upper thread with the presser foot up, try a fresh needle, and clean the bobbin area. Those three steps resolve the vast majority of cases that initially look like bobbin-tension faults.
The Stitchmend team
Every fix here is built from manufacturer service manuals and needle-maker specs, and fact-checked against those sources before it goes live. How we work