Kenmore sewing machine troubleshooting and repair: finding your machine's real family
Kenmore machines were built by several different makers. Know your prefix (117, 158, 385), then fix the faults each family gets: dried oil, belt, tension, and bobbin.
Your Kenmore's model number is the most useful piece of information on the whole machine. The first three digits tell you who actually built it - White, Maruzen, Janome, or one of several other Japanese manufacturers - and that identity determines which parts fit, which service manuals apply, and exactly where to oil it. Most Kenmore faults follow patterns that are specific to the series, so knowing the family first saves you from chasing the wrong problem.
Kenmore was never a manufacturer. Sears sourced machines from different factories across different decades, branded them all "Kenmore," and sold them through their catalog. That arrangement ran from the 1930s all the way to 2013, when Sears ended its supply contract with Janome. What you own today is a Janome, a Maruzen, a White, or one of a handful of others - wearing Kenmore clothes.
Read the first three digits: your machine's real identity

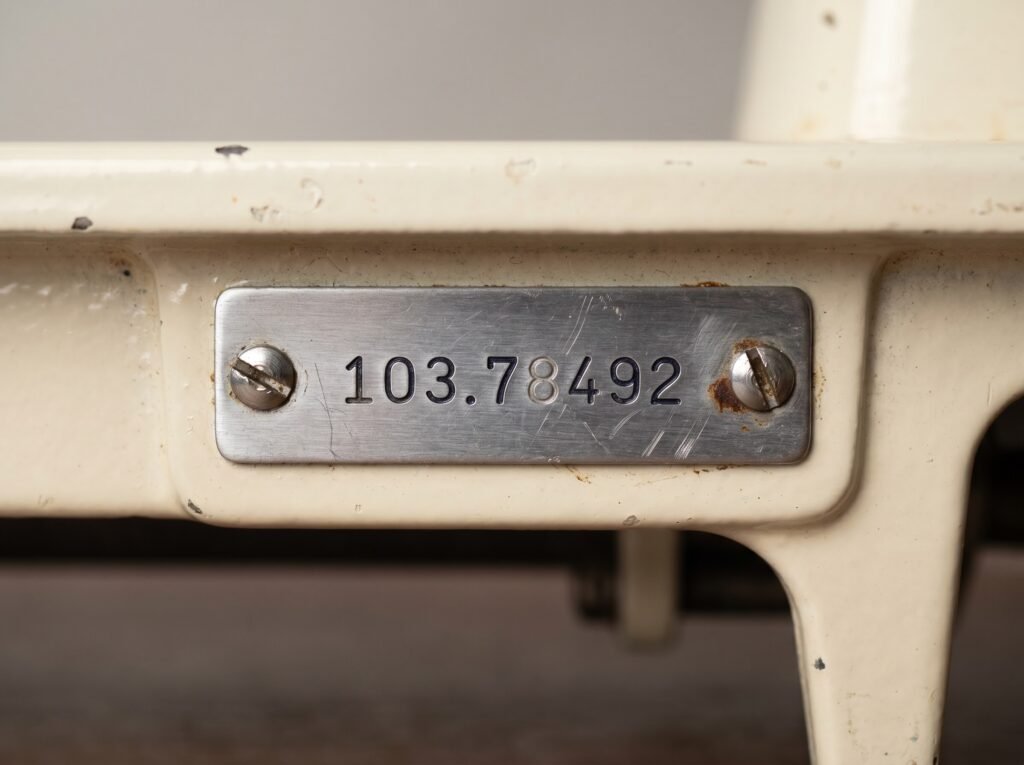
Locate the full model number on the base plate or inside the front access panel. The prefix before the decimal point is the key. ISMACS, the International Sewing Machine Collectors' Society, documents that White built the earliest Kenmores and was Sears' sole supplier from the late 1920s into the 1950s, after which Sears moved to a series of Japanese factories. The exact factory behind each later prefix is documented unevenly across collector and parts records, so treat the maker labels below as the best-supported attribution rather than a stamped certainty, and verify any part against your full model number:
| Model prefix | Actual manufacturer | Era (approximate) | What it means for repair |
|---|---|---|---|
| 117 | White Sewing Machine Company (USA) | 1930s-1950s | All-metal domestics; rotary hook; White parts and manuals apply |
| 148 | Japanese-built (commonly attributed to Soryu) | 1960s | Early Japanese imports; all-metal; similar geometry to the 158 series |
| 158 | Japanese-built (commonly attributed to Maruzen / Jaguar) | 1960s-1970s | All-metal, retro build, pull-up tension assembly; Class 15 bobbins |
| 385 | Janome (Japan) | 1965-2013 | Largest family; Class 15 bobbins; use exact sub-model for parts |
| 562 | Japanese-built (commonly attributed to Brother) | 1960s-1970s | Brother parts and service logic generally cross-reference |
The 385 family ran for nearly 50 years and was revised repeatedly, which means "385" alone is not enough to find a part. Kenmore changed the 385 series throughout its run, so you must use the full model number when ordering anything beyond generic consumables. The 158 series machines are recognizable by their all-metal casting and a distinctive pull-up style upper tension assembly - a physical tell that other series lack.
Once you have a likely maker, look for that factory's service manual in addition to the Sears-branded documentation - a Janome manual for a 385, or a Maruzen/Jaguar manual if that is what your 158 turns out to be. They often carry more detail on oil points and adjustment specs than the Sears booklet. For Singer-style machines from the early period, the Singer repair guide covers shared mechanical principles that apply to the White-built 117s.
The fault that affects every vintage Kenmore: dried oil and the seized handwheel
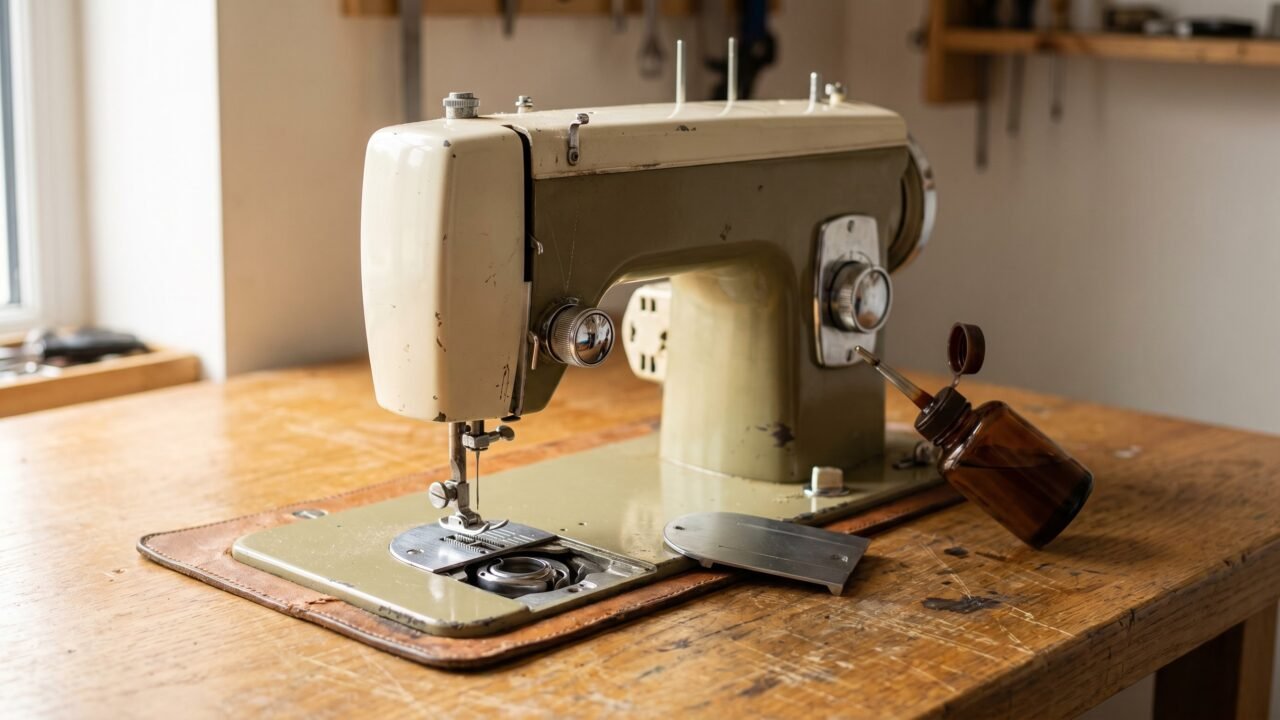
Kenmores from the 1960s and 1970s - the all-metal 148s and 158s especially - are stout machines that can last another 50 years. The one thing that reliably kills them is neglect. Sewing-machine oil left inside a machine for years does not stay liquid. It oxidizes, thickens, and eventually forms a varnish-like resin that bonds moving parts together. The handwheel locks, the needle bar feels sluggish, and the machine skips stitches even after a fresh needle.
The Kenmore 385 owner's manual instructs oiling at least once a year, specifying "one or two drops of oil is sufficient." Vintage machines that have been stored dry for years need more than that first pass - they need the old residue cleared out before fresh oil can reach the bearing surfaces.
For a machine with moderately stiff movement (turns but resists), work in this order:
- Unplug the machine.
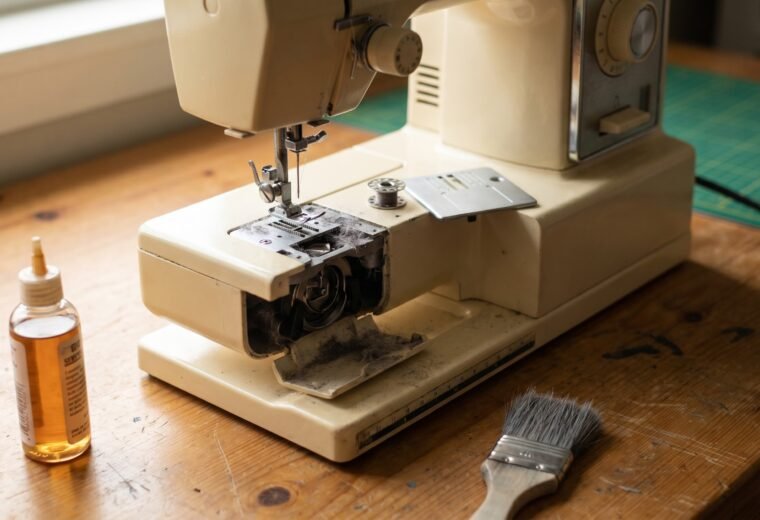
- Remove the throat plate, bobbin, and hook cover to expose the hook race area.
- Apply one or two drops of sewing-machine oil directly to the hook race ring and to the visible shaft bearing points. On the 158 series, there are oil holes on the top of the arm and near the handwheel end - look for small brass cups or marked dots.
- Rock the handwheel gently back and forth, working it in the normal sewing direction - toward you, so the top of the wheel rolls forward. That is the direction the machine is built to run; forcing it the other way against stiff residue is what disrupts timing.
- Allow five minutes for the oil to wick in, then try again with steady pressure.
- Repeat at all accessible oil points. Brush lint out first; the Kenmore 385 manual specifies brushing or vacuuming the bobbin holder before any oiling.
If the machine is fully seized and will not rock at all, iFixit's guide on gummed mechanics documents a more aggressive approach: a penetrating solvent (the guide uses brake cleaner) applied at the stuck pivot points, allowed to evaporate fully, followed by fresh sewing-machine oil. This technique reaches residue that a drop of fresh oil cannot penetrate on its own. A seized vintage Kenmore that doesn't free up after penetrant treatment belongs with a technician - forcing the handwheel against true seizure strips plastic gears on later models or bends linkage on the older all-metal ones.
Our dedicated guide on stuck or seized handwheels covers the full unlock sequence, including the bobbin-winder spindle check and hook-race thread jam - clear those first before assuming dried oil is the cause. And before buying any lubricant, read the why WD-40 destroys sewing machines guide: WD-40 and 3-in-1 oil both leave residue that worsens gumming. Only sewing-machine oil belongs inside the mechanism.
Common faults by series
Each Kenmore family has a fault pattern shaped by its construction. The table below follows from the documented build of each series - all-metal vintage bodies versus later part-plastic ones - and the failure modes those materials produce.
| Series | Most common fault | Second most common | DIY boundary |
|---|---|---|---|
| 117 (White) | Dried oil / seized points (all-metal, many lube points) | Timing drift after decades of use | Full clean-and-oil is DIY; timing adjustment is technician work |
| 148 / 158 (Maruzen) | Dried oil / stiff top-shaft bearing; pull-up tension spring worn | Belt cracking or slipping | Oil + belt replacement is DIY; pull-up tension disassembly is careful DIY or technician |
| 385 (Janome) | Drive belt wear (rubber degrades over 20-30 years) | Bobbin-winder tire failure; tension disc wear | Belt and bobbin-winder tire are DIY; tension assembly swap is moderate DIY per model |
| 562 (Brother) | Threading errors mistaken for mechanical faults | Plastic feed-dog linkage wear on older units | Threading and bobbin reseating is DIY; feed-dog linkage is technician work |
Belt wear on the 385 series
The 385 family uses a rubber drive belt that connects the motor pulley to the handwheel. Over two to three decades, rubber compounds harden, crack, and lose grip. Signs are a motor that runs (you hear it) but a needle that barely moves or moves only under extra hand pressure on the wheel. The belt can also slip rather than break - look for a black dust ring around the motor pulley area.
Replacing the belt on a 385 is a genuine DIY task. Unplug the machine, remove the side cover by taking out the two or three screws that secure it, loosen the motor mounting screws enough to pivot the motor toward the handwheel and release belt tension, slide the old belt off, roll the new one on, pivot the motor back to restore tension, and retighten. The belt must be dry before use - any oil on the rubber eliminates traction immediately. A replacement belt for most 385 models costs $5-10 and is still widely available because the underlying Janome parts network remains active. The drive belt replacement guide covers the full procedure and how to measure belt length if your model tag is faded.
Tension and threading on all Kenmore series
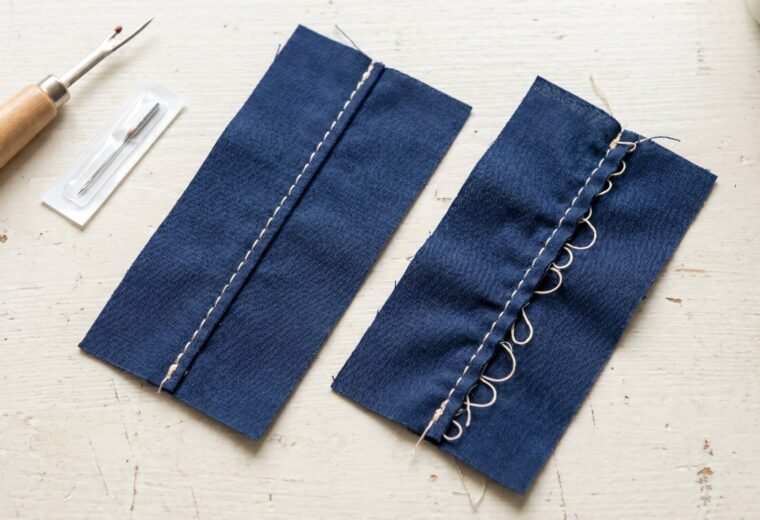
Tension problems on Kenmores are almost always threading problems first. The root cause - across every series - is threading with the presser foot down. When the foot is down, the tension discs are clamped shut; thread fed through in that state bypasses the discs entirely and produces a bird's-nest of loose thread on the underside of the fabric. Raise the presser foot lever first, then thread. Every time, without exception.
The diagnosis sequence before touching any dial:
- Raise the presser foot and rethread the entire upper path from scratch, following the numbered guides on your machine.
- Install a fresh 130/705 H needle (the correct system for all Kenmore home machines per Schmetz's official compatibility data) of the right size for your fabric - size 75/11 for lightweight fabrics (batiste, silk, chiffon), 90/14 for medium, 100/16 for denim and heavier.
- Reseat the bobbin, and reseat it the way your specific machine loads. The 385 series uses a top drop-in compartment; for most Janome-built drop-in machines the thread feeds counter-clockwise (left) when viewed from above, but verify against the threading diagram in your manual before relying on that rule. The 148 and 158 families are not one mechanism: they came in both styles depending on sub-model. Many are front-loading machines with a removable Class 15 bobbin case, where the thread follows the arrow stamped on the case itself; others are top-loading drop-in Class 15 machines with no removable case at all. Before you trust any orientation rule, check which yours is - does the bobbin drop in from the top, or seat in a case you pull out at the front? Match the reseating step to that, not to a family-wide assumption. (Either way, most 148/158 machines run Class 15 bobbins.)
- Clean lint from the bobbin holder and hook race with a brush before reinserting.
- Run a test seam and read the stitch. Loops on the underside = top thread too loose or mis-threaded. Bobbin thread pulled to the top surface = top thread too tight. Only move the dial after steps 1-4 are confirmed.
A full explanation of reading stitch defects and the correct adjustment sequence lives in the tension diagnosis guide. If thread keeps looping regardless of rethreading, the tension discs themselves may be worn - this is more common on the older 158 series after heavy use. The tension assembly replacement guide covers that path.
Bobbin problems specific to the 385 (Janome) family
Because the 385 series is a rebadged Janome, it takes Class 15 bobbins - the same family that fits most Janome home machines, which is why bobbins stay easy to find even though Sears no longer supports the line. Class 15J bobbins fit the same machines as standard Class 15 bobbins and are interchangeable in practice; the letter "J" in the name describes a hook and case configuration used on certain Singer models, not any difference in the bobbin itself. The real incompatibilities to watch are Class 15 versus Class 66 (a larger bobbin that looks similar but will not seat correctly), and plastic versus metal within Class 15 - those two seat differently and the wrong one will shift the tension-spring reading.
Match two things before assuming a mechanical fault: match the bobbin class (Class 15, not the larger Class 66 from other machines), and match plastic-versus-metal to what your model specifies. The manual's accessory list tells you which your machine was built around. The bobbin compatibility guide has a lookup table for common Kenmore 385 sub-models, and plastic vs metal bobbins explains why the seating differs.
The bobbin drop test: check tension in ten seconds
If your machine has a removable bobbin case - the front-loading 148s and 158s, and any other front-load sub-model - you can test the bobbin tension directly in about ten seconds before touching any screw. Wind a bobbin, drop it into the case, and thread it through the case's tension slot the normal way. Hold the loose thread tail so the case hangs free in the air, then give your hand a small, sharp jerk upward. A correctly tensioned case slips down the thread a short distance - roughly one to three inches - and then holds. If it free-falls and keeps unspooling, the bobbin tension is too loose; if it will not budge at all, it is too tight. Most underside loops trace back to the top thread rather than the bobbin, so only adjust the bobbin-case screw once this test actually shows a fault, and turn it in tiny increments. (A top drop-in 385 has no removable case to hang, so there you confirm the top thread and seating first, then have the in-machine bobbin tension checked at service if loops persist.) The drop test guide walks through it in detail.
Needles, fabric, and the silent cause of skipped stitches
Skipped stitches on a Kenmore trace to the needle about nine times out of ten. The hook tip passes behind the needle at a very precise distance; a needle that is bent slightly, pushed in not quite all the way, or sized wrong for the fabric moves just enough to miss that window. A needle failure that happens on every stitch is more likely timing - but timing is the last thing to suspect, not the first.
All Kenmore home machines take the 130/705 H system (also designated HAx1 or 15x1) with a flat shank. The flat automatically orients the needle correctly; there is no ambiguity about which way to face it. Seat it fully so the shank is flush against the top of the clamp recess, then tighten the set screw. Change the needle at the start of each new project, or after about 8 hours of sewing time, whichever comes first - dull needles cause skipping on fine fabrics long before they feel rough to the touch.
For stretch fabrics, the standard universal needle will skip on nearly every stitch regardless of how correctly it is installed. The 385 manual's own needle chart specifies a stretch needle (size 11 blue, in the Kenmore color-coded system) for stretch fabrics. On modern equivalents, a ballpoint or stretch-designated 130/705 needle is the correct choice. Schmetz, Organ, and Klasse all manufacture compatible options in this system.
Where the DIY line sits on older Kenmores
Vintage all-metal 117s and 158s are genuinely robust machines, and most owners are capable of cleaning, oiling, rethreading, replacing a belt, and fitting a new needle. The iFixit vintage machine guide is direct on this: many machines end up scrapped purely because of unnecessary repair attempts, and the right first step is always to confirm the machine is actually broken before disassembling it. Incorrect setup - wrong bobbin, needle not fully seated, presser foot down during threading - accounts for a large share of apparent "faults."
Stop here and call a technician for:
- True timing adjustment (the needle-hook synchronization that requires measuring the hook gap against the needle at a specific point in the cycle). This is DIY-possible in principle but has a precise stop-line: if your test seam still skips after a confirmed new needle, correct rethreading, and verified bobbin, and you find the hook tip is not passing within about 1 mm of the needle above the eye at the correct rotational position, timing work on a vintage Kenmore needs a service manual for the specific series and the right gauge tools.
- Internal electrical faults - any issue with the motor wiring, foot pedal controller board, or speed control on computerized 385 models. Unplug first; do not open motor housings.
- The bobbin-case tension screw if it has a factory paint seal. On many machines the small screw on the bobbin case has a dot of colored paint from the factory (sometimes called the yellow-paint seal on other brands). This is a factory calibration; moving it without proper test equipment makes the problem harder to fix, not easier.
For context on when a repair cost outweighs replacement, the repair vs. replace guide walks through the calculation. A clean-and-oil tune-up for a vintage Kenmore typically runs $80-150 from a qualified technician - well worth it on an all-metal 158 or 117 that could run another 30 years, less obvious on a late-model 385 with plastic internal parts.
Cleaning vintage Kenmores: the right sequence
Vintage all-metal Kenmores accumulate lint, old oil residue, and sometimes rust on chrome parts. The cleaning order matters because lint displaced by oil becomes harder to remove, and oil applied before cleaning the hook race traps abrasive particles against bearing surfaces.
- Remove the throat plate and bobbin cover. Brush all visible lint out of the feed-dog slots and hook race with a stiff-bristle cleaning brush. The Kenmore 385 manual specifies brushing or vacuuming the bobbin holder - never compressed air, which drives lint into inaccessible areas and can damage delicate tension springs.
- Wipe the hook race ring and the area around the feed dogs with a lint-free cloth.
- Oil the hook race with one drop of sewing-machine oil. On the older 117 and 158 series, locate all the marked oil points (small holes or dimples along the top arm and at the handwheel end). Apply one drop per point only - excess oil migrates onto the belt and fabric.
- Remove the top cover panel if your model allows it and oil the top shaft bearings in the same single-drop fashion.
- Cycle the machine by hand several times to distribute the oil, then run it briefly on scrap fabric to pick up any excess before sewing a project.
A deep-dive procedure for machines coming out of long storage is in the vintage machine cleaning guide, including how to address rust on the bed and light surface oxidation on chrome parts without damaging the underlying castings.
FAQ
Are Kenmore sewing machine parts still available?
For the 385 (Janome) series, yes - Janome manufactures equivalent parts under its own name, and the parts network remains active. For 158 and 148 machines, parts are available through vintage suppliers; the all-metal construction means fewer parts actually fail. For 117 (White) machines, parts require more searching through vintage-specialist sources, but the machines' simplicity means fewer things break.
My Kenmore 385 needle breaks repeatedly. What is wrong?
The most common causes in order: needle not fully pushed up into the clamp before tightening, the needle clamp screw loose, pulling fabric toward you while sewing (let the feed dogs do the work), or a bent needle installed from a previous break. Confirm the needle is pushed all the way up so the shank is flush with the top of the clamp slot, tighten the set screw firmly, and start with a fresh needle. If breakage continues on thick seams, check that the presser foot is correct for the thickness - a foot that cannot accommodate the fabric forces the needle into the feed dogs.
Can I use Janome bobbins in my Kenmore 385?
Yes, as long as you match two things. First, match the class: a 385 takes Class 15. Class 15J is the same bobbin as Class 15 - both sizes are interchangeable; the "J" suffix identifies a hook and case variant used on certain Singer machines, not a distinct bobbin size. The incompatibility to avoid is Class 66, which looks similar but is a larger bobbin and will not seat correctly. Janome-labeled Class 15 bobbins are the correct part. Second, match plastic versus metal to what your machine specifies. Plastic and metal bobbins of the same nominal Class 15 size seat slightly differently in the case, and that difference can shift how the tension spring reads, producing loops or skips that no dial adjustment fixes. If your machine came with a plastic bobbin, check the original accessory bag or the manual's accessory list and stick with plastic; if it came with metal, stay with metal. When in doubt, use what the manual lists for your sub-model.
How do I find a service manual for an older Kenmore?
For 385 series machines, Sears Parts Direct historically hosted official PDFs indexed by full model number. For 158 and 148 series, ISMACS (the International Sewing Machine Collectors' Society) maintains a free manuals list. For 117 series White-built machines, White Sewing Machine Company manuals are the primary source. Search using the complete model number including the decimal suffix - for example, 385.15108200, not just "385".
- ISMACSSears Roebuck and their Sewing Machines
- Kenmore 385 Owner's Manual (Sears, via ManualsLib)
- Kenmore 385.15108200 Service Manual (Sears Parts Direct)
- SCHMETZ Needles official site
- iFixit
The Stitchmend team
Every fix here is built from manufacturer service manuals and needle-maker specs, and fact-checked against those sources before it goes live. How we work