Singer sewing machine troubleshooting: the most common failures and how to fix them
Fix Singer skipped stitches, jamming, bird's nests, and handwheel problems. Brand-specific guidance on bobbins, shank types, and which Singer models have dedicated guides.
Singer sells more home sewing machines in North America than any other brand, which means Singer owners share the same short list of frustrations: stitches dropping on every seam, a bird's nest of thread on the underside of the first few inches, a handwheel that won't turn. The causes are almost always the same few things. Work through the ranked sections below and you'll fix most problems without touching a single dial.
A few Singer-specific details differ from other brands and will trip you up if you don't know them: the bobbin classes are more confusing than they look, the handwheel has one correct direction, and older Singer models use a shank geometry that catches owners off guard when they try to swap presser feet. Those details are in each section where they matter.
Won't pick up bobbin thread
Four quick checks cover nearly every "needle goes down but no bobbin thread" situation. Work through them in order before opening the bobbin cover.
- Rethread with the presser foot UP. Thread always (always) with the presser foot raised. The tension discs stay closed when the foot is down, so the thread never seats properly in them. That creates a loop that looks like a bobbin problem but is actually upper thread with no tension. Raise the foot, remove all thread, and rethread from scratch. This is the single most common cause, so do it before anything else.
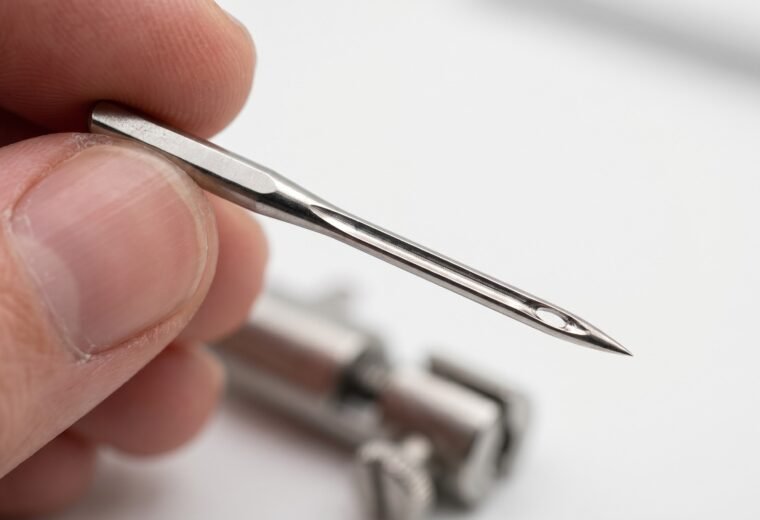
- Needle fully seated, flat side toward the back. Slide the needle up into the clamp as far as it will go - it should hit a hard stop - then snug the clamp screw. A needle that stops short of the top, or goes in with the flat side facing forward, shifts where the eye sits relative to the hook and is a leading cause of both missed stitches and thread-pickup failure. Singer's troubleshooting documentation calls out incorrect insertion specifically.
- Bobbin correctly seated. Drop-in bobbins need the thread to feed through the bobbin case tension slot in the right direction. Check your manual's diagram. Also confirm the bobbin is the right class - more on that below.
- Singer-specific check: bobbin winding spindle position. Once the universal causes above are ruled out, look at the small spindle on top of most Singer machines that slides left for sewing and right for bobbin winding. If it got nudged to the right, the drive to the needle is interrupted and the machine will not pick up the bobbin thread. Slide it fully left. Singer's official guide is direct on this: the spindle must be pushed back to the left before sewing. It is a real Singer quirk, but a less frequent cause than threading or the needle.
If all four checks pass and the machine still misses the bobbin thread, hook timing moves onto the list - but only after the needle and threading are truly ruled out, since most "timing" turns out not to be (see the "Is it really timing?" section below). Our guide on not picking up bobbin thread walks through that question in detail.
Thread bunching underneath (the bird's nest)
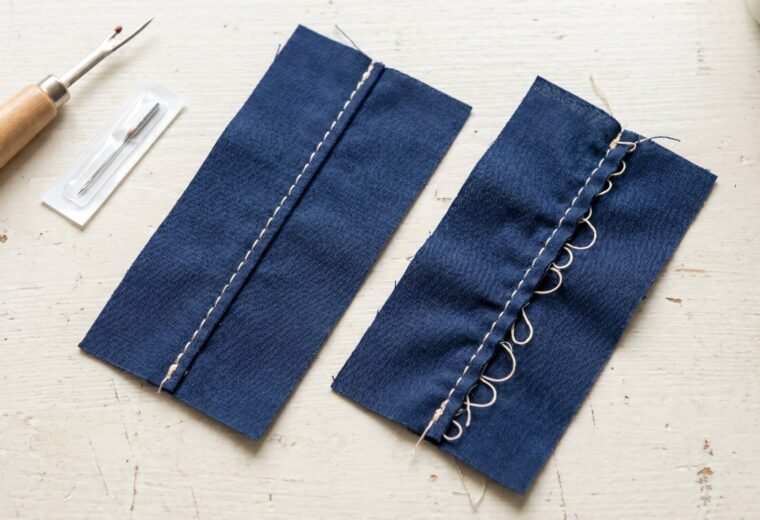
A tangle of thread on the underside of the first few inches of a seam is almost never a bobbin problem. It's the top thread. The presser foot was lowered before threading, which keeps the tension discs pinched shut, so the thread passed through with no grip on it at all and piled up underneath instead of forming a proper stitch.
Fix: cut away the nest, remove both threads from the machine, raise the presser foot, and rethread the top thread from the beginning. Then hold both thread tails toward the back before you lower the presser foot and start sewing. Singer's official documentation is specific: position both threads underneath the presser foot before sewing to prevent bunching at the start.
Resist adjusting the tension dial at this stage. The dial is rarely the cause when the problem appears only at the start of a seam. Our deeper look at bird's nest and bunching covers the tension-dial cases where it genuinely is the fix.
Skipped stitches
The needle is the answer about nine times in ten. A dull, bent, or wrong-type needle is so common that it's worth changing the needle first before any other diagnosis. Singer recommends replacement after every 6 to 8 hours of sewing.
Work through this order:
- Needle type for fabric. Universal needles work for wovens. Knits and stretch fabrics need a ballpoint (jersey) or stretch needle; a universal tip can pierce the yarn loops instead of sliding between them, producing skipped stitches consistently. Singer's help documentation puts this plainly: for knits or synthetics, use a ballpoint needle.
- Needle size. Home machine needles use the 130/705 H system (also written HAx1 or 15x1 on older Singer literature). Sizes run in dual notation: 70/10 for fine fabrics, 80/12 for medium, 90/14 for denim and canvas, 100/16 for heavy layers. Use the size your fabric weight needs. Schmetz, Organ, and Klasse all fit this system on Singer machines.
- Needle insertion. Flat side to the back, seated to the top of the clamp until it contacts the stop. A needle that does not reach the top of the clamp changes where the eye meets the hook and is a leading cause of skipped stitches; depending on how far short it sits, it may skip intermittently or break rather than miss cleanly.
- Rethread top and bobbin. Foot up, fresh thread path.
If skipping persists after a new correct needle and fresh threading, timing becomes a real possibility. See our skipped stitches guide for the sequence that distinguishes a needle problem from a timing problem.
Machine jamming
Jamming means the fabric and thread lock up so the machine won't complete a stitch. The cause is almost always thread tangled in the hook area or around the bobbin case. iFixit's repair guidance makes the most important point first: do not force it. Forcing a jammed machine breaks the needle, bends the hook, or strips the feed mechanism.
Procedure:
- Raise the needle to its highest point by turning the handwheel toward you (the front of the wheel rotates down toward your lap). "Toward you" is the reliable instruction; the clock-direction depends on which side you view the wheel from.
- Cut all visible thread with small scissors. Lift the presser foot and remove the fabric.
- Open the bobbin cover. Remove the bobbin and bobbin case. Clear every thread strand from the hook race with a brush (a vacuum nozzle works well here); avoid compressed air, which drives lint deeper.
- Replace the bobbin and case, rethread the top, and test on scrap fabric.
If the machine jammed because the handwheel was turned away from you, check the stitch quality carefully after clearing it. Turning the wheel the wrong way can knock the hook timing out of sync with the needle. Singer's official guidance flags this specifically: turning the handwheel away from you may throw off the timing and require service center repair. Our machine jamming guide covers the diagnosis for timing disruption after a wrong-way jam.
Handwheel stuck or hard to turn
A handwheel that locks up has three likely causes, in order of probability.
Thread caught in the hook race. Even a single strand looped under the hook can lock the mechanism. Remove the bobbin cover, take out the bobbin and bobbin case, and inspect the hook area for thread. iFixit's community diagnosis confirms this is the right first test: if the handwheel turns freely once the bobbin case is removed, the jam is inside the bobbin area.
Bobbin winding spindle not fully returned left. If the spindle is halfway between positions, it can interrupt the needle bar drive enough to make the handwheel feel stiff. Push it fully to the left.
Machine needs oil. Metal machines, especially vintage Singers that have sat unused for years, stiffen when dry. Two drops of sewing machine oil in the bobbin hook race and one drop at the needle bar pivot usually free up a stiff handwheel within a few minutes of slow hand-rotation. Use sewing machine oil only; household oils gum up over time. See our sewing machine oil guide for what to buy.
If none of these three steps free the wheel, the issue is internal mechanical and needs a technician. Do not continue forcing it. Our handwheel stuck guide covers the less-common causes in more depth.
Tension reading wrong
Reading which thread is looping where tells you which side to investigate:
- Loops or loose thread on the underside: upper tension is too loose, or the top thread was not seated in the tension discs (foot-down threading). Fix: rethread with the foot up.
- Bobbin thread visible on the top side of the fabric: upper tension is pulling it up, or the top thread path has an error.
In both cases, rethread and replace the needle before touching the tension dial. Singer's troubleshooting documentation is consistent on this sequence: the dial is a late step, not the first move. Full tension diagnosis is in our tension guide.
For a front-loading metal bobbin case, there is a quick way to gauge bobbin tension without turning anything. Thread the loaded case, hold the thread tail so the case hangs free, and give your hand a small bounce: the case should slip down only about an inch to three inches, then hold. A case that drops to the floor is too loose; one that will not budge is too tight. Adjust only in tiny fractions of a turn, and a caution that matters on Singers: if the small bobbin-case tension screw still wears its original yellow or red paint dab, that paint is the factory's "set here, do not move" seal. Breaking it is a one-way step that voids the factory setting, so leave sealed screws alone and take a genuinely mis-set case to a technician. The full bobbin tension drop test walkthrough has the details.
Is it really timing?
"It must be the timing" is the conclusion owners jump to fastest and reach least often. A large share of suspected timing problems - roughly four in ten - turn out to be a needle fault or a threading fault once you actually check. So before you accept that diagnosis, run the cheap rule-outs first: fit a fresh needle of the correct type and size, seat it fully with the flat side to the back, and rethread top and bobbin with the presser foot up. If clean stitches come back, it was never the timing.
If skipping or missed pickup survives a new needle and fresh threading on more than one fabric, then genuine hook-to-needle timing is back on the table. Timing is not the bottomless pit some make it out to be: on many mechanical Singers it is a measurable, adjustable thing with a clear stop-line - you set the hook to meet the needle at the right point in the stroke, and if you cannot reach that point or the symptom does not resolve, you stop and hand it to a technician. It is neither trivial nor a guaranteed service bill. Our is it timing or not walkthrough separates the needle/threading cases from the real ones, and how to fix timing covers the adjustment itself with an honest stop-line.
Singer-specific details that catch owners off guard
Bobbin classes are stricter than they look
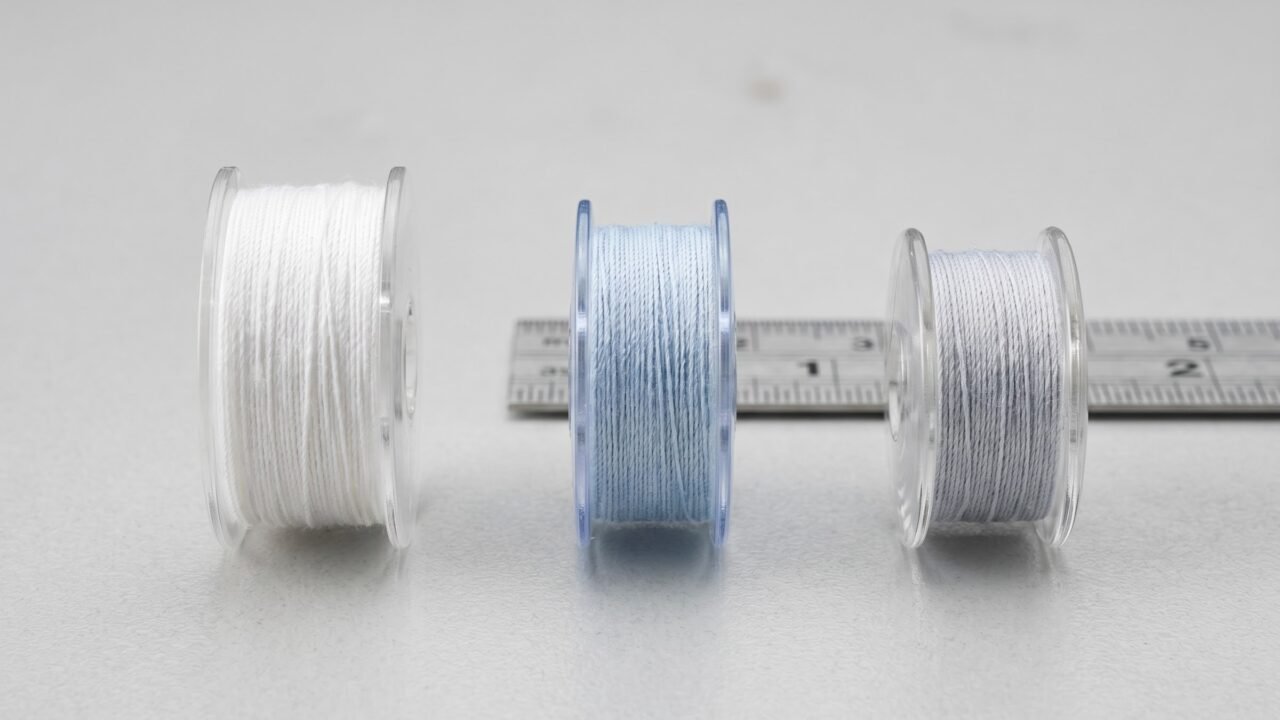
Singer uses several bobbin classes across its model range, and the naming trips up more owners than the actual size differences justify. The letter after the number is where confusion starts: Class 15J measures out identically to Class 15 - both are 7/16" tall, 13/16" in diameter - because the "J" is not about bobbin dimensions at all. It designates the hook and case geometry on certain machines. Singer's official bobbin guide warns against swapping one for the other in machines that call for a specific variant, because the hook on those machines is matched to that particular case style. What is genuinely a different bobbin is the Class 66 transparent (5/16" tall, 13/16" diameter, with rounder edges), found in older machines. Fitting a Class 15 or 15J bobbin into a machine designed for Class 66 - or the reverse - produces tension problems, jamming, and hook race wear.
Most current Singer machines (including the Heavy Duty 4423 and 4452) use Class 15 transparent. Vintage Singers (model 66, 99, and their variations) use Class 66. The Singer Featherweight 221 uses its own shorter proprietary bobbin. If your machine specifies Class 15J specifically, use the J-style bobbin - not because the size differs, but because the hook case on those machines is designed for that variant. Check your manual or the underside of the bobbin compartment lid for the exact designation. Our bobbin compatibility guide has a full model-to-class lookup.
The handwheel direction rule
Always turn the handwheel toward you. That is the only instruction that holds from where you actually sit. ("Counterclockwise" only describes it correctly when you are looking at the wheel from the right-hand end of the machine; from the operator's seat it is not a fixed clock-direction, so go by "toward you" and ignore the clock words.) This is the direction the mechanism is designed to run. Turning it away from you works against the hook-to-needle timing and can knock the machine out of time in a single careless rotation. Singer's FAQ repeats this warning prominently. On modern machines the damage often requires a service visit to correct.
Shank geometry across Singer models
Singer has used three different shank systems over the decades, and mixing feet between them does not work.
| Shank type | Singer models | Key note |
|---|---|---|
| Low shank (standard) | Most machines from the 1980s onward; also 15-91, 201, 66, 99 | About 1/2 inch (roughly 13 mm) from the foot screw down to the needle plate; compatible with many third-party low-shank feet |
| Slant shank | Slant-O-Matic family: 301, 401/403/404, 500/503 Rocketeer, and the 600/700-series Touch and Sew (introduced with the 301a, 1950s) | Presser bar angled back toward the rear; not compatible with low-shank feet or modern snap-on feet. Verify per model: not every machine sold under the Touch and Sew name is slant, so check your shank before buying feet. |
| Singer "skinny" snap-on | Many modern Singer machines with snap-on feet | Attachment bar slightly narrower than standard snap-on; standard snap-on feet will not seat correctly |
The skinny snap-on point matters most when you order third-party feet online. A generic "low-shank snap-on" foot listed as "fits Singer" may not fit Singer's own proprietary snap-on adapter. The bar is fractionally narrower than the generic standard. Singer's own feet are the safe choice; for aftermarket options, confirm the listing specifically matches your machine model number. For a broader look at presser foot compatibility, our sewing machine parts guide covers what to verify before ordering.
Singer vs. Brother: the main mechanical differences
Singer and Brother have more in common than owners expect. Both use 130/705 H needles, standard low-shank feet on most models, drop-in bobbins on their current lines, and a horizontal rotary hook on their consumer machines.
On bobbins they actually agree: Brother's SA156 is a Class 15 bobbin (also labeled "Class A"), the same nominal class most current Singers specify, and both stand about 7/16 inch (roughly 11.5 to 12 mm) tall. The warning that "Brother bobbins are a different class and a different height" is a myth. The real catch is tolerance and variant: not every bobbin stamped "Class 15" is cut to the same plastic-versus-metal profile, and Singer's "Class 15 S" is a separate variant that will not seat in many machines. Match the exact spec your machine's manual calls for rather than trusting the class number alone.
One needle-brand note specific to Singer: certain Singer machines - most notably the 4423 Heavy Duty - are sensitive to needle brand in a way that lighter machines are not. The hook geometry on the 4423 can produce intermittent thread-pickup failures with some aftermarket needles that work fine in a Brother or a lighter Singer. If the 4423 fails to pick up the bobbin thread after correct threading and full needle seating, try switching to a different brand (Organ, Schmetz, or the needle supplied with the machine) before diagnosing further.
The genuine brand difference is the foot system: Singer's narrow "skinny" snap-on adapter versus Brother's standard snap-on. If you have moved from a Brother to a Singer or vice versa, check the feet before your first seam. Our Brother troubleshooting hub covers the Brother side of that comparison in the same format.
Singer model guide: where to go for your machine
Some Singer failures are model-specific. The 4423's needle-thread pickup is sensitive to needle brand in a way the lighter Simple series isn't, and the Quantum Stylist's computerized stitch selector adds failure points that the mechanical Heavy Duty doesn't have. Use the table below to find the right dedicated guide.
| Model | Type | Most reported issues | Guide |
|---|---|---|---|
| Heavy Duty 4423 | Mechanical, metal frame | Thread pickup failure, needle breaking on thick seams, tension drift | Singer 4423 problems |
| Heavy Duty 4452 | Mechanical, metal frame | Similar to 4423; bobbin drop-in alignment | Singer 4452 problems |
| Quantum Stylist 9960 | Computerized, 850 spm | Stitch selector errors, thread-break sensor false trips | Singer 9960 problems |
| Start 1304 | Mechanical beginner | Skipped stitches on knits, tension inconsistency | Singer Start 1304 problems |
| Vintage 99 / 15-91 | Classic mechanical | Timing drift, oiling needs, bobbin class confusion (Class 66 vs Class 15) | Singer 99 / 15-91 problems |
| Heavy Duty 4411 | Mechanical, metal frame | Feed dog engagement, needle-bar screw loosening | Singer 4411 problems |
Not seeing your model? The symptom guides cover the mechanical behavior regardless of model: skipped stitches, not picking up bobbin thread, tension problems, and handwheel stuck each walk through the full diagnosis tree.
The repair-vs-replace question for Singer owners
A basic clean, oil, and tune-up at a service center commonly runs $80 to $150 depending on your region and whether parts are needed - pricing varies, so call ahead for a firm quote before committing. That math is straightforward when the machine cost $300 or more. On a Singer Start or Simple purchased for under $130, a single repair visit can exceed the machine's replacement cost. That is exactly what the repair-vs-replace calculator works out for your specific machine and symptom.
Singer itself recommends a professional tune-up every 3 to 4 years of regular use, regardless of whether problems have appeared. The practical cases where repair is unambiguously worth it: a Heavy Duty or Quantum Stylist (original retail $200-$350+), any vintage Singer in working condition (the all-metal construction is worth preserving), and any machine where the fault is a single identifiable part rather than systemic wear. The honest stop-lines for DIY are internal electrical repair and anything involving the bobbin case screw sealed with factory paint. Hook-to-needle timing is the in-between case: on many mechanical Singers a patient owner can adjust it, but it carries its own stop-line - if you cannot get the hook to meet the needle at the right point, or the symptom does not clear, that is the moment to stop and let a technician finish (see how to fix timing).
Questions answered
Which bobbin does my Singer use?
Most current Singer machines use Class 15 transparent bobbins. Vintage Singer models (66, 99, and many early-to-mid 20th century machines) use Class 66 bobbins. The Singer Featherweight 221 uses its own shorter proprietary bobbin. Class 15 and Class 15J share identical dimensions - the J indicates which hook-and-case arrangement the machine uses, not a change in bobbin size - but Singer's guide still calls for using whichever variant your machine specifies, because machines with one hook style may not seat the other correctly. Class 66 is genuinely different in height and should never substitute for Class 15 or 15J. Check the compartment lid or your manual for the class designation.
Why does my Singer skip stitches even with a new needle?
If the skipping happens only at the very start of a seam - the first two or three stitches - the cause is almost always the thread tails. Hold both the top and bobbin thread tails toward the back of the machine when you begin sewing. Without that tension, the needle loop has nothing to grab and the first few stitches skip or pile up underneath. If skipping happens throughout the seam rather than just at the start, check that the needle is fully seated (flat side to the back) and rethread with the presser foot up before suspecting timing.
Can I use a Brother bobbin in my Singer?
Often yes, because they are the same class. Brother's SA156 is a Class 15 bobbin (Class 15 is also labeled "Class A"), the same class many current Singers specify, and both stand about 7/16 inch (roughly 11.5 to 12 mm) tall. The catch is not the class but the tolerance: not every bobbin sold as "Class 15" is cut to the same plastic-versus-metal profile, and Singer's separate "Class 15 S" variant will not seat in many machines. So check that the bobbin matches the exact spec in your Singer's manual rather than assuming any "Class 15" or any Brother bobbin will drop in cleanly.
My Singer's presser feet won't fit replacement feet I bought online. Why?
Many current Singer machines use a proprietary "skinny" snap-on adapter bar that is fractionally narrower than the generic low-shank snap-on standard. Standard snap-on feet do not seat correctly on Singer's skinny adapter, and vice versa. When ordering replacement or accessory feet, confirm the listing specifically names your Singer model number rather than just "low shank Singer compatible."
Is it safe to clean my Singer with WD-40?
No. WD-40 is a water displacer, not a lubricant, and it leaves a residue that gums up the moving parts over time. Use sewing machine oil only. Compressed air is similarly off the list; it drives lint deeper into the hook race. A small stiff brush or a vacuum nozzle is the right lint-removal tool.
- Singer official FAQ and troubleshooting guide
- Singer official bobbin selection guide
- Singer Heavy Duty 4423 product page
- Schmetz needles: how to read the needle package
- iFixit: What to do when your sewing machine gets jammed
- Singer Quantum Stylist 9960 product page
- Sailrite: Rotary vs. Oscillating Hook Sewing Machines
The Stitchmend team
Every fix here is built from manufacturer service manuals and needle-maker specs, and fact-checked against those sources before it goes live. How we work