Bernina, Juki, Pfaff, and Husqvarna Viking troubleshooting: brand-by-brand fixes and the honest stop-line
Fix the signature issues of four higher-end brands: Pfaff IDT snags, Bernina gear-icon errors, Juki tension and timing, and Viking bobbin sensor faults. Know where to stop.
Four machines, four very different personalities at the workbench. Pfaff builds its feed system into the machine body itself; Bernina computerized models throw a gear-icon error that stops everything cold; Juki's semi-pro straight-stitch machines demand needle precision at 1,500 stitches per minute; and Husqvarna Viking's sensor-rich computerized lines can report a bobbin fault when a speck of lint is the only culprit. Each brand has one or two issues that come up again and again - and for each one, there is a clear line between what you can fix at the kitchen table and what belongs at a dealer bench.
This guide covers those signature problems brand by brand, gives you the ranked fix sequence for each, and tells you exactly where to stop. If you are looking at a tension or timing problem that could affect any machine, the deeper diagnostics live in our tension guide and timing guide.
Pfaff: the IDT system and when it misbehaves
The feature that makes Pfaff machines worth their price is the IDT (Integrated Dual Feed) - a built-in upper feed dog that grips fabric from above while the lower feed dogs push from below. According to the Pfaff owner's manual, the system feeds fabric "from the top and bottom at the same time at the same stitch length," which is why Pfaff owners get near-perfect pattern matching on plaids and stripe-on-stripe seams without a walking foot attachment. But when it acts up, the fix is usually one of three things.
Symptom: IDT won't engage, or disengages mid-seam. The manual says to raise the presser foot, then press the IDT lever down until you feel it click into position. If it does not stay engaged, the most common cause is using a foot without the center back cut-out. Pfaff's manual is clear on this: "For all work with the Integrated Dual Feed IDT system, use presser feet with the center back cut-out." Using a standard third-party foot that lacks this notch means the IDT lever has nothing to grip, so it bounces out. Swap in a genuine IDT-compatible foot and the problem usually disappears.
Symptom: fabric feeding unevenly even with IDT engaged. First, check that the stitch length is not at zero (a setting of zero parks the feed dogs). Second, clear lint from under the stitch plate - pack lint between the feed teeth and you get uneven grip regardless of the IDT. Third, adjust presser foot pressure: Pfaff machines have a pressure dial on the top of the machine, and light fabrics like chiffon need reduced pressure so the IDT does not over-compress and drag the upper layer faster than the lower.
Symptom: skipped stitches on a Pfaff. Same root cause as any machine - the needle about nine times out of ten. Install a fresh 130/705 H needle (the universal home-machine system), seat it fully in the needle bar clamp - flat side of the shank to the back, shank raised until it stops, and rethread with the presser foot up so the tension discs fully engage. If skipped stitches continue only on knits or stretch fabric, move to a ballpoint or stretch needle rather than a universal. For more on this, our skipped stitches guide runs through the full ranked sequence.
The Pfaff stop-line. Internal IDT mechanism wear - where the lever itself is bent or the pivot point is damaged - is a dealer job. Pfaff machines are built to tight tolerances, and an IDT lever that is deformed usually means the machine took a knock or was forced against a non-IDT foot repeatedly. Attempting to reshape the lever yourself risks misaligning the top feed timing.
Bernina: reading the error codes on computerized models
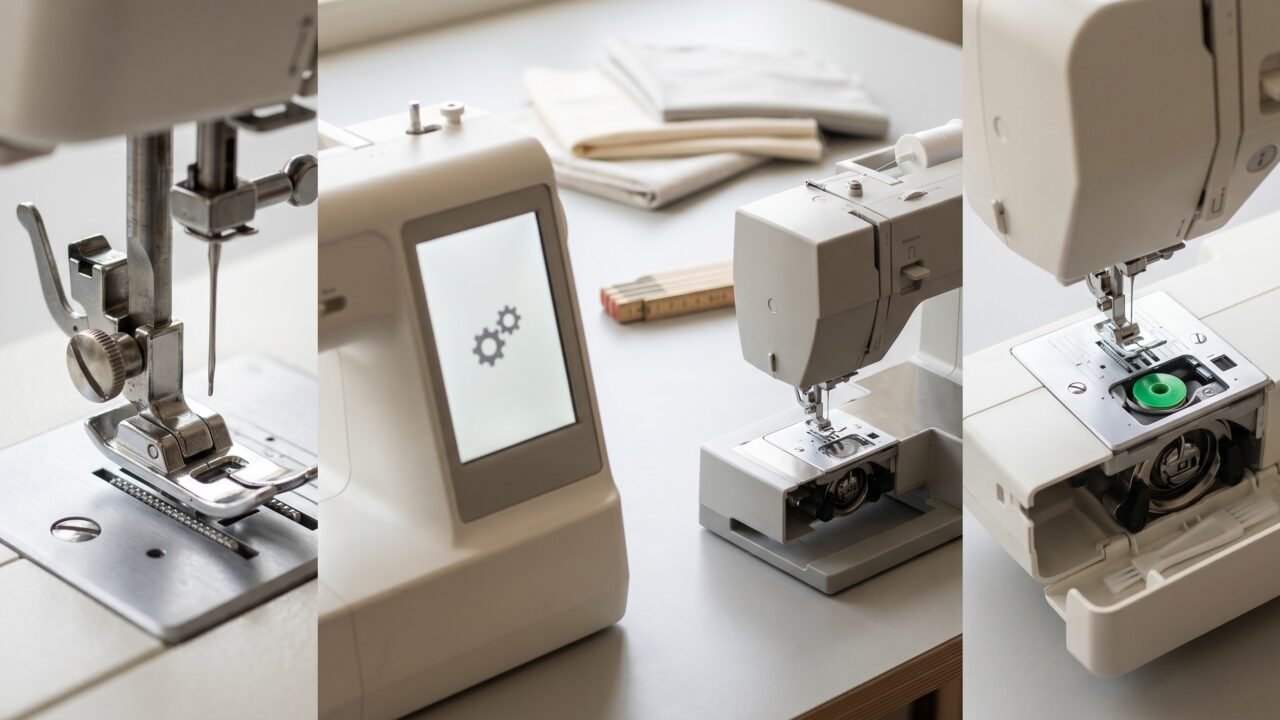
Bernina's higher-end computerized lines (the 4xx, 5xx, 7xx, and 8xx series) have an LCD or touchscreen that displays icon-based error messages when the machine stops. Two come up in the service queue more than any others.
The gear icon (main drive sync error). When two gears appear on the screen, the machine is locked up - the internal timing between the motor and the hook has been interrupted. The BERNINA Lafayette FAQ (an authorized BERNINA dealer support page) covers the clearing sequence: gently remove your project without using the thread cutter; remove the needle, top thread, bobbin case, hook, and stitch plate; look for rogue threads and lint and remove them; slowly rotate the handwheel one full revolution; reassemble and rethread. Standard Bernina maintenance also calls for a single drop of sewing-machine oil on the hook race before reassembly whenever you have the hook area fully opened - follow your model's owner's manual for the exact point. Most gear-icon events are a thread fragment jammed around the hook - clear it, and the machine resets. If rotating the handwheel meets hard resistance at any point, stop and call a dealer; forcing it can bend the needle bar.
One rule that protects a machine in this price class: use proper sewing-machine oil and nothing else. Sewing-machine oil is a clear, light mineral oil that looks almost like water; on Bernina, the dealer can supply the brand's own. Never reach for WD-40, 3-in-1 oil, household oil, or any general-purpose lubricant. WD-40 is a water-displacing penetrant, not a sewing-machine lubricant; it evaporates quickly, attracts dust, and leaves the hook dry within hours. The thicker household oils do the opposite: they gum up, harden over time, and turn into a sticky varnish that traps lint and seizes the very parts you were trying to free. A single drop of the wrong oil on a $2,000 Bernina hook can mean a dealer strip-down later. One drop of the right oil, on the hook race only, every several hours of sewing.
The "out of bobbin" false alarm. Bernina computerized machines detect the bobbin level via small silver strips on the bobbin itself. A damaged strip - even a tiny scratch - triggers the warning before the thread is actually gone. The BERNINA Lafayette FAQ recommends inspecting the bobbin for damaged silver strips and trying a fresh one. If the alert fires immediately with a brand-new genuine Bernina bobbin, the sensor itself may be fouled with lint; the same lint-clearing pass you do for the gear icon will often fix it. The FAQ also notes you can disable the sensor in Settings as a temporary measure while you source a replacement bobbin.
Below is a quick-reference comparison across the most common Bernina error states, the likely cause, and whether it is owner-fixable.
| Screen indicator | What it means | First owner step | Dealer territory? |
|---|---|---|---|
| Gear icon (two gears) | Main drive sync - machine locked up | Clear lint/thread from hook area; rotate handwheel slowly | Only if handwheel meets hard resistance |
| "Out of bobbin" | Low bobbin or damaged silver strip | Inspect and swap bobbin; clear sensor lint | If sensor remains faulty after cleaning |
| "Out of top thread" | Thread not caught in takeup lever | Unthread fully; rethread with foot up | If displaced spring suspected (see manual) |
| Handwheel won't turn (no error) | Hook slightly misaligned | Follow gear-icon clearing steps above | If hook is visibly out of position |
Bernina threading specifics. Bird's nest under the fabric on a Bernina is the same culprit as on any machine: the top thread was loaded with the presser foot down, so the tension discs never grabbed the thread. Rethread from scratch with the foot up, hold both thread tails behind the foot as you start your first stitch, and the nesting stops. Details on reading exactly which thread is the problem are in our bird's nest guide.
The Bernina stop-line. These machines are dense with electronics - the BSR (Bernina Stitch Regulator) foot, the embroidery module connector, the screen assembly. Anything involving the circuit board, a calibration reset, or firmware reflash is dealer work. Bernina dealers have proprietary diagnostic software; they are not just parts-swappers. A Bernina annual service (roughly $80-$150 for most models, running higher for the more complex 7xx and 8xx series) covers cleaning, lubrication, timing verification, and calibration in a single visit and is worth doing every 12-18 months of regular use.
Juki TL series: tension and timing on a straight-stitch speed machine
The Juki TL-2000Qi and its siblings are a different animal from a typical home machine. They are semi-professional 1-needle lockstitch machines: straight stitch only, no zigzag, and a maximum speed of 1,500 stitches per minute (Juki's official spec). That speed is their appeal for quilters and garment sewers who want industrial output from a portable machine - and it is why precision matters more here than on a typical domestic machine.
Needle system. The Juki TL-2000Qi uses the HA x 1 (130/705 H) needle system, per the official Juki product page - the same needle type used by standard home machines. One important distinction: the needle is the same, but the TL-2000Qi's presser foot system is industrial high shank, not the flat-shank interface found on most domestic machines. That means standard flat-shank presser foot accessories will not fit; you need high-shank feet for this machine. The official Juki spec lists the system as "HA x 1 (130/705H) #7 - #18 (HLx5 #9 - #16)" - in other words, it takes standard 130/705 H needles all the way up to #18. For light fabrics, sizes 9-11/65-75 work well; medium fabric calls for 11-14/75-90; for heavy quilt layers or denim, the Juki TL-2000Qi instruction manual specifies sizes 14-18/90-110. Some TL owners reach for the HL x 5 needle - made specifically for the TL series by Organ and others - which has a slightly stiffer blade that resists deflection at high speed. One thing to know before you do: per Juki's own spec, the HL x 5 range tops out at #16, so it does not reach the #18 end of the heavy range. If you are running the very heaviest layers at the top of that range, stay with the 130/705 H needle, which goes to #18. At 1,500 SPM, a dull or slightly bent needle causes skipped stitches far faster than on a 600-SPM domestic machine. The Juki instruction manual lists "a bent or blunted needle" and "improper needle attachment to the needle bar" as the two primary causes of skipped stitches. Change the needle first, every time.
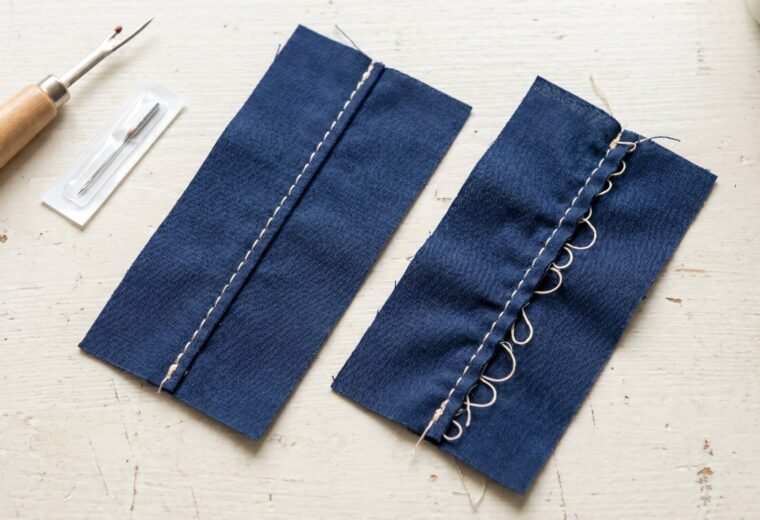
Tension on the TL series. The TL-2000Qi has a manual tension dial and a separate bobbin tension adjustment. The Juki owner's manual describes the bobbin drop test: thread the bobbin case, hold it suspended by the open end of the thread, and give it a gentle shake or bounce. Correctly set, the case should slip down slowly - about one to three inches - and then stop. Not fall freely (too loose) and not hang frozen without moving (too tight). That slow, controlled slip is the baseline you want before you ever touch the upper dial. One word of caution on the bobbin-case screw itself: many factory cases ship with a dab of yellow lacquer or paint over the tension screw. That seal is the manufacturer's mark that the case left the factory correctly set. If the yellow paint is intact, leave the bobbin screw alone and chase your tension on the upper dial instead; breaking that seal to turn the bobbin screw is technician territory, and a quarter turn there changes far more than it looks like it should. Upper thread tension is adjusted by turning the numbered dial; clockwise increases tension. On these machines, the relationship between upper tension and presser foot pressure matters more than on most domestic machines because the high speed amplifies any mismatch. If you are getting loops on the underside, the top thread tension is loose or mis-threaded - rethread with the foot up before touching the dial. For a full tension read, our guide on reading your stitch shows exactly where each thread ends up when tension is off.
Timing on the TL series. The Juki TL line can develop timing issues after heavy use or if the machine takes a hard knock. Before you go anywhere near the hook, internalize the single most important fact about timing on any machine: most suspected timing is not timing. A large share of reported "timing" faults - on the order of two in five - turn out to have nothing wrong with the timing at all. The real fault is a bent or wrong-size needle, a needle inserted backward or not pushed fully into the bar, or a top thread that never seated in the tension discs. Those three checks fix the symptom (skipped stitches, the hook missing the loop) without opening the machine, so run them first, every single time. Timing on these machines is adjustable by an experienced owner - the service manual is publicly available from Juki's own site - but the procedure involves loosening the hook set screw and repositioning the hook timing relative to the needle. Our timing repair guide covers the general sequence, and our is-it-timing guide walks the triage that tells you whether you are even in timing territory. Be aware: at 1,500 SPM, a hook that is even slightly off-position will skip stitches reliably. The honest guidance is to attempt a timing reset only if you have already confirmed the needle and threading are correct, and you have access to the service manual for your specific TL model.
The Juki stop-line. The bobbin case latch mechanism on TL machines is precision-machined. If the latch is bent or the bobbin case seats loosely, that is a replacement part (Class L bobbin case), not a field repair. Electrical issues - the foot pedal circuit, the speed controller - are manufacturer-service territory; unplug first, then call Juki support. Our parts guide covers finding genuine Juki replacement parts by model number.
Husqvarna Viking: sensor faults and the bobbin detection system
Husqvarna Viking's mid-range and higher lines (Jade, Emerald, Designer, Opal, and above) are sensor-dense machines. They monitor bobbin thread level, needle position, presser foot status, and - on embroidery-capable models - hoop alignment. That sensor coverage is genuinely useful, but lint is its persistent enemy.
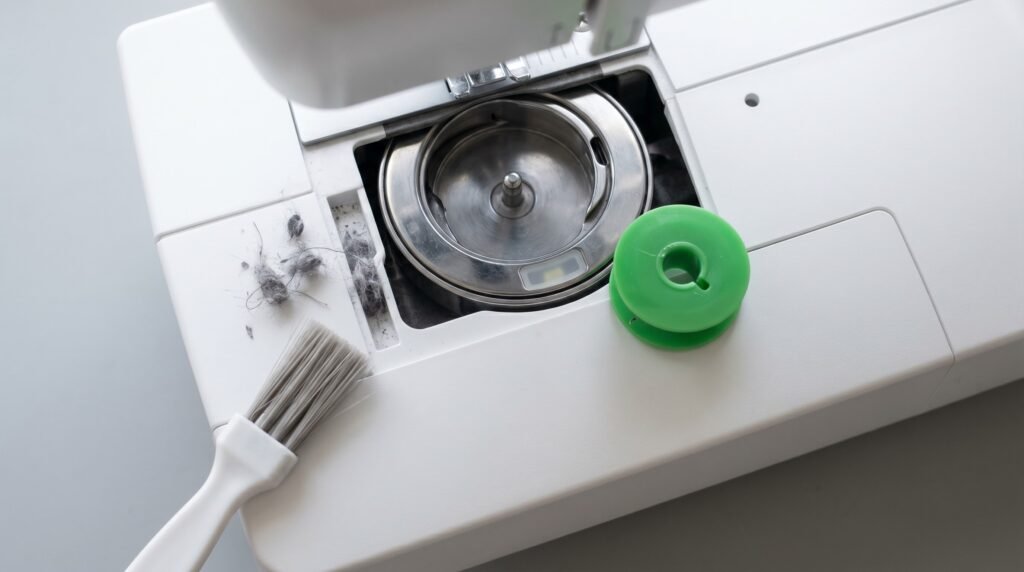
Bobbin sensor false fault. The most common service call on computerized Viking machines is a bobbin-area sensor alert with a full bobbin still in place. Lint from the thread and fabric accumulates in the sensor space (the area beneath and around the bobbin case in the hook race), and the machine reads it as a fault. The fix is straightforward: remove the needle plate, take out the bobbin case, and clean the hook race with a small brush - never with compressed air, which drives lint deeper. If the sensor area has visible debris or is coated in compressed lint, use a lint brush or a vacuum with a small nozzle. Reassemble, reinsert a fresh genuine Viking bobbin, and the fault typically clears.
Husqvarna Viking's proprietary bobbin system has one important detail to get right. The distinctive green bobbins are a trademark of the higher-end Designer series - Designer Diamond, Designer Ruby, Topaz, and similar higher-tier models. The Jade, Emerald, Quartz, Onyx, and H-Class lines use clear Class 15 bobbins, not the green ones; the official Viking product page explicitly lists those models as incompatible with the green bobbin. Specialty quilting models like the Mega Quilter and Platinum 3000 use M-style bobbins. Using the wrong class causes the sensor to misread the thread level and can also create genuine tension problems, because the bobbin sits at the wrong height in the case. Check your model number against the official Husqvarna Viking bobbin compatibility list before buying any replacement, generic or branded.
Presser foot sensor errors. Some Viking models will throw an error if they detect the presser foot is not properly attached or is not in the down position when sewing begins. If this fires with a correctly attached foot, clean the attachment point on the ankle and check that the foot snaps fully into the holder. A tiny lint bridge between the foot and the sensor can mimic a detached foot.
Viking threading specifics. Like all home machines, the presser foot must be up when threading. Viking's higher models use an auto-threader with a hook that is easy to bend if you push it too hard. Thread the eye manually if the auto-threader hook is damaged - operating with a misaligned threader hook causes the thread to bypass the tension discs on the needle side, leading to loops and bird's nests even with everything else correct.
The Viking stop-line. Sensor replacement, circuit board issues, and embroidery module calibration are dealer jobs on Viking machines. The brand's computerized models are serviced with proprietary Viking software tools that are not available to the public. If a sensor fault persists after a thorough cleaning and a fresh genuine bobbin, book a dealer service. A good place to think through whether the repair cost makes sense for your model is our when to see a pro guide and the repair vs replace decision.
How these four brands compare: owner-fixable vs dealer territory
The table below distills the brand-by-brand picture. The "DIY ceiling" column shows the furthest any reasonably careful owner can go without risking more damage.
| Brand | Signature issue | Needle system | DIY ceiling | Hard dealer territory |
|---|---|---|---|---|
| Pfaff | IDT lever not engaging; fabric feeding unevenly | 130/705 H (flat shank) | IDT re-engagement, compatible foot swap, presser pressure, lint clearing | Bent IDT lever, internal IDT pivot damage |
| Bernina | Gear icon / main drive sync; bobbin sensor false alarm | 130/705 H (flat shank) | Hook area cleaning, handwheel rotation check, bobbin swap, sensor lint clearing | Hard handwheel resistance, BSR calibration, circuit board, firmware |
| Juki TL | Skipped stitches at speed; tension mismatch; timing drift | HA x1 (130/705 H), #7-#18 (HL x5 #9-#16); high-shank presser foot system (not flat shank) | Needle change, full rethreading, tension dial, bobbin drop test, timing reset with service manual | Bobbin case latch damage, electrical/foot pedal circuit, hook replacement |
| Husqvarna Viking | Bobbin/presser foot sensor false fault; auto-threader hook damage | 130/705 H (flat shank) | Hook race lint clearing, correct bobbin class installation, manual threading bypass | Sensor replacement, circuit board, embroidery module calibration |
One pattern holds across all four: before calling the issue brand-specific, rule out the universal causes first. A fresh correct needle, a clean hook area, and a rethread with the presser foot up resolve roughly two-thirds of the complaints the Stitchmend team sees on higher-end machines - same as on entry-level ones. The brand-specific quirks (IDT, error codes, sensor faults) only become relevant once those basics are confirmed. This is doubly true when the symptom looks like timing: on every one of these four brands, most suspected timing turns out not to be timing at all but a needle or threading fault wearing a convincing disguise. For anything that smells like a timing problem, our is-it-timing guide will help you confirm whether you are actually looking at a timing problem before you touch the hook.
A note on dealer servicing for these brands
Of the four brands covered here, Pfaff and Husqvarna Viking are both owned by SVP Worldwide, which means many authorized service centers carry both brands - one shop visit can cover a Pfaff IDT repair and a Viking sensor issue. Bernina is a different story: Bernina International AG is an independent, family-owned Swiss company and is not part of SVP Worldwide. It has its own separate authorized dealer network, so a dealer that services Pfaff and Viking is not automatically authorized for Bernina. If you own both a Bernina and a Viking, you may need two separate service relationships. Juki's household division maintains its own authorized service center list. All four brands lean more toward dealer servicing than entry-level brands like Singer or Brother - partly because the machines are more complex, partly because their owners are typically investing in the machine long-term and want it properly maintained.
An annual cleaning and lubrication service at a dealer runs roughly $80-$150 for most models, higher for complex computerized Bernina 7xx and 8xx machines. Here is where the repair-vs-replace math works differently than it does for a budget machine. On a sub-$200 entry-level machine, an $80 to $150 tune-up is a real decision, because you are spending close to the price of a new machine to service an old one - often it is cheaper to replace. On the machines in this article, the logic flips. A $150 service on a $1,500 Bernina or a $1,200 Pfaff is roughly a tenth of the machine's value, and these machines are built to run for decades, so routine servicing is almost always worth it - you are protecting an asset, not propping up a disposable one. The calculation only gets genuinely hard when you move from a tune-up to a major part: a replaced IDT assembly, a new circuit board, a hook replacement. There the cost climbs into the hundreds, and whether it is worth it depends on the machine's age, its condition otherwise, and what you originally paid. Our repair vs replace calculator works through exactly that decision. For entry-level brand comparison, the picture is different - see our guides on Singer troubleshooting and Brother troubleshooting for how those machines compare.
Questions answered
Can I use any 130/705 H needle in my Pfaff, Bernina, or Viking machine?
Yes - the 130/705 H flat-shank system is universal across roughly 99% of home sewing machines, including these three brands. Schmetz, Organ, and Klasse all fit. For Juki TL machines, the same needle system (HA x1, 130/705 H, sizes #7-#18 per Juki's spec) applies - but note that the Juki TL-2000Qi is a high-shank machine, meaning presser foot accessories must be high-shank compatible. The needle itself is the same as a home machine; the presser foot interface is not. Choose the needle type (universal, ballpoint, stretch, denim) and size based on your fabric, not your brand.
My Bernina gear icon keeps coming back after I clean the hook. What next?
If cleaning the hook area and rotating the handwheel clears the error but it returns within a few seams, check for a burr on the hook itself - a tiny metal sliver that catches thread on every rotation. Hold the hook under good light and run a cotton swab around the hook tip. A burr that snags fibers consistently means the hook needs replacement, which is a dealer part and fitting job.
The Pfaff IDT engages but then slips out when I sew thick layers. Why?
Two common causes: the presser foot you are using lacks the center back cut-out that the IDT lever grips, or the IDT lever itself has a small crack or deformation at the engagement point. Confirm you have a genuine IDT-compatible foot first. If the foot is correct and the lever still slips on heavyweight material, have a dealer inspect the lever pivot.
My Viking says the bobbin is empty but it is full. I cleaned the sensor and it still fires.
Try a fresh, genuine Husqvarna Viking bobbin for your specific machine group - the silver detection strip on off-brand bobbins is sometimes the wrong width or absent, causing persistent false alerts. If a genuine new bobbin still triggers the fault, the sensor itself is likely worn and needs dealer replacement.
- Pfaff sewing machine owner's manual (manufacturer's owner's manual, accessed via ManualsLib)
- BERNINA Lafayette machine FAQs (authorized BERNINA dealer support page)
- Juki TL-2000Qi owner's manual (manufacturer's instruction manual, accessed via ManualsLib)
- SCHMETZ Needles official FAQ
- Husqvarna Viking green bobbins official product page (Singer/Husqvarna Viking)
The Stitchmend team
Every fix here is built from manufacturer service manuals and needle-maker specs, and fact-checked against those sources before it goes live. How we work